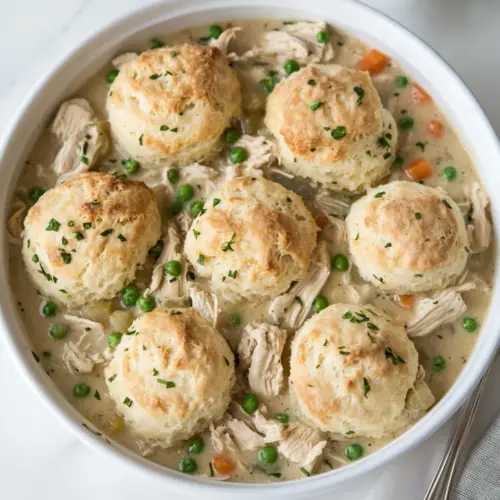
Gluten Free Chicken Pot Pie with Biscuits
Gluten Free Chicken Pot Pie with Biscuits is a creamy, cozy main with tender shredded chicken, a rich coconut milk sauce, and flaky gluten free biscuits on top. This easy weeknight dinner balances savory, sweet, and herbaceous notes, delivering a comforting, family friendly meal. Make it for a winter supper or a Thanksgiving side that satisfies everyone, gluten free or not.
Equipment
- Oven
- Baking Sheet
- Parchment Paper
- Mixing Bowls
- Whisk
- Large ovenproof skillet
- Spatula
- Ice Cream Scoop
Ingredients
- 2 cups all-purpose gluten-free flour Provide structure and a neutral base for the biscuit topping while keeping the recipe gluten-free; blends with leavening and fat to create tender, cohesive dough for baking.
- 4 teaspoons baking powder Leaven quickly and lift the biscuits by producing carbon dioxide when mixed with wet ingredients; balances crumb texture and helps achieve light, airy tops.
- 1/2 teaspoons salt Season gently to enhance overall flavor and balance sweetness and savory elements; also helps strengthen gluten-free dough flavor perception.
- 1 cup non-dairy milk (oat works well) Moisten dry ingredients and activate baking powder while contributing mild flavor; oat milk adds a slightly sweet, creamy consistency without dairy.
- 1 large egg (at room temperature) Bind wet and dry components together, add richness, and promote golden color; an at-room-temperature egg incorporates more easily for even texture.
- 3 tablespoons unsalted butter (ghee or coconut oil, melted) Add tenderizing fat and richness to the biscuit dough and help brown the tops when melted; ghee or coconut oil offers a dairy-free alternative with deep flavor.
- 2 teaspoons honey or maple syrup Provide subtle sweetness to balance savory filling and promote browning in the biscuit crust; maple syrup or honey also enhances overall flavor complexity.
- 4 tablespoons unsalted butter (ghee or dairy-free alternative) Sautéed in the filling, contribute buttery flavor and a silky mouthfeel while forming the base for the roux when combined with flour for thickening.
- 2 medium carrots (finely diced, about 1/2 cup) Cook until softened and slightly sweet to contribute body and texture to the filling; finely dicing ensures even distribution throughout the pot pie.
- 2 large shallots (thinly sliced) Sweat until translucent and sweet to build savory depth and aromatic foundation for the filling; thin slicing ensures even cooking and tender bites.
- 2 garlic cloves (roughly chopped) Crush or mince to release pungent aromatics that boost savory depth; roughly chopped garlic infuses the filling with warm, layered flavor.
- 1/4 cup all-purpose gluten-free flour or white rice flour Absorb fat and starch to create a roux that thickens the coconut-milk-based sauce; a gluten-free flour or rice flour choice maintains the recipe's gluten-free status.
- One 14-ounce can full fat coconut milk Provide creamy richness and body as the primary liquid fat in the sauce; full-fat coconut milk yields a smooth, dairy-free base for the filling.
- 1 cup chicken stock Add savory, concentrated flavor and adjust sauce consistency; chicken stock complements the poultry while balancing the coconut milk's richness.
- 1 teaspoon salt Enhance overall seasoning and bring out other flavors; added salt adjusts the savory balance of the filling and biscuits.
- 1 teaspoon Dijon mustard Brighten and deepen flavor with tangy, savory spice; Dijon mustard contributes subtle acidity and complexity to the sauce.
- 1 teaspoon fresh chopped thyme or rosemary leaves (or 1/2 teaspoon dried) Infuse herbal aroma and earthy notes to the filling; fresh thyme or rosemary (or dried) pairs with poultry and enriches the sauce's flavor profile.
- 1 1/2 cups frozen peas (see note) Contribute pop of color, sweet flavor, and vegetable texture; frozen peas add freshness and mild sweetness once thawed into the filling.
- 1 cup frozen pearl onions (optional) Optionally add sweet, tender onion bites for texture contrast and caramelized flavor; pearl onions provide small, uniform pops throughout the pie.
- 3 cups shredded chicken or turkey (see note) Provide substantial protein and hearty texture to make the pot pie a full meal; shredded chicken or turkey distributes evenly and soaks up flavorful sauce.
- 1/4 cup chopped fresh parsley Offer fresh herb brightness and a finishing contrast to the rich filling; chopped parsley adds color and a clean, herbaceous note when sprinkled on top.
Instructions
- Preheat the oven to 400 degrees F and line a baking sheet with parchment paper.: The warm oven will give your biscuits immediate lift and set their structure as they bake. You should feel the kitchen warmth rise and hear little settles of air as the oven reaches temperature. If you skip preheating you risk dense biscuits, so always allow the oven to fully come to temperature before baking.
- Make the biscuit dough: In a medium mixing bowl, whisk together the gluten-free flour, baking powder, and salt until combined. In a separate medium mixing bowl or liquid 4-cup measure, whisk together the milk, egg, melted butter and honey. Add the wet ingredients to the dry ingredients and mix until just combined. Using an ice cream scoop for portioning, scoop the dough onto the prepared sheet pan (you’ll have 8 to 10 balls). Use your fingers to pat down the tops so they aren’t domed and smooth the sides.: In a medium mixing bowl, whisk together the gluten free flour, baking powder, and salt until combined. In a separate medium mixing bowl or liquid 4 cup measure, whisk together the milk, egg, melted butter and honey. Add the wet ingredients to the dry ingredients and mix until just combined. Using an ice cream scoop for portioning, scoop the dough onto the prepared sheet pan (you’ll have 8 to 10 balls). Use your fingers to pat down the tops so they aren’t domed and smooth the sides : When you combine the wet into the dry, the texture should be slightly shaggy and tacky, not smooth like bread dough. You will feel a cool, slightly sticky dough when you scoop it, and using an ice cream scoop keeps the portions consistent so the biscuits bake evenly. Overmixing develops the flour too much and yields tough biscuits, so stir gently until just incorporated.
- Bake the biscuits until they are set but not browned, about 10 minutes. Set aside.: In the oven you will hear a faint crackle as steam escapes and see the tops become matte and no longer wet. They should feel set to the touch but pale. Allowing them to bake longer to brown now could over crisp the exterior and leave the interior dryer when they finish baking on top of the filling, so err on the side of slightly underbaked here.
- Meanwhile, make the filling: In a large ovenproof skillet, shallow Dutch oven or casserole dish, melt the butter over medium heat. Add the shallots, carrots and garlic. Sauté over medium heat until soft, about 5 minutes. Push the veggies to the sides of the pan.: In a large ovenproof skillet, shallow Dutch oven or casserole dish, melt the butter over medium heat. Add the shallots, carrots and garlic. Saute over medium heat until soft, about 5 minutes. Push the veggies to the sides of the pan : As the vegetables cook you will notice the shallots turn translucent and give off a sweet, savory aroma. The carrots should begin to soften but still have shape. Pushing them aside creates space to make the roux while preventing hot bits from burning. A common misstep is cooking too hot, which can brown the garlic and lend bitterness, so keep the heat moderate.
- Sprinkle in the flour and whisk until a paste forms. Pour in the coconut milk and whisk until combined. Continue to simmer over medium-low heat, stirring occasionally, until the coconut milk vegetable mixture is thick enough to coat the back of a spoon, about 5 minutes. Add the stock, salt and thyme or rosemary; cook for another few minutes until smooth and thick.: When the flour is added to the melted butter it should become a smooth paste with no lumps, and the whisking makes it glossy. Pouring in the coconut milk should create a velvety emulsion that softens and smells faintly sweet. The spoon test is key here; if a clean line stays on the spoon, you have the correct thickness. If the sauce is too thin, simmer gently to reduce, but beware of boiling which can separate dairy free milk. Stirring prevents scorching and ensures even thickening.
- Off the heat, add the mustard, peas, pearl onions (if using), shredded chicken, and parsley. Taste for seasoning and add more salt as needed. Smooth into an even layer and top with the cooked biscuits. Feel free to brush the biscuits with olive oil or butter for more of a browned, glazed look. Transfer the pan to the oven and bake for 15 minutes, or until the biscuits are lightly golden brown and flaky, and the pot pie is bubbling.: Off heat, the aroma will bloom when you add Dijon and fresh herbs, brightening the creamy base. The frozen peas will warm and keep their bright green color when folded in, and the shredded chicken will absorb the sauce creating a cohesive filling. Smoothing the surface ensures even coverage beneath the biscuits. Brushing the tops helps them brown attractively; if you prefer a paler look skip this step. One pitfall is adding cold ingredients that drop the sauce temperature too much, so let proteins come closer to room temperature when possible.
- Transfer the pan to the oven and bake for 15 minutes, or until the biscuits are lightly golden brown and flaky, and the pot pie is bubbling: In the oven the filling will start to bubble around the edges and you will see steam escape where the biscuits meet the sauce. The biscuits should finish into a flaky golden top with a slight crispness on the edges. If the filling is not bubbling after the time has elapsed, bake a little longer until you see a lively simmer; this ensures the sauce is fully thickened. Avoid opening the oven too often, as this can lower the temperature and interfere with rising.
Notes
- Use leftover roasted chicken to save time and deepen flavor, shredding it finely so it integrates fully into the sauce.
- Swap the herb from thyme to rosemary for a pine like note, or use a small amount of fresh sage for a more autumnal profile.
- Make biscuits in advance and freeze them on the sheet pan; finish baking from frozen on the pot pie for a quick assembly night.
- Adjust thickness by simmering the filling longer to reduce it, or adding a little more stock if the sauce feels too stiff before assembly.
- Use different non dairy milk such as almond or cashew if oat is not available, noting that flavor and body will vary slightly.