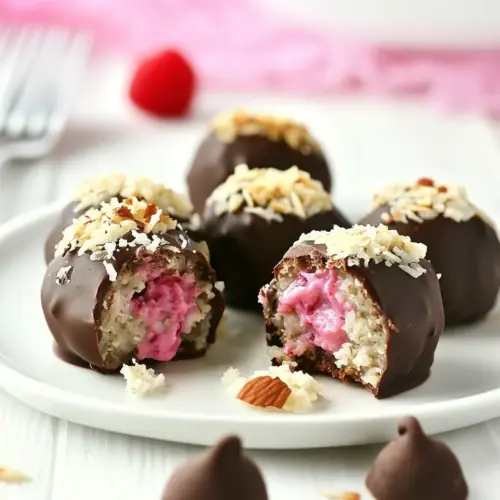
Gluten Free Cheesecake Stuffed Raspberry Coconut Quinoa Bites With Chocolate Glaze
Gluten Free Cheesecake Stuffed Raspberry Coconut Quinoa Bites With Chocolate Glaze are creamy, chewy, and glossy little treats that balance tart raspberries with nutty quinoa and toasted coconut flakes. These easy to handle bites are great for brunch or gatherings, offering a refined dessert without fuss. Make them for friends who appreciate thoughtful, portable sweets and you ll see why they re so addictive.
Equipment
- Muffin Tin
- Mixer or electric mixer
- Large Pot
- Cookie Sheet
- Parchment Paper
- Wire Rack
- Microwave-safe Bowl
Ingredients
- 3 ounces reduced-fat cream cheese softened Soften to a spreadable consistency and provide creamy, tangy cheesecake filling texture while contributing protein and fat for structure.
- 1/8 teaspoon fresh lemon juice Squeeze to add a bright acidic note that balances sweetness and helps brighten the cheesecake filling flavor profile.
- 2 tablespoons + 2 teaspoons powdered stevia or sweetener of choice Measure precisely to sweeten the filling and batter with minimal calories while maintaining a fine, easily soluble texture.
- 1 ounce white chocolate Melt gently to incorporate a sweet, milky flavor into the filling and to add richness and smoothness to the cheesecake component.
- 2 tablespoons raspberry Greek yogurt Fold in to impart a concentrated raspberry flavor and creaminess, enhancing the filling’s fruitiness and contributing moisture.
- 1 teaspoon liquid egg whites Whisk to bind and stabilize the filling’s structure while contributing additional protein without adding strong egg flavor.
- 3 tablespoons fresh raspberries Gently crush and fold in to provide fresh tartness, bursts of fruit texture, and natural moisture for contrast in each bite.
- 1/2 cup water Boil to cook the quinoa and create the necessary liquid base for the grain component while contributing neutral flavor.
- 1/2 cup unsweetened vanilla almond milk Combine with water to cook quinoa with a subtle vanilla note, adding mild sweetness and depth to the base mixture.
- 1/2 cup quinoa Rinse and cook to form the gluten-free, chewy grain base that provides bulk, texture, and a slight nuttiness to the bites.
- 3 tablespoons powdered stevia, or sweetener of choice Add to batter to enhance sweetness without sugar while keeping the mixture light and preventing grainy texture when powdered.
- pinch salt Season lightly to enhance all flavors, balance sweetness, and support overall taste perception without overpowering delicate components.
- 1/4 cup + 2 tablespoons unsweetened coconut flakes Toast or fold in to contribute coconut aroma, crunchy texture, and tropical flavor that complements raspberry and chocolate.
- 2 eggs lightly beaten Beat lightly to aerate and bind the base, helping to set the quinoa mixture and provide tenderness in the finished bites.
- 3 ounces dark chocolate Melt and drizzle or temper to create a rich, bittersweet chocolate coating or glaze that contrasts the sweet filling.
- 2 teaspoons coconut oil melted Melt smoothly to help thin chocolate for glazing, add sheen and mouthfeel, and facilitate an even chocolate finish.
Instructions
- Preheat your oven to 350°F and place 2 muffin liners in a muffin tin, filling the empty cups with a little bit of water.: Right away you should sense the warmth filling the kitchen as the oven begins to hum, and the water in the extra cups prevents the tin from overheating, creating a gentler heat that helps the cheesecake set evenly. This trick reduces hot spots and keeps the centers from cracking, which is important for a smooth interior. A common mistake is skipping the water bath idea entirely, which can lead to overbaked, dry cheesecake centers; watch for a soft but set top that barely jiggles when moved.
- Make the cheesecake center. In a large bowl, beat together the softened cream cheese, lemon juice, and stevia until smooth and creamy.: As you beat the mixture, notice the texture go from lumpy to silky, and the lemon aroma will brighten the dairy scent in the bowl. Achieving a lump free blend is essential so the final center is uniformly smooth, so scrape the bowl sides and beat thoroughly. If you overmix, the filling can become too airy and shrink as it cools, so stop once it is homogenous and creamy.
- In a small bowl, melt the white chocolate in 20-second intervals in the microwave, stirring between each interval.: The white chocolate will soften into glossy ribbons if you heat it gently, and stirring between bursts prevents scorching. You should see a thick, shiny liquid and smell the sweet cocoa butter; act quickly to fold it into the filling while warm. A common error is overheating, which causes the chocolate to seize and become grainy, so short bursts and frequent stirring are your friend.
- Combine the melted chocolate, Greek yogurt, and egg whites into the cream cheese mixture and beat until well blended.: As you fold these into the base, the mixture will loosen slightly and gain a balanced tang and silkiness from the yogurt. The egg whites help set the filling during a brief bake, adding structure without heaviness. Avoid adding cold ingredients straight from the fridge; bringing them to room temperature first prevents the mixture from separating or becoming lumpy.
- Pour into the 2 lined muffin tins and bake until the cheesecake is set, about 20 minutes.: The oven will transform the custard like filling into a tender set center, and you will see edges firm while the middle remains slightly wobbly. This visual cue indicates doneness; overbaking will dry the centers and reduce creaminess. To prevent this, begin checking a few minutes early and remove them when the jiggle is minimal.
- Let cool in the pan and then refrigerate for at least 5 hours.: Cooling in the pan allows the cheesecake centers to firm gently while residual heat equalizes, then refrigeration chills them so they freeze solid later. The chill time is crucial for shaping, because a soft center will disintegrate when coated. A mistake I often warn about is rushing this step; insufficient chilling makes the balls runny and difficult to handle.
- Make the quinoa. Combine the water and almond milk into a large pot and bring to a boil.: When the pot heats, a faint steam and a sweet almond aroma will rise, signaling that the liquid is ready to receive the quinoa . Boiling thoroughly ensures the grains can absorb evenly. If the pot does not reach a full boil before adding the quinoa , the grains can cook unevenly and remain chewy in spots.
- Once boiling, add in the quinoa, stevia, and pinch of salt. Turn the heat to low, cover, and cook until the water is completely absorbed (about 15-20 minutes). Let the quinoa completely cool.: As it simmers, the quinoa will plump and curl into translucent spirals, and the aroma will become slightly nutty. Turning the heat to low and covering traps steam so the grains cook gently and uniformly. A common mistake is lifting the lid too often, which releases steam and increases cooking time, possibly yielding undercooked, firm kernels.
- While the quinoa cools, mash the chilled cheesecakes in a large bowl. Add in the fresh raspberries and beat with an electric mixer until well combined.: Cooling is a slow, necessary step so the grains stop steaming and firm up, which makes them easier to bind with eggs and coconut flakes . Warm quinoa will melt melted chocolate later and cause the outer shell to fall apart, so patience here prevents a soggy result. If you try to assemble while still warm, the mixture may be too loose to shape.
- Cover a cookie sheet with parchment paper and drop the cheesecake filling onto it in teaspoon-sized balls. If your filling is a little bit runny, use your fingers to help shape each ball.: The chilled cheesecakes will break into creamy lumps that become smoother as you mash, and adding the raspberries introduces bright, juicy pockets. The mixer helps distribute the fruit evenly, creating an ideal balance of tang and sweetness. A typical pitfall is overmashing the berries, which can turn the filling overly pink and thin; pulse just until combined.
- Put the cookie sheet into the freezer until each ball is frozen solid, about 30 minutes.: As you drop each teaspoon sized ball, the chilled filling should hold shape and feel cold to the touch. This small size makes them easier to encase later and lets the center thaw just enough while the outer shell bakes. If the filling seems too soft, return the tray to the freezer briefly; trying to shape warm filling will result in misshapen centers that are hard to coat.
- Transfer the cooled quinoa into a large mixing bowl and add in the coconut flakes and lightly beaten eggs. Mix well so that the quinoa is evenly coated. The quinoa will seem quite 'eggy;' you need this so that the balls stick together.: Freezing firms the centers so they can be handled without melting. You should hear a faint clink when the tray shifts, and the balls will feel rock solid when ready. Skipping this freeze step risks the cheesecake softening during assembly and leaking into the quinoa shell.
- Preheat your oven to 350°F.: Mixing warms the mixture slightly and the beaten eggs bind the grains and flakes, creating a cohesive paste that bakes into a clinging shell. You will notice the scent of toasted coconut flakes and the texture becoming tacky, which is precisely what you want for shaping. If the mix feels dry, it will not adhere; if it is overly wet, bake times will lengthen and the interior can become soggy.
- Take 1/2 the frozen cheesecake balls out of the freezer and line another cookie sheet with parchment paper. Keep the remaining half in the freezer until you are ready to use.: Reheating the oven ensures the assembled bites bake in an environment that crisps and sets the outer shell properly. The familiar warmth prepares the tray and creates a stable temperature that yields even browning. Turning the oven on too late can extend baking time and affect texture, so allow it to reach temperature before the first tray goes in.
- In the palm of your hand, take about a heaping 1/2 tablespoon of the quinoa and drop one of the cheesecake balls on top. Cover with an additional heaping 1/2 tablespoon of the quinoa mixture.: Working with half at a time keeps the remaining centers frozen and manageable, and lining a fresh tray gives you a clean surface to place the formed bites for baking. Handling too many at once increases the chance that centers will thaw and leak during assembly, so batch work is a practical prevention against messy outcomes.
- Squish and spread the quinoa around the cheesecake until it sticks together and is completely covered. Place onto the prepared cookie sheet. Do this until all of your quinoa is gone.: The heaping 1/2 tablespoon should feel substantial and slightly sticky as you press and mold it, creating a good base to cover the cheesecake. The tactile process helps you judge how much quinoa is needed for a full coating. A common mistake is using too little, which exposes the filling, or too much, which creates oversized bites that take longer to bake.
- Bake the balls until they feel just set and stick together, about 23-25 minutes. Transfer to a wire rack to let them completely cool.: When you add the top portion, the quinoa should spread and adhere around the cheesecake, and you will feel the two halves fuse into a single ball. Ensure there are no gaps so the filling remains sealed during baking. If you notice cracks, press gently to smooth them; cracks can lead to leakage and uneven baking.
- Finally, make the chocolate glaze. In a large bowl, melt the dark chocolate in the microwave by heating it for 20-second intervals, stirring between each interval.: As you shape each ball, the exterior should look uniform with tiny grains visible, and the surface will appear slightly glossy from the beaten eggs . Place them spaced apart so air circulates during baking. Crowding the tray causes uneven heat and can prevent proper browning.
- Stir in the melted coconut oil until the chocolate is very smooth.: During baking, you will notice the tops firm and the coconut develop a gentle toast color, and the kitchen will fill with a toasty aroma. Letting them cool on a wire rack prevents condensation from making the shells soggy. Opening the oven too early can make them collapse, so resist the urge to check frequently.
- Once completely cool, roll each quinoa bite around in the chocolate and place back onto the parchment-lined cookie sheet.: Melt the dark chocolate until it becomes shiny and fluid, and the smell will be deep and cocoa forward. Gentle heating preserves a smooth texture that is easy to work with while dipping. Overheating can cause the chocolate to separate and become grainy, so use brief bursts and stir well.
- Refrigerate until the chocolate is hard, then enjoy.: Adding melted coconut oil thins the glaze and gives it that glossy finish that sets with a nice snap, and it also helps the coating adhere evenly to the chilled bites. The combined aroma of chocolate and coconut is comforting and evocative. If the glaze appears too runny, let it cool slightly; if it is too thick, stir in a tiny extra bit of coconut oil carefully.
- Once completely cool, roll each quinoa bite around in the chocolate and place back onto the parchment lined cookie sheet: Rolling chilled bites in the cooled glaze ensures an even coat; you will hear a faint clink as each bite meets the tray, and the chocolate should coat smoothly without dragging or tearing the shell. If the bites are warm, the glaze will slide off, so keep them chilled until dipping. Work quickly to maintain a consistent sheen.
- Refrigerate until the chocolate is hard, then enjoy: The final chill sets the glaze and firms the center to the perfect texture when served. After refrigeration, the bite should have a satisfying contrast between a crisp chocolate shell, a chewy quinoa exterior, and a cool, creamy center. Leaving them at room temperature too long can soften the chocolate and alter the intended mouthfeel.
Notes
- Switch the sweetener - If you prefer a different sweetener, replace the powdered stevia with an equivalent amount of your chosen powdered sweetener, keeping the texture in mind; powdered sweeteners dissolve more evenly than granulated ones, which helps the cheesecake and quinoa shells stay smooth.
- Toast the coconut - Lightly toasting the unsweetened coconut flakes adds a warm, nutty depth that plays beautifully against the tart raspberries and dark chocolate, just spread them on a sheet and watch closely because they brown quickly.
- Make them bite sized - Keep the cheesecake centers to teaspoon sized scoops so each finished ball is a true bite, which is perfect for parties where people prefer small, elegant morsels rather than larger portions.
- Chill between steps - If you find the filling softens too quickly, pause and chill more frequently; returning the tray to the freezer for a few minutes during assembly helps maintain clean shapes and prevents leaks.
- Use high quality chocolate - Choosing a good quality dark chocolate for the glaze greatly improves flavor complexity; since the glaze is a prominent finishing touch, quality here elevates the whole recipe.