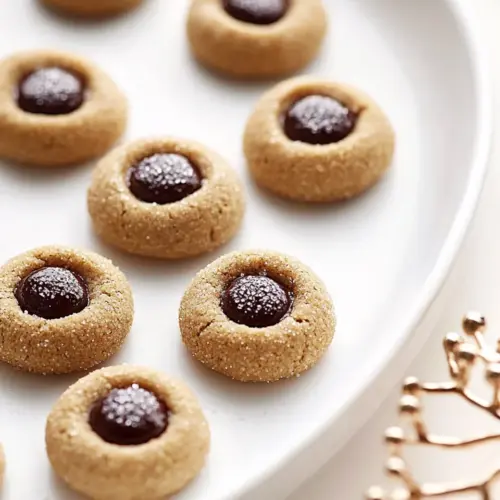
Gingerbread Thumbprint Cookies
Gingerbread Thumbprint Cookies are spicy, chewy, and finished with a glossy chocolate center. These easy to make cookies combine warm ginger and molasses with a tender dough and crisp sugared exterior, perfect for holiday cookie swaps and cozy gatherings. Make a batch for gifting, they store well and offer a classic festive flavor that keeps everyone coming back for one more.
Equipment
- Mixing Bowl
- Stand mixer or hand mixer
- Measuring Cups and Spoons
- Baking Sheet
- Parchment Paper
- Wire Rack
- Piping Bag
- Saucepan or microwave safe bowl
Ingredients
- 3 cups (12.75 ounces) all-purpose flour Provide structure and bulk to the cookies, forming the base of the dough and giving it body. Combine with leaveners and fats to create the proper crumb and chewiness. Measure precisely to maintain dough consistency and cookie spread.
- 1 teaspoon baking soda Leaven gently by reacting with acidic ingredients to produce carbon dioxide, helping cookies rise slightly and become tender. Incorporate evenly into the dry mix to avoid metallic pockets of flavor. Use the specified amount to balance texture without over-rising.
- 1/2 teaspoon kosher salt Season subtly to enhance overall flavor and balance sweetness, while also strengthening gluten network for better dough handling. Dissolve into dry ingredients for even distribution and mouthfeel. Adjust kosher salt carefully if using a different salt type to maintain proper seasoning.
- 2 teaspoons ground ginger Add warm, pungent spice that defines the gingerbread profile and provides a bright, slightly spicy backbone. Blend thoroughly with other spices so the heat is balanced throughout the dough. Use measured amounts to avoid overpowering the other flavors.
- 1 teaspoon ground cinnamon Contribute sweet, woody warmth that complements the ginger and deepens the spice blend. Disperse uniformly to create a cohesive spiced flavor in every bite. Pair with molasses and brown sugar for classic gingerbread notes.
- 1/2 teaspoon ground allspice Introduce clove-like warmth and complexity to the spice mix, amplifying the holiday-inspired flavor. Mix with the other dry spices to ensure even distribution and nuanced depth. Use sparingly to prevent astringency.
- 1/4 teaspoon ground nutmeg Provide a subtle nutty, sweet warmth that rounds out the spice blend and adds aromatic complexity. Incorporate into the dry ingredients to ensure gentle background flavor. Keep quantity small to maintain balance with stronger spices.
- 4 tablespoons unsalted butter, room temperature Cream for richness and tender flakiness while contributing to the cookie's flavor and mouthfeel. Soften at room temperature to blend smoothly with shortening and sugars, creating an emulsion that traps air for lighter texture. Use the exact amount to control fat ratio in the dough.
- 6 tablespoons unflavored vegetable shortening, room temperature Stabilize structure and add crumb tenderness while contributing to the fat content that controls spread. Keep at room temperature to ensure smooth creaming with butter and sugar. Combine thoroughly to produce a consistent dough texture.
- 3/4 cup packed brown sugar Sweeten and add moisture with deep, caramel-like notes that pair with molasses; also aid in chewiness and color development. Cream with the fats until light to help incorporate air and build structure. Pack firmly to measure accurately for consistent sweetness.
- 1/2 cup unsulphured molasses Sweeten with rich, robust flavor and provide moisture and dark color characteristic of gingerbread cookies. Bind with sugars and fats to contribute to chew and density. Use unsulphured molasses to avoid bitter off-flavors and achieve cleaner taste.
- 1 large egg Bind ingredients and add tenderness, promoting structure and a slightly cakey crumb when combined with leaveners. Beat into the creamed fats and sugars to emulsify and create a uniform dough. Use a large egg for reliable size and moisture contribution.
- 1 teaspoon vanilla extract Enhance overall sweetness and aroma while deepening flavor with a familiar vanilla note. Fold into the wet ingredients to evenly distribute flavor without causing separation. Use the specified amount to complement spices without overshadowing them.
- granulated sugar, for rolling Provide texture contrast and a lightly sweet outer coating that prevents sticking and adds crunch. Roll dough balls in granulated sugar before baking to create a sparkly, crisp exterior. Keep sugar accessible for quick rolling during shaping.
- 10 ounces dark or semisweet chocolate, finely chopped (1 cup) Melt smoothly to create a rich, chocolate coating or filling with balanced bitterness and sweetness. Chop finely so it melts evenly when combined with butter and corn syrup for ganache or dipping. Use dark or semisweet to pair well with molasses-forward cookies.
- 1 tablespoon butter Enrich and smooth melted chocolate, adding shine and a silkier mouthfeel to the coating or filling. Stir into warm chopped chocolate to create a glossy ganache that sets with a tender bite. Use measured amount to maintain desired firmness.
- 1 tablespoon corn syrup Promote gloss and pliability in the melted chocolate, preventing crystallization and keeping the coating shiny and smooth. Stir into finished ganache to improve spreadability and texture for dipping or filling. Use the specified amount to avoid excess stickiness.
Instructions
- In a bowl, whisk together flour, salt, baking soda and spices; set aside.: The air fills with aromatic spice as you whisk, and this first step ensures the all purpose flour and leavening are evenly distributed so each cookie bakes uniformly. If you skip thorough whisking, you might get pockets of baking soda or concentrated spice, which can cause uneven rise or bursts of flavor. I recommend using a shallow bowl so you can whisk quickly and check for any clumps; if you see small lumps, press them with the back of a spoon until the mixture feels smooth. The visual cue to look for is an even, sandy texture with no visible streaks of spice or baking soda.
- In a large mixing bowl or the bowl of a stand mixer, beat butter and shortening together until smooth. Add sugar and beat 1 to 2 minutes or until fluffy. Beat in molasses. Scrape down the sides of the bowl, then add egg and vanilla and mix until smooth.: Right away you'll notice the texture becoming creamy and glossy as the unsalted butter blends with the vegetable shortening . This combination creates a tender crumb and prevents excessive spreading. A common mistake is not creaming long enough, which can leave the fats uneven and make the dough flaky rather than cohesive. Aim for a smooth, slightly pale mixture; this indicates air has been incorporated, which lends lightness. The sound is subtle, a low whir while the paddle works, and the feel should be soft when you press between fingers.
- Add half of dry ingredients and mix on low speed until just incorporated, scraping down the sides of the bowl as needed. Add remaining dry ingredients in two additions until no streaks of flour remain. The dough should be thick and just slightly sticky.: As you add the brown sugar , the bowl will start to look lighter and the smell becomes richer. Fluffiness means tiny air pockets are trapped, helping the cookie rise gently in the oven. If you rush this, the sugar may not dissolve into the fats, leaving a grainy mouthfeel. Watch for the change from shiny to slightly matte and aerated; this visual is your indicator to proceed. Scrape down the sides at least once to ensure no unmixed sugar clings to the bowl.
- Cover bowl with plastic wrap; chill for at least 1 hour or overnight.: When you add the unsulphured molasses , the mixture darkens and a deep, earthy scent comes forward. Molasses adds moisture and the classic gingerbread flavor. The error to avoid here is adding too much molasses at once if it is very cold, which can seize the mixture; gently warming molasses to room temperature if it is stiff helps it incorporate smoothly. Look for a glossy, syrupy consistency before moving on.
- Preheat oven to 350 degrees F. Line a cookie sheet with parchment paper or a silicone baking mat.: Scraping ensures everything combines evenly, and the addition of the large egg and vanilla extract binds the dough while adding subtle aroma. The mixture should finish smooth and slightly thick. If the egg is cold, the fats can firm up, so use room temperature eggs for the best texture. A smooth, homogeneous batter without streaks of egg is the visual cue you want.
- Roll dough into 1 inch balls (or use a small cookie scoop which is the perfect size). Roll into a smooth ball, then roll in granulated sugar. Arrange on prepared baking sheet, leaving 2 inches of space between balls.: Adding the flour mixture in stages prevents over mixing, which can develop too much gluten and make the cookies tough. Use low speed so the flour disappears into the batter without creating a flour cloud. Over mixing here is common and will lead to denser cookies; stop mixing the moment you no longer see streaks of flour. The dough should begin to hold together and feel slightly tacky.
- Gently press an indentation into each cookie using your thumb or the back of a rounded 1/4 teaspoon (something like a melon baller, or even a marble would also work well). Don’t press all the way, you want the indentation about half the depth of the cookie without it cracking too much around the edges.: Continue to add the remaining dry mix, keeping the mixer on low and scraping the bowl as needed. The dough should become thick and just slightly sticky, a tactile cue that it is ready to chill. If the dough feels overly sticky and difficult to handle, refrigerate for a short time before rolling. Look for a uniform color and texture to know that the spices and flour are fully integrated.
- Bake for 7 to 9 minutes or until puffed and bottoms are just barely starting to darken; bake them on the lower side of the time range if you will be shipping your cookies or if you prefer softer cookies overall.: Chilling firms the dough, makes it easier to roll into neat balls, and allows the flavors to meld. The chill also prevents excessive spreading during baking. Avoid skipping this rest, because warm dough will flatten and lose its thumbprint cavity. When ready, the dough should be firm to the touch but still pliable; if chilled overnight, let it sit for a few minutes to soften slightly so it can be scooped easily.
- Re-press the puffed indentations while the cookies are still warm, then let cool for 10 minutes before transferring to a wire rack to cool completely. Repeat with remaining dough.: Turning on the oven early ensures it reaches 350 degrees F so the cookies bake evenly from the first minute. Lining the sheet prevents sticking and browning on the bottom. A common slip is crowding the sheet, which leads to uneven heat circulation; give each cookie space. When the oven is at temperature, you should feel a warm rush each time you open the door to place the tray.
- To make filling, gently melt chocolate together with butter and corn syrup in a saucepan over the lowest heat setting possible, or in the microwave on 50% power in 30 second intervals.: Rolling into smooth balls and then coating them in granulated sugar creates a pretty, sparkly crust. The sound of the sugar rubbing as you roll is oddly satisfying, and the sugar helps with a delicate crisp. If you press too firmly when rolling, the dough can compact and produce dense cookies. Keep each ball uniform in size so they bake at the same rate; visually they should be round and consistent before placing on the sheet.
- When chocolate is melted and smooth, transfer to a piping bag fitted with a 1/2-inch-round tip, then pipe into thumbprints. You can also spoon the chocolate into the thumbprints, but I found the piping bag way more efficient. Let sit at room temperature for about 1 hour or refrigerate briefly until chocolate is set.: This creates the pocket for the chocolate filling. Press about half the depth of the cookie so it holds filling without cracking. A common mistake is pressing too hard, which breaks the edge and causes the filling to spill during baking. The surface should remain mostly intact, with a smooth well in the center ready to receive filling after baking.
- Cookies will keep in an airtight container for up to 5 days.: During baking, the cookies will puff and the aroma of spices will fill the kitchen. Baking on the shorter end yields softer cookies, while a few extra minutes gives slightly firmer edges. Avoid overbaking, because that kills the tender interior. The cue to remove them is a light golden color and barely darkened bottoms; they will continue to set as they cool.
- Re press the puffed indentations while the cookies are still warm, then let cool for 10 minutes before transferring to a wire rack to cool completely: Re pressing restores the thumbprint shape as the centers puff up in the oven. Doing this while warm makes a clean well for filling. If you wait until fully cooled, the cookie may crack when pressed. After a short rest, the cookies will be sturdy enough to move to a wire rack for complete cooling without losing shape.
- Repeat with remaining dough: Work in batches so your oven temperature stays steady and you do not overcrowd trays. If your dough becomes too soft between batches, a quick chill helps. Consistency across batches comes from uniform scooping and spacing on the baking sheet.
- To make filling, gently melt chocolate together with butter and corn syrup in a saucepan over the lowest heat setting possible, or in the microwave on 50 percent power in 30 second intervals: Melt slowly and gently, stirring frequently, until the mixture is smooth and glossy. This low heat approach preserves the melt quality and prevents the chocolate from seizing. If you overheat, the chocolate can become grainy; the right texture is viscous and shiny, and it should coat the back of a spoon smoothly.
- When chocolate is melted and smooth, transfer to a piping bag fitted with a 1/2 inch round tip, then pipe into thumbprints: The sensory pleasure here is the glossy sheen and the neat, controlled flow from the piping bag. Piping delivers clean presentation and prevents overfilling. If you lack a piping bag, spooning works too, but it is harder to keep the filling tidy. Look for a filled center that sits slightly proud of the cookie without spilling over.
- Let sit at room temperature for about 1 hour or refrigerate briefly until chocolate is set: Allowing the filling to set slowly keeps it glossy and slightly tender. Fast refrigeration can sometimes dull the shine, but it is a handy shortcut if you are short on time. The finished set should be firm to the touch without being brittle; chilling briefly is fine if you need to stack or box the cookies soon.
- Cookies will keep in an airtight container for up to 5 days: Stored properly, your cookies retain texture and flavor for several days. Keep them in a single layer or separate layers with parchment to avoid scuffing the chocolate. A common storage mistake is trapping moisture by sealing while still warm, which softens the cookies; ensure they are fully cooled before sealing.
Notes
- Measure flour properly by spooning it into your measuring cup and leveling off the top, this prevents a dry dough and ensures the right tender crumb.
- Use room temperature fats and egg so they incorporate smoothly, producing a uniform dough that is easy to chill and shape.
- Chill dough at least 1 hour to firm up the fats, which helps the cookies keep their shape and creates that signature thumbprint well.
- Coat balls in granulated sugar for a subtle crunch and sparkling finish that contrasts nicely with the soft interior.
- Melt chocolate slowly and stir constantly, avoiding high heat that can cause grainy texture, for a silky glossy filling.