Gingerbread Pancakes
Gingerbread Pancakes bring warm spice and cozy texture to breakfast with aromatic ground cinnamon, ground ginger, and blackstrap molasses. These easy, slightly chewy pancakes use chickpea flour and plant based binders for a satisfying, nutritious start, ideal for an easy weeknight or relaxed holiday brunch. Make them when you want a flavorful, comforting morning treat.
Equipment
- Non-stick pan
- Mixing Bowls
- Spatula
- Cooling rack
Ingredients
- 2/3 cup non-dairy milk I used unsweetened almond milk Provide a creamy dairy-free base that hydrates the batter and contributes to a tender crumb; unsweetened almond milk keeps calories lower while letting other flavors shine.
- 1 flax egg 1 tbsp freshly ground flax + 3 tbsp water (1/4 cup egg whites for non-vegan recipe) Act as a vegan binder and emulsifier when mixed with water, creating a gel that holds the batter together and adds slight nuttiness; can be substituted with egg whites for non-vegan versions.
- 1 tablespoon blackstrap molasses Add rich, robust sweetness and deep molasses notes that evoke traditional gingerbread flavors while supplying moistness and a hint of iron and minerals.
- 1 tablespoon chia seed Contribute extra binding, a subtle crunch, and omega-3 fats when hydrated; help thicken the batter and support structure in egg-free recipes.
- 1 teaspoon pure vanilla extract gluten-free Deliver aromatic warmth and a sweet, floral backbone while enhancing overall flavor complexity; gluten-free pure vanilla extract balances spicy notes.
- 10 vanilla stevia drops or 2 tbsp xylitol *see note Provide concentrated sweetness without sugar, allowing control over sweetness level while minimizing added carbohydrates and keeping batter consistency unchanged.
- 2/3 cup chickpea flour Offer a hearty, protein-rich gluten-free flour that gives pancakes a slightly dense, nutty texture and pairs well with warming spices for a wholesome result.
- 1 teaspoon baking powder gluten-free Leaven the batter by producing gas bubbles during cooking, creating lift and a lighter texture while ensuring the ingredient is certified gluten-free for sensitive diets.
- 1 teaspoon ground cinnamon Impart sweet, warming aromatic notes and enhance the overall spice profile; cinnamon complements molasses and adds a comforting flavor dimension.
- 1 teaspoon ground ginger Bring bright, peppery warmth that defines gingerbread character and balances sweetness; ground ginger also aids digestion and adds zingy aroma.
- 1/8 teaspoon ground cloves Introduce pungent, warm, slightly bitter aromatic notes that deepen the spiced profile and provide complexity in small quantities to avoid overpowering the batter.
Instructions
- Combine almond milk and chia and allow to sit for 10 minutes – this will get the chia all gelatinous and good for your digestion. Alternatively, allow the chia to soak overnight in the milk, then add to the recipe.: The moment you mix the almond milk and chia seed , you will notice the milk take on a slightly thicker, glossy feel as the seeds swell; this texture is soothing and signals the binder is working. Smell is subtle, mostly neutral, with a faint nuttiness from the milk. I let it sit undisturbed so the seeds hydrate evenly, stirring only once to ensure no dry clumps remain. The why here is simple, a well hydrated chia seed avoids gritty bits in the pancakes and helps trap air for a tender crumb. One common mistake is under soaking, which leaves seeds crunchy and compromises texture, so give it the full ten minutes or soak overnight for an even silkier result.
- Preheat a small non-stick pan on medium-low heat for 2 minutes.: When I soak the mixture overnight, the texture becomes almost pudding like, offering a creamy backdrop to the dry ingredients and deepening flavor as the chia seed releases subtle nuttiness. You may detect more pronounced molasses notes later because the base is more integrated. This long soak also makes early morning prep effortless, just whisk and cook. A pitfall is forgetting to whisk before using, which can leave a gelatinous layer; a quick stir restores uniformity and keeps batter consistency predictable.
- Meanwhile, combine the dry ingredients in a separate bowl, then add to the wet ingredients.: As the pan warms, you should feel gentle heat when hovering your hand a few inches above it, not a blast of warmth. The surface will shimmer slightly when ready, and a properly preheated pan ensures the batter sizzles softly and forms those tell tale bubbles and golden edges. Using medium low prevents burning while allowing caramelization; if the pan is too hot, the exterior will char before the center cooks, so test with a drop of water which should bead and evaporate slowly. Adjusting heat is normal, I often lower it as I work through the batter to maintain even cooking.
- Stir until just mixed.: As you whisk the chickpea flour , baking powder , and spices together, inhale the dry aroma, that toasted spice scent is where the gingerbread personality starts to form. Tossing the dry components separately ensures the baking powder distributes evenly, which is key for uniform rise. When folded into the wet chia mixture, the batter will thicken and become speckled with spices. Overmixing at this stage is a typical misstep, it can tighten the batter and reduce tenderness, so combine until just blended for the best texture.
- Pour 1/4 of the mixture into the preheated pan. Allow the first side to cook for 3-4 minutes, or until bubbles form and the edges begin to turn golden.: As you fold the mixture, you will feel it move from liquid to a cohesive batter, slightly thick but pourable. The batter should hold together with slow ribbons when lifted, and you may see tiny pockets of air which will expand in the pan. The reason for gentle stirring is to preserve those air pockets and avoid developing gluey texture from overworked chickpea flour . A mistake to watch for is chasing uniformity by vigorous mixing, which often yields pancakes that are dense rather than tender.
- Flip and allow to cook for another 1-2 minutes.: When the batter hits the pan, listen for a soft hiss and watch the surface slowly set; bubbles will appear and migrate to the edges, signaling it is time to check for flipping. The edges should change to a warm golden hue and feel slightly firm to the touch with a spatula. This stage builds that gentle crust which contrasts the tender center, and it forms flavor through light caramelization. A common error is flipping too early, which leaves a raw center, so be patient and rely on the visual cues of bubbling and edge color.
- Place completed pancake on cooling rack and repeat with remaining batter.: After flipping, you will notice a brief increase in sizzling as the second side finishes, and the aroma will become more toasty and molasses forward. The short cook time helps preserve moisture while ensuring the surface sets evenly. I press lightly with a spatula to confirm resilience but avoid squashing which releases juices and dries the pancake. Overcooking on this side is easy if the heat is too high, producing a dry interior, so aim for a light golden color rather than a deep brown.
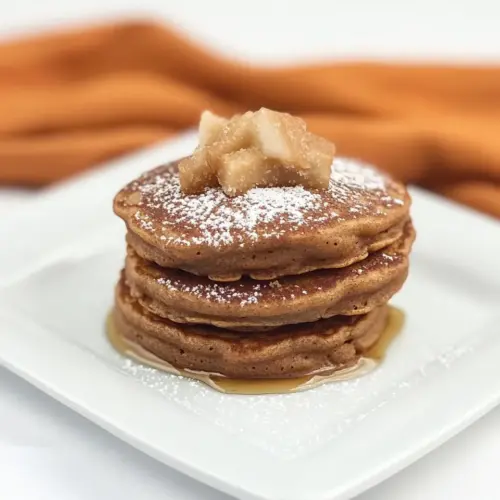
- Serve with melted coconut oil, maple syrup, chopped apple and pecans.: Transferring pancakes to a cooling rack prevents steam from making the undersides soggy and helps them keep a pleasant edge crispness. The stack should not be piled directly on a plate while hot; a rack maintains texture while you finish the batch. This step matters for presentation and mouthfeel, especially if you plan to rewarm them briefly before serving. A frequent slip up is stacking hot pancakes flat which traps steam and softens the crust, so give them space to breathe on the rack.
- Serve with melted coconut oil, maple syrup, chopped apple and pecans.: The final serving brings contrasting textures and flavors, the warm nutty sheen of melted coconut oil , sticky maple syrup for sweetness, tart fresh apple , and crunchy pecans to add bite. When plated, you will hear the light crisp when you cut into the edge and taste layers of spice, sweet, and nutty notes. Serving right away preserves contrast; holding too long can flatten vibrant textures. One tip is to add syrup sparingly, starting small so you don’t overpower the nuanced spice base.
Notes
- Swap sweeteners carefully Replace the vanilla stevia drops or xylitol with an equal tasting sweetness, remembering that liquid sweeteners will slightly thin the batter while granular ones affect browning.
- Soak overnight For even silkier texture, combine the chia seed and non dairy milk the night before; this deepens flavors and makes morning prep nearly instantaneous.
- Adjust spice levels Increase or decrease the ground cinnamon, ground ginger, and ground cloves to suit your taste, but tweak cloves sparingly as it is very potent.
- Use egg whites for lift If you are not keeping the recipe vegan, substituting the flax egg with egg whites yields a lighter, airier pancake while maintaining the same spice profile.
- Make batter thinner or thicker If the batter seems too thick after mixing, add a splash more non dairy milk; if too thin, let it rest so the chickpea flour can absorb moisture before cooking.
- Cook in batches Keep the finished pancakes on a cooling rack in a low oven if making large quantities to preserve texture without drying them out.