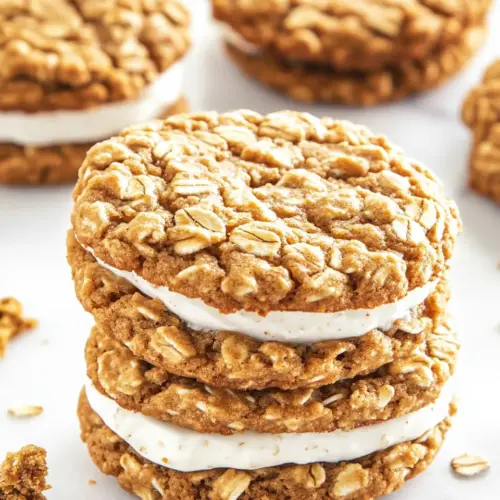
Gingerbread Oatmeal Sandwich Cookies
Gingerbread Oatmeal Sandwich Cookies are chewy, spiced cookies layered with a fluffy vanilla buttercream, offering warm molasses notes and a delightful oat chew. This easy festive cookie yields a crisp appearance with a tender interior and a show stopping filling, perfect for holiday gatherings and gifting, making it a must bake for anyone craving classic seasonal flavors.
Equipment
- Stand mixer
- Paddle attachment
- Mixing Bowl
- Whisk
- Spring loaded scoop
- Baking Sheets
- Parchment Paper
- Wire racks
- Pastry bag
- 1/4-inch French star piping tip (Ateco #862)
Ingredients
- 1/2 cup (113 grams) unsalted butter, softened Creamed to provide a rich, tender base and help incorporate air for lightness in the cookie dough.
- 1 cup (220 grams) firmly packed dark brown sugar Packed to add deep, caramel-like sweetness and moisture that contributes to chewiness and flavor depth.
- 1 large egg (50 grams) Beaten to bind ingredients and add structure while contributing moisture and a tender crumb.
- 1/4 cup (85 grams) unsulphured molasses Stirred in to supply characteristic molasses flavor, dark color, and a touch of chewiness to the cookies.
- 1 teaspoon (4 grams) vanilla extract Added to enhance and round out the warm flavors with a sweet, aromatic vanilla note.
- 1 1/2 cups (188 grams) all-purpose flour Whisked in to create structure and bulk while providing the necessary gluten to hold the cookies together.
- 1 cup (80 grams) old-fashioned oats Folded into the dough to contribute hearty texture, chewiness, and oat-forward flavor.
- 1 3/4 teaspoons (3.5 grams) ground ginger Sprinkled in to deliver warm, pungent heat and the signature gingerbread spice profile.
- 1 1/2 teaspoons (4.5 grams) kosher salt Measured to balance flavors and control sweetness while enhancing overall taste perception.
- 3/4 teaspoon (1.5 grams) ground cinnamon Blended to offer warm, sweet-spicy complexity and complement the ginger and molasses in the dough.
- 1/2 teaspoon (2.5 grams) baking soda Activated to react with acidic components, helping the cookies spread and develop a tender lift.
- 1/4 teaspoon ground nutmeg Ground and added sparingly to contribute nutty, warm undertones without overpowering the spice blend.
- 1 cup (227 grams) unsalted butter, softened Creamed to create a stable, rich frosting base that provides structure and a creamy mouthfeel.
- 1 teaspoon (6 grams) vanilla bean paste Stirred into the frosting for an intense, smooth vanilla flavor and tiny flecks that elevate appearance.
- 1/2 teaspoon (1.5 grams) kosher salt Measured to season the frosting, balancing sweetness and enhancing the overall flavor profile.
- 3 cups (360 grams) confectioners’ sugar Sifted and whipped into the butter to form a smooth, sweet, and pipeable filling with stable volume.
Instructions
- For cookies: In the bowl of a stand mixer fitted with the paddle attachment, beat butter and brown sugar at medium speed until fluffy, 2 to 3 minutes, stopping to scrape sides of bowl. Add egg, beating until well combined. Beat in molasses and vanilla extract until combined.: In the bowl of a stand mixer fitted with the paddle attachment, beat butter and brown sugar at medium speed until fluffy, 2 to 3 minutes, stopping to scrape sides of bowl. : The minute your mixer starts, listen for a soft whir and watch the butter and dark brown sugar collapse into a glossy, aerated mixture that should look lighter in color and pillowy to the touch. This creaming traps tiny air pockets that contribute to a tender, slightly risen cookie, so patience here matters. If you rush or use very cold butter you will see coarse granules of sugar rather than a smooth cream, which often leads to uneven texture in the finished cookie. A common mistake is overbeating past the 3 minute mark, which can warm the butter too much and cause excess spread in the oven. Stop to scrape the bowl once or twice so everything is evenly combined and there are no streaks of uncreamed butter.
- In medium bowl, whisk together flour, oats, ginger, salt, cinnamon, baking soda, and nutmeg until combined. With mixer on low speed, gradually add flour mixture to butter mixture, beating until combined. Cover and refrigerate for 1 hour.: At the moment the egg goes in you should lower the mixer speed so it incorporates without splashing. Visually, the mixture should tighten and become glossy as the egg emulsifies the fat and sugar, creating a smooth batter. The egg helps bind and adds moisture for chew, so if you notice separation or curdling, scrape and pause briefly; a short burst of mixing will bring it back. A common error is adding cold egg to very cold butter, which can seize the mix, so use room temperature ingredients whenever possible.
- Preheat oven to 350°F (180°C). Line baking sheets with parchment paper.: Once the unsulphured molasses joins the bowl, the mixture will deepen in color and smell distinctly of caramel and spice. Stirring at medium speed, you want a uniform, glossy consistency where the molasses is fully dispersed. The aroma will shift from buttery sweet to warmly spiced, which is your sensory cue that things are progressing. If you pour too quickly the mixture can become sticky and hard to integrate, so add the molasses slowly. A typical pitfall is using too dark or overly robust molasses that can dominate the spice; the unsulphured variety keeps the balance.
- Using a 1 1/2-tablespoon spring-loaded scoop, scoop dough (about 30 grams each), and place 3 inches apart on prepared pans.: As you whisk, take a moment to inhale the blend of ground ginger and ground cinnamon , which should smell warm and aromatic without a single overpowering note. This dry mix ensures even distribution of leavening and spice, so the cookies bake evenly. Visually the mixture will look cohesive with small flecks from oats and spices. Overmixing here is not a concern for the dry ingredients alone, but make sure you remove any lumps in the flour; lumps can create dense pockets in the cookie.
- Bake until cookies flatten and tops look dry, 10 to 12 minutes. (Do not overbake.) Let cool on pans for 5 minutes. Remove from pans, and let cool completely on wire racks.: As the dry mix trickles into the wet, the dough will thicken and become sable in texture, with hearty bits of old-fashioned oats visible throughout. This is the point where the dough firms and becomes scoopable, and chilling for 1 hour lets the fats solidify so the cookies maintain shape while baking. The chill also deepens flavor as the spices meld. A common mistake is skipping the chill, which often results in excessive spread and flatter cookies; patience here is rewarded with tidy, chewy rounds.
- For filling: In the bowl of a stand mixer fitted with the paddle attachment, beat butter, vanilla bean paste, and salt at medium speed until combined. Reduce mixer speed to low; gradually add confectioners’ sugar, beating until smooth and well combined, stopping to scrape bottom and sides of bowl. Increase mixer speed to medium-high, and beat until fluffy, 1 to 2 minutes.: When the oven begins to hum, you want an even, reliable heat so cookies bake uniformly. The surface of the oven should be stable and the racks centered for even air circulation. Lining pans with parchment prevents sticking and promotes even browning on the underside. A rookie misstep is using unlined pans or placing sheets too close together, which can create hot spots and uneven bake; give each sheet space for heat to move.
- Transfer filling to a pastry bag fitted with a 1/4-inch French star piping tip (Ateco #862). Pipe about 2 tablespoons (30 grams) filling onto flat side of half of cookies. Place remaining cookies, flat side down, on filling. Store in an airtight container for up to 3 days.: As you portion dough, notice the heft and slightly tacky surface; the scoops should release cleanly from the spring-loaded scoop. Spacing the mounds about 3 inches apart allows them to expand without merging. If your scoops are inconsistent, cookies will bake unevenly, so take a moment to level each dollop before baking. A typical issue is crowding the pan to save time, which yields merged cookies and irregular edges.
- Bake until cookies flatten and tops look dry, 10 to 12 minutes. (Do not overbake.) Let cool on pans for 5 minutes. Remove from pans, and let cool completely on wire racks.: During baking you will notice the cookies spread and the tops transition from glossy to matte; that change signals doneness. The edges may set first and take on a slight golden hue while the centers remain tender. Resist the urge to leave them in until they appear deeply brown, because carryover heat will finish them on the pan. After pulling them from the oven, they continue to firm for those first 5 minutes on the sheet, which allows safe removal to wire racks where air circulates and cools them fully. Overbaking here results in dry, brittle cookies lacking chew, so watch the visual cues more than the timer.
- For filling: In the bowl of a stand mixer fitted with the paddle attachment, beat butter, vanilla bean paste, and salt at medium speed until combined. : The filling begins with unsalted butter and vanilla bean paste , which will whip into a creamy base that smells richly of vanilla. At medium speed you want a smooth, slightly aerated texture before sugar is added. The salt helps lift flavors and keeps the buttercream from tasting cloying. If the butter is too cold, it resists fluffing, while overly warm butter makes a greasy filling, so aim for soft but cool butter consistency.
- Reduce mixer speed to low; gradually add confectioners’ sugar, beating until smooth and well combined, stopping to scrape bottom and sides of bowl.: Adding the confectioners’ sugar slowly prevents clouds of sugar in the kitchen and promotes a silky, lump free filling. As the sugar integrates, the mixture will thicken and become smooth, with a sheen that indicates proper emulsification. Periodically scraping ensures there are no hidden pockets of sugar and that the filling is uniform. If you add sugar too quickly you risk a gritty texture or airborne mess, so be methodical here.
- Increase mixer speed to medium-high, and beat until fluffy, 1 to 2 minutes.: The final whipping transforms the filling into a light, fluffy cream that will hold shape when piped. You should see volume increase and a cloud like texture that still reads glossy. This aeration is what gives the sandwich a satisfying contrast to the denser cookie. Overbeating for too long can introduce air that collapses later, so stop as soon as you reach a stable, billowy texture.
- Transfer filling to a pastry bag fitted with a 1/4-inch French star piping tip (Ateco #862). Pipe about 2 tablespoons (30 grams) filling onto flat side of half of cookies.: As you transfer, the filling should glide into the bag without breaking apart, and piping with a French star tip will give pretty ridges that catch light. The recommended portion yields a generous but not overwhelming amount between cookies. The contrast of the ridged filling against the cookie edge is both attractive and practical, helping the sandwich stay put. A common error is overfilling, which causes the filling to ooze from the sides when pressed together.
- Place remaining cookies, flat side down, on filling. Store in an airtight container for up to 3 days.: Gently pressing the top cookie down should create a slight squeeze that exposes the ridged edge of the filling. The sandwiches will set as they rest, and storing them airtight keeps the cookies from drying out. I recommend a single layer or layers separated by parchment to avoid smudging the filling. Leaving them exposed to air causes the cookies to harden and lose their ideal chew within a day, so sealing is essential for maintaining texture.
Notes
- Measure flour by weight to ensure accurate structure, using the gram amounts listed for consistency.
- Soften butter properly by letting it sit at room temperature about 30 to 60 minutes, depending on your kitchen warmth.
- Slowly add confectioners’ sugar to the filling to avoid a gritty texture and to keep your mixer from straining.
- Chill the dough for the full hour to reduce spread and concentrate spice flavors.
- Use parchment-lined pans for even browning and easy cookie removal without extra fat.
- Pipe filling with a star tip for attractive edges and better bite texture in the finished sandwich.