German Chocolate Poke Cake
German Chocolate Poke Cake is a creamy chocolate lover's dream with coconut and walnut topping, moist chocolate cake pockets, and glossy ganache. This easy to slice, crowd pleasing dessert blends rich textures and bold chocolate aroma into an ideal make ahead treat for family gatherings or an easy weeknight celebration. Make it for its showstopping flavors and reliable results.
Equipment
- 9×13-inch Cake Pan
- Stand mixer or hand mixer
- Medium Saucepan
- Food Processor
- Mixing Bowls
- Offset Spatula
Ingredients
- 1 3/4 cups all-purpose flour228g Measure and sift to ensure lightness and even texture in the cake batter; provides structure and absorbs liquids for proper crumb development.
- 2 cups sugar414g Sweeten abundantly to balance cocoa bitterness and enhance moistness; creaming with wet ingredients helps dissolve granulated sugar for even distribution.
- 1 cup unsweetened cocoa powder Add deep chocolate flavor and color while contributing to dry structure; whisk thoroughly with dry ingredients to prevent lumps and ensure uniform cocoa intensity.
- 2 teaspoons baking powder Leaven gently and help the cake rise by releasing carbon dioxide when heated; combine with other dry ingredients for consistent aeration and lift.
- 1 teaspoon salt Season subtly to enhance overall flavor balance and strengthen gluten slightly; distribute evenly through the dry mix to avoid concentrated salty spots.
- 1 cup whole milk Pour warm dairy richness to hydrate dry ingredients and add tenderness; whole milk contributes fat and proteins that improve mouthfeel and crumb.
- 1/2 cup vegetable oil120ml Incorporate fat for moistness and tenderness while shortening gluten strands; vegetable oil yields a tender, moist cake that stays soft after baking.
- 2 teaspoons vanilla extract Infuse aromatic depth and enhance sweetness perception; stir into the batter with wet ingredients to distribute flavor uniformly.
- 2 large eggs room temperature Bind ingredients and provide structure while contributing richness and leavening when beaten; room-temperature eggs incorporate more evenly into the batter.
- 1 cup hot water240ml Add moisture and bloom cocoa for richer flavor and smoother batter; hot water helps dissolve cocoa and activate flavor compounds.
- 14 oz sweetened condensed milk Sweeten and moisten the poke cake after baking while creating a dense, caramel-like layer; pour over cake to soak into holes made for flavor infusion.
- 1 1/2 cups semi-sweet chocolate chips Contribute a melted chocolate layer and add richness and chocolate intensity; stir into warm mixtures to achieve a glossy, cohesive filling.
- 14 oz sweetened condensed milk Create an additional sweetened, creamy layer that soaks into the cake for extra moisture and sweetness; can be poured or spread for indulgent texture.
- 1 cup heavy cream Provide richness and stabilized creaminess for ganache or fillings; heavy cream aids in creating smooth chocolate mixtures and adds mouthfeel.
- 4 large egg yolks Thicken custard-like filling and increase richness while adding a silky texture; egg yolks emulsify with dairy for a luxurious custard component.
- 1 cup packed light-brown sugar200grams Caramelize and sweeten with deep molasses notes when cooked into mixtures; packed brown sugar adds moisture and complex flavor to fillings.
- 1 stick 115grams unsalted butter, diced into pieces Melt into custards or sauces to provide creamy richness and a tender mouthfeel; diced unsalted butter allows precise melting and incorporation.
- 1 teaspoon vanilla extract Enhance and round out flavors with warm, aromatic notes; add to cooked mixtures or creams near the end to preserve its fragrant quality.
- 3 cups sweetened shredded coconut flakes Add chewy texture and tropical sweetness while contributing to the classic German chocolate topping; distribute evenly so every bite has coconut presence.
- 1 1/2 cup walnuts ground Introduce nuttiness and slight crunch while grounding the topping with toasted flavor; finely ground walnuts mix easily into caramelized coconut.
- 1 cup heavy whipping cream Whip into a stabilized topping or use as part of chocolate ganache to add volume and creamy richness; heavy whipping cream aerates when whipped for light texture.
- 8 ounces semi-sweet chocolate chopped Provide concentrated chocolate flavor and texture when melted into ganache or sauces; chopped semi-sweet chocolate melts smoothly for glossy finishes.
- 1 tablespoon light corn syrup Improve shine and prevent crystallization in chocolate sauces or glazes; light corn syrup lends elasticity and smoothness to chocolate mixtures.
- Chocolate Whipped Cream Topping: Label or note a section that specifies the following component is a topping element for assembly; indicates that subsequent ingredients complete the dessert presentation.
- 3 cups heavy whipping cream cold Whip cold to a stable, airy chocolate topping that crowns the cake and adds lightness; heavy cream whipped cold holds peaks and contrasts dense cake layers.
- 1/2 cup powdered sugar Sweeten the whipped topping and help stabilize while cutting bitterness from cocoa; powdered sugar dissolves quickly for a smooth whipped cream.
- 2/3 cup unsweetened cocoa powder Provide dry chocolate intensity to the whipped topping and dusting; unsweetened cocoa deepens chocolate flavor without adding sweetness.
- 1 teaspoon vanilla extract Give aromatic warmth and roundness to whipped cream or fillings; vanilla extract enhances perceived sweetness and harmonizes flavors.
- Cocoa powder Finish with a subtle cocoa dusting for decoration and a hint of bitterness; cocoa powder used as a garnish sharpens contrasts.
- Chocolate sauce store bought Drizzle for additional sweetness and sheen when serving, offering convenient chocolate flavor enhancement; store-bought sauce simplifies finishing and presentation.
Instructions
- Preheat oven to 350°F. Place the oven rack in the middle of the oven.: Warmth circulating evenly sets the stage, you should feel the oven preheat hum and the interior come to a steady heat. Proper rack placement ensures balanced baking so the cake does not dome or slump. A common mistake is opening the door frequently which causes temperature dips, so resist peeking until the later part of the bake.
- Spray a 9×13 inch cake pan with non-stick baking spray and set aside.: Coating the pan eliminates sticking and helps you lift the cake cleanly once chilled. Take a moment to spray corners and edges thoroughly so the cake releases without tearing. If you skip this step the cake may cling to the pan and break when removed, so be thorough.
- Add the flour, sugar, cocoa, baking powder, and salt to a large bowl and whisk until combined, or add to the bowl of a stand mixer and whisk on low.: As you whisk dry ingredients together you will notice the mixture lighten and even out in color, indicating homogeneity. Properly combined dry ingredients prevent streaks of cocoa or pockets of leavening. A typical error is not sifting denser cocoas which can leave lumps in the batter, so whisk well.
- In another medium bowl, combine milk, vegetable oil, vanilla extract, and eggs and whisk until thoroughly combined.: The wet mixture should look smooth and slightly glossy, with the eggs fully emulsified into the oil and milk. This creates stability and even distribution of fat for a tender crumb. If the eggs are too cold they can cause the mixture to seize or appear curdled, so bring them to room temperature first.
- Add the wet and dry ingredients and beat until well combined.: When combined the batter will appear smooth and uniform, and you should not see streaks of flour. The mixing binds the structure while preserving tenderness. Overmixing can develop gluten and make the cake dense, so stop as soon as the ingredients are incorporated.
- Slowly add the hot water to the batter and mix on low speed until well combined. Stop and scrape down the sides and bottom of the bowl with a spatula.: The hot water will thin the batter and bloom the cocoa, releasing deep chocolate aromas that fill the kitchen. This creates a velvety batter that yields a moist crumb. If you add the water too quickly it can splash and create uneven texture, so pour gradually and scrape to ensure even blending.
- Pour batter into the prepared pan and bake for 30-32 minutes, or until a toothpick comes out with a few moist crumbs. I baked mine for exactly 30 minutes.: As it bakes you will notice the edges pulling slightly from the pan and a gentle doming. The top will set and the center should still yield a few moist crumbs on a toothpick. Avoid assuming time equals doneness, use the toothpick test to prevent over baking which dries the cake.
- Remove the cake from the oven. If you don't have anything on hand, poke holes all over the cake using the end of a spatula or a large straw. Even a pen will work.: Poking creates channels for the chocolate sauce to sink in, so press firmly but not so deep that you touch the pan bottom. The tactile feedback of the cake should be springy yet set. A common slip is poking before the cake cools a touch, which can tear the crumb, so let it rest briefly.
- In a medium, microwave-safe bowl, combine chocolate chips and sweetened condensed milk. Heat in the microwave until hot for approximately 1 minute. If needed, stir and heat for 30 seconds or more. Whisk until fully combined, smooth, and shiny.: When the chips melt into the condensed milk you will see a glossy, viscous sauce that smells intensely of chocolate. The heat helps the sugars incorporate into a shiny emulsion. Overheating can cause the chocolate to seize, so stir between short heating intervals.
- Pour the chocolate mixture all over the cake and spread it into the holes.: As you pour the sauce it will pool into each poke and the surface will darken with a wet gloss. Use the back of a spoon to nudge the sauce into any remaining dry spots so each bite is infused. If the sauce is too cool it won’t sink easily, so work while the sauce is warm for best absorption.
- Use a food processor to ground the walnuts finely or, if you don't have one, finely chop them: place walnuts and coconut flakes in a large bowl. Set aside.: Grinding the walnuts releases oil and aroma, complementing the sweet coconut. The coconut and walnut mixture will have a sandy texture ready to receive the custard. Over processing can turn nuts into paste, losing pleasant crunch, so pulse to a coarse meal.
- Combine heavy cream, egg yolks, brown sugar, and butter in a medium saucepan. Cook over medium heat, stirring constantly, until the mixture comes to a light boil and thickens, about 10 – 15 minutes.: This step transforms the ingredients into a glossy, thick custard; you will smell caramel notes from the brown sugar and see the mixture coat the spoon. Constant stirring prevents hot spots that can curdle the yolks. A frequent pitfall is rushing the heat which yields scrambled yolks, so maintain medium heat and patience.
- Remove from heat and strain the mixture through a fine mesh strainer into the bowl with the coconut and ground walnuts. Stir in the vanilla extract and condensed milk, mixing until well combined.: Straining yields a silky custard free of bits, ensuring a smooth spreadable topping. Stirring the custard into the coconut and walnuts creates a cohesive, slightly sticky mixture that will adhere to the cake. If you skip straining you may have tiny coagulated bits that affect texture, so do not skip this refinement.
- Spread the mixture evenly on top of the cake.: The custard should feel warm and pliable, and as you spread you'll notice it cling to the poke filled cake, forming an even layer that holds the coconut and walnut texture in place. Use an offset spatula for smoothness. Rushing this step while the custard is too hot can make it run off the sides, so allow it to cool a touch if needed.
- Heat whipping cream in the microwave for 60-90 seconds until hot and almost boiling.: The hot cream will release steam and a faint sweet cream aroma, which primes it to melt chopped chocolate for a satin ganache. Aim for simmering warmth rather than a rolling boil to avoid scalding. Boiling cream can alter texture and create separation in the chocolate mixture.
- Place chopped chocolate and corn syrup in a bowl and pour hot whipping cream on top. Let it sit for one to two minutes, and then stir until smooth and shiny. If needed, heat for 30 more seconds.: After the short rest the chocolate will soften and begin to melt, and stirring will produce a glossy, pourable ganache that smells deeply of cocoa. Corn syrup smooths the sheen and texture. If lumps remain, heat gently rather than aggressive stirring to avoid seizing.
- Add the heavy whipping cream, powdered sugar, cocoa, and vanilla extract to a large mixer bowl. Whip on high speed until stiff peaks form and the whipped cream holds its shape.: The whipped topping should become billowy and stable with defined peaks that do not collapse when the beaters are lifted. Powdered sugar dissolves quickly, and cocoa adds chocolate depth. Over whipping will turn whipped cream grainy or buttery, so stop at stiff peaks.
- Make sure the cake has completely cooled.: Cooling lets the poke fillings set and prevents the whipped cream and ganache from melting into the cake. The cake should feel cool to the touch in the center; this may take an hour at room temperature or more if the kitchen is warm. Decorating too soon will cause runny toppings, so wait for full cooling.
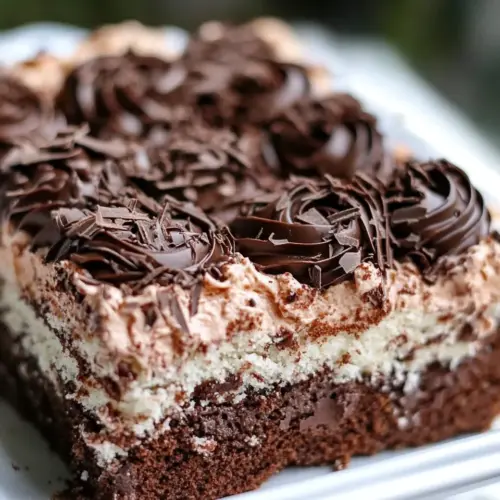
- Add the Chocolate Whipped Cream to a piping bag fitted with the star tip, pipe four domes in lines, or spread the whipped cream on the cooled cake. If you choose to spread the whipped cream, you will need two cups of heavy whipping cream instead of 3.: Piping creates an elegant finish with defined domes that hold texture. Spreading yields a more rustic, generous look. A common misstep is under chilling the cream or bowl, which leads to soft peaks and poor piping definition, so ensure cold equipment and cream.
- Finish the cake with cocoa powder and chocolate sauce.: Dusting cocoa powder adds a dry hint of chocolate and visually anchors the whipped domes while the sauce provides glossy drips that catch the light. Use a light hand to avoid overpowering the cream. Heavy application of sauce can make the surface soggy, so drizzle sparingly.
- Refrigerate the cake for at least 6-8 hours before serving.: Chilling allows the flavors to meld and the layers to set into a sliceable, unified dessert. The fridge hum is your ally here; overnight is even better. Serving too soon results in a runny texture and toppings that will not hold, so be patient for best results.
- Enjoy!: Take pleasure in the interplay of textures and the rich coconut chocolate notes. Slice with a sharp knife and serve chilled. A common oversight is using a dull knife which tears the slices instead of cutting cleanly, so warm and sharpen your blade for neat portions.
Notes
- Measure flour accurately Use the spoon and level method to avoid packing flour which can make the cake dense; spoon flour into the cup and level with a knife for consistent results.
- Bloom the cocoa Mixing hot water into the batter intensifies chocolate flavor; pour slowly and blend to get a richer, deeper profile.
- Pulse nuts for texture Pulse walnuts to a coarse meal so you retain small crunchy bits that contrast the creamy topping.
- Temper yolks carefully While making the custard, add a small amount of hot cream to the yolks first to prevent them from scrambling, then return to the saucepan gently.
- Warm ganache before pouring The ganache should be glossy and pourable when added to the cake; if it cools, reheat gently in short increments to regain sheen.
- Chill fully before slicing Refrigerate the assembled cake for at least 6 to 8 hours so slices hold and flavors meld, yielding cleaner portions.