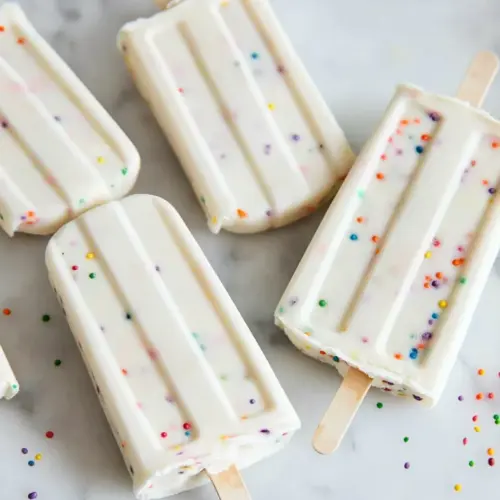
Funfetti Cake Batter Popsicles
Funfetti Cake Batter Popsicles are creamy, colorful, and endlessly fun, bringing cake batter flavor to a frozen pop. The texture is silky thanks to heavy cream and milk powder, while sprinkles add whimsical little bites. Perfect for summer gatherings or an easy weeknight treat, these popsicles are simple to make and irresistible to share.
Equipment
- Stand mixer or hand mixer
- Popsicle Molds
Ingredients
- 1 cup heavy cream Whip to add richness and a creamy mouthfeel that forms the base of the popsicle, contributing fat that helps prevent ice crystals and delivers a silky texture when frozen. Chill thoroughly before blending with other ingredients to help the mixture set smoothly and hold air for a light, indulgent bite.
- 1/2 cup plus 2 tablespoons powdered/confectioners' sugar Sweeten and slightly thicken while dissolving easily into the liquid base to provide consistent sweetness and a smooth texture in the frozen popsicles. Sift or whisk well to avoid lumps and ensure even distribution of sweetness throughout the mixture.
- 3 tablespoons milk powder Stabilize and increase creaminess by adding concentrated dairy solids that improve body without extra liquid, helping the popsicle maintain a soft, scoopable texture straight from the freezer. Blend fully so the powder hydrates completely and integrates with the milk and cream for a uniform consistency.
- 1/2 teaspoon pure vanilla extract Flavor and enhance the overall profile by imparting warm, familiar notes that complement the sweet dairy base and sprinkles, rounding out the taste without overpowering it. Add sparingly and taste, as a little goes a long way in preserving the delicate balance of flavors.
- 1 1/4 cups whole milk Dilute and balance the richness while providing the liquid foundation needed to achieve a scoopable frozen treat; whole milk contributes additional fat and lactose for flavor and texture. Use at proper temperature to help dissolve powdered ingredients and allow smooth blending with cream and milk powder.
- 1/4 cup sprinkles Decorate and add bursts of color and occasional crunchy texture, creating the signature funfetti appearance and small textural contrasts throughout the popsicle. Fold in gently at the end to prevent bleeding of colors and maintain visible specks of sprinkle for visual appeal.
Instructions
- In the bowl of a stand-up mixer, add the heavy cream and powdered sugar. Alternatively, you could pour the heavy cream and powdered sugar into a large bowl and use an electric hand-mixer. Whip until light and fluffy, about 2 minutes. Next, add the milk powder and vanilla extract; beat once more until medium peaks, an additional minute.: When you begin, listen for the whisk as it moves through the heavy cream , a soft whisper that changes as air folds in. The mixture will start glossy, then become thicker and brighter in color; that visual shift signals incorporation of air. The aroma at this stage is a sweet dairy scent, clean and inviting. If you use a hand mixer, the rhythm will be different but the end point the same. Why this matters, the whipped texture traps air so the final popsicle feels light not dense. One common mistake is under whipping, which leaves the base too loose, or over whipping to firm peaks that will break the silkiness when you add milk. Stop when the cream holds medium peaks and still looks glossy.
- Pour in the whole milk and mix until thoroughly combined. At first it’ll seem like it won’t want to merry with the whipped cream but continue stirring or beating until combined.: At this point you should notice the texture change from liquid to pillowy, with soft peaks that bend gently. The sound becomes slightly higher pitched as the mixer aerates the cream. I like to tilt the bowl to see if the cream clings and then falls slowly; that slow fall indicates the right stage. If you overshoot and it becomes grainy, the fat has separated, which will make the mouthfeel unpleasant. To avoid that, whip in short bursts and check frequently.
- Fill up your popsicle molds about 1/4 of the way; add a few pinches of sprinkles to each mold. Fill up the molds about 1/2 way; again, add a few pinches of sprinkles to each mold. Repeat this process until all of the molds are full and layered with sprinkles. Insert popsicles into the center of each of the molds. Transfer to the freezer until frozen solid, at least 6 hours, ideally overnight. Run the molds under hot running water for a few seconds; remove the popsicles from their molds and enjoy.: Adding milk powder and vanilla extract introduces both texture and aroma, the powder lending a silkiness while the vanilla perfumes the base with warm, familiar notes. Beat briefly to incorporate, watching as the mixture smooths again. The reason this step is important is the milk powder increases solids which helps the mixture resist big ice crystals. One mistake people make is adding the milk powder too quickly so it clumps, so I stir it in gently at first then beat to finish.
- Pour in the whole milk and mix until thoroughly combined: As you add the whole milk the mixture loosens, and you may worry it will separate, but persistent mixing brings everything together into a homogeneous base. Visually you will see the whipped peaks mellow into a thick, silk cream. The smell becomes more rounded, with milky sweetness rising. This step matters because it balances richness and freeze firmness. A common pitfall is stopping too early, leaving streaks of heavier cream that will create uneven texture in the frozen pops, so continue until smooth.
- At first it’ll seem like it won’t want to merry with the whipped cream but continue stirring or beating until combined: This is the calming moment where patience pays off, keep mixing with steady strokes and you will feel the resistance ease as the whole milk integrates. The texture should finish as a thick pourable batter, not runny, and you may notice tiny air bubbles that give a lightness once frozen. The why is simple, full emulsification prevents pockets of fat or icy lumps. Avoid overmixing which can deflate too much air and make the final popsicle dense.
- Fill up your popsicle molds about 1/4 of the way; add a few pinches of sprinkles to each mold: When you pour the first layer, the base will glisten and settle smoothly, and the small cavity of the mold will make the sprinkles rest on top, creating a pretty ring of color. The contrast between the creamy white base and the bright flecks is very satisfying. Layering sprinkles lets you space out pockets of color rather than having them sink to the bottom. A common error is overfilling the first layer which leaves no room for the subsequent layers, so measure visually to keep the pattern.
- Fill up the molds about 1/2 way; again, add a few pinches of sprinkles to each mold: As you continue, the weight of the new layer may push the sprinkles deeper, creating marbled effects. The temperature of the mix may feel slightly cooler from contact with the mold, and that is fine. Why layer, it distributes the speckles so every bite has a playful surprise. One thing to watch for is tapping the mold too forcefully which can cause the sprinkles to clump; instead gently shake to even them out.
- Repeat this process until all of the molds are full and layered with sprinkles: Building layers creates a ribboned appearance of color and ensures sprinkles appear throughout the popsicle rather than concentrating in one spot. Visually, the molds will look like tiny confetti towers, which is part of the fun. This step matters because it creates visual interest and varied texture. Avoid pouring too quickly, which can trap air pockets; pour slowly and steady for a smooth finish.
- Insert popsicles into the center of each of the molds: Pushing the sticks into the still liquid center helps them set straight and centered as they freeze. You may feel slight resistance when the stick contacts colder parts of the mold, that is normal. This positioning is important so the pops come out evenly and are comfortable to hold. A common mistake is inserting sticks off center which can produce lopsided pops, so take a moment to center each stick.
- Transfer to the freezer until frozen solid, at least 6 hours, ideally overnight: As the pops freeze, the scent will become subtler and the surface will dull slightly as ice crystals form then stabilize. Freezing slowly overnight yields a smoother internal texture because it gives the dairy time to set without shock. This step is crucial for achieving the right bite, and rushing it by using a quick freeze setting can lead to ice crystals. If you need them sooner, aim for firm edges first, but know the texture improves with full freeze.
- Run the molds under hot running water for a few seconds; remove the popsicles from their molds and enjoy: Briefly running the molds under warm water loosens the frozen surface and allows the pops to slide out cleanly, releasing a brief billow of sweet, cold scent. Be careful not to use very hot water which can melt them too much, a quick warm rinse is perfect. This matters because gentle release keeps the pops intact and pretty. A common error is soaking the molds which softens the popsicle too much and causes drips and misshapen edges.
Notes
- Chill equipment Before you start, place your mixing bowl and whisk in the fridge for 15 to 20 minutes. Cold metal keeps the heavy cream colder during whipping, which helps it trap air more easily and reach the ideal medium peak without becoming grainy.
- Measure powdered sugar precisely Use a spoon to add the powdered sugar into your measuring cup instead of scooping. This prevents packing and keeps sweetness balanced so the pops are not overly sweet, while maintaining a silkier texture in the base.
- Sift milk powder if clumpy If your milk powder has lumps, sift it before adding. Clumps can stay grainy even after mixing and will affect the smoothness of the frozen pops, so breaking them up ensures an even body.
- Layer sprinkles for visual interest Add sprinkles in thin pinches between layers and avoid dumping them all at once. This yields pockets of color that show up in every bite, and prevents dense clusters that can sink and create uneven texture.
- Use sturdy popsicle molds Rigid molds support neat layering and make unmolding easier. Flexible molds can cause the layers to shift while inserting sticks, resulting in less tidy popsicles.
- Freeze overnight for best texture Although firm in six hours, leaving popsicles overnight results in a more homogenous freeze with fewer ice crystals. Plan ahead when you can for the creamiest outcome, and store them flat to avoid leaning sticks.