Funfetti Cake
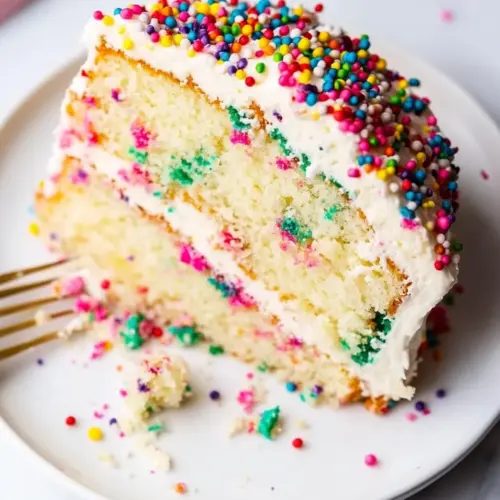
Funfetti Cake is a colorful, easy to make layer cake with a tender crumb and playful rainbow sprinkles. This moist, vanilla forward cake uses pantry staples and a simple frosting, making it perfect for easy weeknight baking or spontaneous parties. Bright, fun, and reliably delicious, it is a great pick when you want a festive dessert without fuss.
Equipment
- 8 inch springform cake pans
- Mixing Bowl
- Spatula
- Oven
- Skewer
- Knife
Ingredients
- 3 cups all purpose flour* See notes Provide structure and bulk to the cake batter, creating the crumb and absorbing liquids; sift for lighter texture and measure accurately for consistent results.
- 2 cups sugar Sweeten the cake and help tenderize the crumb by interacting with fats and liquids; creaming with oil produces moisture and supports browning during baking.
- 2 teaspoon baking soda Leaven the batter by producing carbon dioxide when combined with acidic ingredients, giving lift and a tender crumb; whisk thoroughly into dry ingredients for even rise.
- 1 teaspoons salt Season the cake and enhance other flavors while balancing sweetness; dissolve salt evenly in the dry mix to avoid localized salty pockets.
- 1 tablespoon vanilla extract Impart fragrant, warm vanilla flavor that elevates overall taste profile and complements the sweetness; add with liquids to distribute aroma evenly.
- 2 teaspoon vinegar React with baking soda to generate additional lift and a subtle tang, improving texture and rise; mix with liquids to activate fully before baking.
- 1/2 cup + 2 tablespoons oil I used vegetable oil Contribute moisture and richness while keeping the crumb tender; choose a neutral oil for subtle flavor and mix with other wet ingredients until smooth.
- 2 cups water Hydrate dry ingredients to form the batter, activate leaveners, and control consistency; use room-temperature water for easier incorporation and even mixing.
- 1/4 cups sprinkles use rainbow jimmies Provide colorful bursts and a festive appearance throughout the cake without melting if using jimmies; fold in gently to prevent color bleed and clumping.
- 2 cups vanilla frosting any frosting of choice Add creamy sweetness and moisture on top while complementing the cake’s flavor; spread or pipe after cooling for best presentation and texture.
Instructions
- Preheat the oven to 180 C/350 F. Grease two 8-inch springform cake pans and set aside.: You should feel the warmth of the kitchen as the oven climbs to 180 C/350 F , and the smell of warm air signals readiness. Greasing the pans creates a glossy sheen on the metal, and a light dusting of flour after greasing will give the cakes a smooth release. The reason this matters is that even heat and cleanly released layers make assembly far easier, and the pans reaching temperature before the batter goes in helps give the edges a gentle set. If your oven runs hot or cool, use an oven thermometer to double check, because uneven heat can bake the edges too fast while leaving the center underdone. A common mistake is skipping the greasing step, which can tear the cake when you remove it from the pans. If you hear the oven fan cycle louder than normal, give it another five minutes to stabilize before you slide the pans in.
- In a large mixing bowl, add your dry ingredients and mix well. Add the wet ingredients and mix until a thick batter remains. Fold through the sprinkles.: As you stir the combined all purpose flour , sugar , baking soda , and salt , notice the uniform pale color and faint flour scent, which tells you the dry blend is even. When the wet ingredients join the party, the batter transforms into a glossy, cohesive mass with a slow ribboning motion as the spatula lifts through it, indicating the correct hydration. Folding in the sprinkles last keeps their colors intact and prevents excessive bleeding. This technique matters because overmixing now will develop gluten, making the cake chewy rather than tender. If the batter feels grainy, you may have unevenly measured flour, so check your scooping method next time. One slip people often make is using an electric mixer at high speed during this stage, which whips too much air and can cause collapse; gentle folding is the safer path.
- Distribute the batter evenly amongst the two cake pans. Bake for 27-30 minutes, until a skewer comes out clean.: When you pour the batter into the prepared pans, you should see a smooth top that levels itself with a light tap on the counter, and the batter will slightly bounce back when nudged. Placing the pans on the center rack helps uniform oven circulation, and toward the end of the bake you will notice the edges pulling slightly from the pan and a golden top forming. The skewer test is the reliable cue, and a clean skewer means the interior crumb set properly. The purpose of even distribution is to ensure both layers finish at the same time, so weigh or eyeball as evenly as you can. A typical pitfall is checking the oven too early and opening the door repeatedly, which drops oven temperature and can lead to sinkage. If the top is browning too quickly, tent a piece of foil loosely over the cakes for the last five to ten minutes.
- Remove the cakes from the oven and let them cool completely. Once cool, remove them from the springform pans. Using a wet knife, carefully slice through the center of the cakes, leaving 4 thin layers of cakes.: The cooling stage is when the internal steam redistributes and the crumb firms up, so patience here pays off. When the cakes are room temperature, the surface will feel just slightly springy, and you will smell a warm vanilla sweetness without any raw batter notes. Releasing them from the springform should be smooth if the pans were properly greased, revealing even, golden sides. To create four thin layers, I run a sharp knife under warm water and dry it between cuts to get clean, even slices; the wet blade glides through without tearing. This matters because neat layers stack more uniformly and create an elegant profile. A common error is slicing while the cake is still warm, which can compress and crumble the layers. If you encounter tearing, chill the cakes for ten to fifteen minutes to firm them up before reattempting.
- Place one layer of cake onto a flat surface and spread with frosting. Repeat the process until you have a four layer cake. Cover the exterior of the cake with extra frosting and let the cake sit for 30 minutes before serving.: When spreading the vanilla frosting , you should feel a smooth resistance as the knife moves, and the frosting should hold gentle peaks rather than sliding off the blade. Layering creates a beautiful contrast between the tender cake and creamy frosting, and pressing lightly with the palm helps set each layer without squashing them. Crumb coating with a thin layer first traps crumbs and gives a polished final surface when you add the outer layer of frosting. Letting the cake rest for 30 minutes allows the frosting to set and the flavors to meld, making for cleaner slices. The reason to let it sit is that cold or freshly spread frosting can slip when cut, so resting prevents that. A misstep I see is overfilling each layer with too much frosting, which causes the cake to lean or slide; apply moderate amounts and adjust as needed.
Notes
- Room temperature ingredients: Bring your wet ingredients to room temperature so the batter emulsifies smoothly and the crumb bakes evenly.
- Even pans: Use matching 8 inch pans and rotate them if your oven has hot spots for uniform browning.
- Fresh leavening: Test your baking soda by adding a drop of vinegar to a pinch; it should fizz actively if fresh.
- Sprinkle choice: Choose jimmies rather than nonpareils to minimize color bleed inside the batter for brighter flecks.
- Skewer test: Insert a skewer near the center to check doneness, a few crumbs are fine but raw batter is not.
- Storage: Store the cake covered in the refrigerator and let it sit 30 minutes at room temperature before serving for best flavor.