Fruit and Yogurt Parfaits with Easy Granola
Fruit and Yogurt Parfaits with Easy Granola is a creamy, crunchy breakfast that comes together quickly. Bright fruit layers and lightly toasted granola meet smooth yogurt for an easy, feel good meal that is perfect for mornings or a light dessert. It is adaptable, simple to scale, and makes a great easy weeknight breakfast or make ahead snack.
Equipment
- Baking Sheet
- Silpat or cooking spray
- Microwave-safe Bowl
- Spatula
Ingredients
- 2 tablespoons unsalted butter, melted Melted and softens easily to coat and crisp the granola mixture, adding richness and a golden finish when baked or toasted for parfait layers.
- 1 Thomas’ Light Multi-Grain English Muffin, halved and diced small Halved and diced small to provide a chewy, bread-like crunch that mimics crouton texture in the granola, offering extra substance and fiber to each parfait layer.
- 3 tablespoons old-fashioned whole-rolled oats, not quick-cook or instant Rolled and hearty oats contribute substantial chew and whole-grain body to the granola, absorbing flavor and browning pleasantly for a nutty base.
- 2 tablespoons granulated sugar Sweetens and caramelizes during toasting to create a crunchy, slightly crisp texture, balancing tart yogurt and fresh fruit with gentle sweetness.
- 1 teaspoon cinnamon Warm and aromatic spice that brings depth and warmth to the granola, enhancing both the oat and fruit flavors while harmonizing sweet elements.
- 4 to 8 ounces yogurt, low or nonfat okay, use your favorite flavor and type Creamy and tangy or mild depending on choice, providing a cooling, protein-rich layer that contrasts with crunchy granola and bright fruit flavors.
- 1 to 2 cups diced fruit, I used 1/2 banana and about 10 strawberries, halved Fresh and juicy pieces supply natural sweetness, texture contrast, and bright flavor notes that complement yogurt and granola while adding freshness and color.
Instructions
- Preheat oven to 375 F and line a baking sheet with a Silpat or spray with cooking spray; set aside.: As the oven warms you will smell the faint, dry scent of heated air which signals the right environment for toasting, giving you a window to prep other items. Proper preheating ensures the granola begins to brown immediately rather than steaming, producing crisp, well toasted pieces rather than chewy, underdone bits. Spread the oven heat evenly by placing the rack in the center so hot air circulates around the baking sheet, and avoid opening the oven door repeatedly since that drops the temperature and can lead to uneven browning. A common mistake is not preheating long enough, which makes the granola take longer and brown inconsistently; wait until the oven registers the full 375 F before placing the tray inside. The visual cue to look for later is a light, golden color appearing across the top surface, not just in pockets.
- To a medium microwave-safe bowl, add the butter and heat on high power to melt, about 1 minute.: You will hear a faint pop as the butter liquefies, and steam will rise briefly, releasing the buttery aroma that hints at the toasted flavor to come. Melting in a microwave bowl allows quick, even melting without risking a stovetop burn, and stirring briefly after heating ensures there are no unmelted pockets that would leave dry spots in the granola mix. If your butter splatters, cover the bowl loosely to avoid mess, and be careful when removing the hot bowl so you do not burn fingers. A frequent oversight is overheating so the butter separates, which can lead to greasy clumps, so heat just until melted and stir to homogenize.
- Add the English muffin, oats, sugar, cinnamon, and toss to combine and coat evenly.: When you toss the diced English muffin , oats , sugar , and cinnamon into the melted butter, the mixture should glisten slightly as each piece becomes evenly coated, signaling that the binding is adequate for cluster formation during baking. Use a spatula to fold and toss so each fragment picks up a sheen of butter and a dusting of spice, which will caramelize and brown in the oven. If pieces stick together in large clumps, gently separate them so heat can reach all surfaces; conversely, if pieces remain dry, the granola will not form satisfying clusters. The goal is even coverage without sogginess, and you can test by squeezing a small handful to ensure it sticks together lightly before baking.
- Turn mixture out onto prepared baking sheet in flat, even layer. Mixture will only take up about one-third to half the baking sheet, not the entire sheet.: Laying the granola in a relatively compact, even layer concentrates heat so the clusters form and brown consistently, rather than spread thin and crisp completely. You will see the mixture sitting in a clear patch of the sheet, with exposed space around it to allow hot air circulation. Pressing lightly with a spatula can encourage small clusters to adhere while still allowing airflow; too heavy a press will fuse everything into a single slab that is harder to break gently after baking. Watch for uneven thickness because thin edges will brown faster and can burn before the center is ready.
- Bake for about 13 to 15 minutes, or until as lightly golden browned and lightly toasted as desired. Granola will firm up as it cools.: During baking you will notice the kitchen filling with a warm, toasty aroma, and the surface color shifting from pale to honey gold. Listen for subtle changes in scent, that toasty note tells you sugars are caramelizing and the oats are toasting, which is essential for that classic granola flavor. Rotate the sheet halfway if your oven has hot spots, and check at the 13 minute mark so you can catch the moment before it moves from golden to overly dark. Letting it cool undisturbed is important because the granola firms as it loses heat; attempting to break it while hot often results in crumbly pieces rather than crisp clusters.
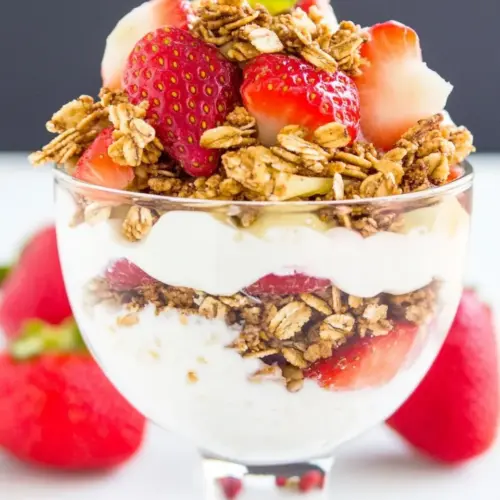
- While granola bakes, add yogurt to serving bowl, top with fruit, and then sprinkle with granola. Breakfast bowl should be made and served fresh. Extra granola will keep airtight for up to 3 days.: The contrast of cool, creamy yogurt and freshly toasted granola is immediate, and the fresh fruit adds both visual pop and a juicy textural element that brightens each bite. Assemble with intention so the fruit sits between layers of yogurt and granola to keep textures distinct; spoon the granola on top right before serving to maintain crunch. If you prepare everything too early, the granola will soften from the moisture of the yogurt and lose its character, so time assembly close to serving. Store leftover granola in an airtight container at room temperature to preserve its crispness, and avoid refrigerating it, as humidity will soften the clusters.
Notes
- Make it ahead: Prepare a double batch of granola and store it airtight so you can assemble parfaits quickly over several mornings without extra work.
- Flavor boost: Stir a pinch of cinnamon into the yogurt or pick a fruit flavored yogurt to introduce another layer of flavor without changing the granola.
- Texture control: If you like bigger clusters, gently press the granola mixture into a tighter layer before baking, then cool and break into larger pieces.
- Fruit swaps: Use seasonal fruit to vary sweetness and acidity, like stone fruit in summer or apples in cooler months, keeping the parfait lively.
- Sweetness tweak: Reduce the granulated sugar if your yogurt or chosen fruit is already sweet to maintain balance and avoid cloying bites.
- Presentation idea: Layer parfaits in clear glasses to showcase the colorful strata, it elevates the simplest ingredients into something shareable.