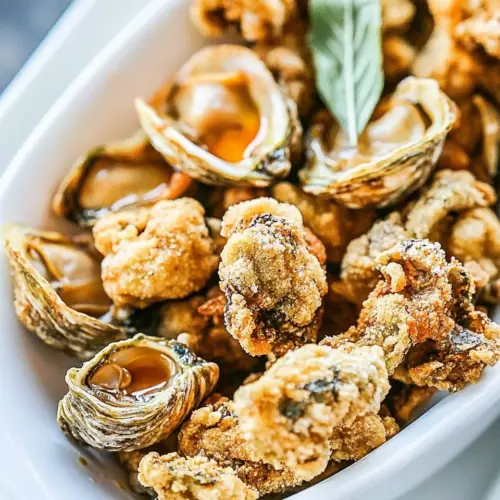
Fried Oysters and Littleneck Clams
Fried Oysters and Littleneck Clams delivers a crispy golden crust with briny, tender interiors, perfect for an easy weeknight dinner or a relaxed gathering. This indulgent recipe uses simple ingredients and quick frying for maximum texture and seaside flavor, making it ideal for sharing. Try it for a memorable fall meal that feels special without hours of work.
Equipment
- Large Pot
- Dutch Oven
- Fryer
- Thermometer
- Slotted Spoon
- Spider
Ingredients
- 2 quarts canola, grapeseed, or other high-heat cooking oil for frying Heated to high temperatures and used as the cooking medium for deep-frying the clams, oysters, and sage; choose a neutral, high-smoke-point oil like canola or grapeseed to achieve a crisp exterior without imparting off-flavors. Maintain a steady temperature to prevent greasiness and to ensure even browning, and use enough oil to fully submerge the seafood for consistent results.
- 1/2 cup Wondra flour or all-purpose flour Lightly coats and helps bind the breading to the seafood; use Wondra for a finer, lighter crust or all-purpose flour for a slightly heartier coating. Sift or shake off excess before frying to avoid clumping and to promote an even, golden finish.
- 1 dozen raw littleneck clams cleaned and shucked Shucked and prepared to provide a tender, briny component that crisps quickly when fried; clean thoroughly to remove grit and any shell fragments before dredging. Pat dry to reduce splatter during frying and season lightly to enhance the natural sweetness of the clam meat.
- 1 dozen raw oysters cleaned and shucked Shucked and readied to add delicate, oceanic flavor and a soft interior that contrasts with a crisp fried crust; ensure oysters are drained and patted dry to prevent oil splatter and uneven frying. Fry briefly at the correct oil temperature to keep them plump and tender while achieving a golden exterior.
- Sea salt to taste Sprinkled sparingly to enhance and balance the seafood’s natural flavors; use sea salt to season the flour or to finish the fried pieces to taste. Adjust seasoning incrementally after frying to avoid over-salting delicate shellfish.
- Fresh sage leaves quick-fried, for garnish Quick-fried until crisp to create an aromatic, herbaceous garnish that provides texture and a pop of color; use fresh sage leaves and fry briefly in hot oil used for the seafood. Drain on paper towels to remove excess oil and sprinkle over the finished dish just before serving.
- Tobasco, or other hot sauce to taste, optional Added sparingly as a finishing condiment to introduce acidity and heat that cuts through the richness of the fried seafood; offer Tabasco or another hot sauce at the table for diners to customize spice levels. Choose a sauce that complements the briny flavors without overpowering them.
Instructions
- Pour the oil into a large pot, Dutch oven, or fryer. It should be at least 2 inches deep. Heat the oil to 375°F. If you don't own a candy or oil thermometer, simply sprinkle a pinch of flour into the oil. If it sizzles, it's ready.: When the oil heats, you want a steady environment that lets pieces float and fry evenly. Look for a glossy surface and a slow shimmer, not smoke. The ideal sound is a clear, active sizzle when you test with a pinch of flour; it should snap but not spit wildly. If you see heavy black smoke, the oil is too hot and will burn coatings, so lower the heat and let it cool slightly before testing again. Overcrowding the pot is a common mistake here because it drops the temperature and yields greasy results.
- Meanwhile, put the flour in a shallow dish. Dredge the clams in flour and set aside. Repeat with the oysters, keeping the clams and oysters separate.: At this temperature, the flour coating crisps quickly, sealing in juices without overcooking the shellfish. If you have a thermometer, aim for a stable 375°F and watch for slight temperature dips between batches. Without a thermometer, sprinkle a pinch of flour into the oil; it should sizzle energetically and brown in a few seconds. A too cool oil will soak into the coating and feel heavy, while too hot oil will scorch the crust, so pacing and thermometer checks prevent disasters.
- When the oil is hot, using a slotted spoon or spider, fry one test clam to ensure your oil is at the correct temperature. If your test is successful and the clam is pale golden, using a slotted spoon or spider, lower half of the clams into the oil and fry for 45 seconds, then transfer to a plate or baking sheet lined with paper towels to drain. Sprinkle liberally with salt. Repeat the process with the remaining clams, letting the oil return to temperature before frying the next batch.: Dry flour helps form the crust and gives each piece a consistent finish. As you dredge, pat excess flour off so you have a light coating rather than a thick batter. Keeping clams and oysters separate avoids cross contamination of cooking times and maintains clarity of texture. A mistake to avoid is letting the dredged pieces sit too long and absorb ambient moisture, which can make the crust fall off in the oil.
- Next, fry half of the oysters. Using a slotted spoon or spider, lower half of the oysters into the oil and fry for 1 minute, then transfer to a plate or baking sheet lined with paper towels to drain. Sprinkle liberally with salt. Repeat the process with the remaining oysters, letting the oil return to temperature before frying the next batch.: A test piece confirms readiness and saves a whole batch from being ruined. The test clam should come up pale golden and crisp quickly. Listen for a lively sizzle that calms as the clam is removed; that indicates proper heat. If the test fritter sinks and does not brown, the oil needs to be hotter. One trap here is assuming the thermometer is correct without a test if your burner is finicky; the test keeps you honest.
- Garnish the clams and oysters with fried sage leaves and serve with hot sauce, if desired.: The brief fry time preserves a juicy interior while giving a thin, crisp coating. You will hear a sustained sizzle and see tiny bubbles racing around the edges. Transfer to paper towels to wick away excess oil and sprinkle sea salt immediately so it sticks. Avoid crowding the basket because it will lower oil temperature and make results uneven.
- Sprinkle liberally with salt: Salting right after frying is critical because the warmth helps the salt adhere and season through the crust. The grains create a bright counterpoint to the fried richness. A common misstep is waiting too long to salt, which leaves the exterior bland; salt while still warm for best flavor penetration.
- Repeat the process with the remaining clams letting the oil return to temperature before frying the next batch: Patience between batches ensures each group hits the same thermal window for crispness. Use the test method again if the oil temperature wavers, and remove any small debris in the oil that could darken the next batch. Rushing by adding too many at once invites greasy, undercooked results, so keep the rhythm steady.
- Next fry half of the oysters Using a slotted spoon or spider lower half of the oysters into the oil and fry for 1 minute then transfer to a plate or baking sheet lined with paper towels to drain: Oysters take marginally longer than littlenecks because their shape and moisture content need that extra moment to set the crust. Listen for a bright sizzle that keeps going for the full minute, and look for a uniform pale golden hue. Remove and let them drain briefly; should you see a dull, soggy surface, the oil was probably too cool, so adjust heat before the next batch.
- Sprinkle liberally with salt: As with the clams, seasoning immediately after frying brings out the shellfish's natural flavors. The salt anchors the bite and balances the fried coating. One trap is using too fine a grind that dissolves away; medium flake sea salt gives a satisfying crunch and consistent seasoning.
- Repeat the process with the remaining oysters letting the oil return to temperature before frying the next batch: By the final batches you will have a rhythm that helps you anticipate temperature dips and timing. Keep a small plate for finished pieces to avoid stacking while hot, which can steam and soften the crust. The most frequent mistake at this stage is impatience, leading to uneven doneness across pieces.
- Garnish the clams and oysters with fried sage leaves and serve with hot sauce if desired: Quick frying the Fresh sage leaves imparts an aromatic, slightly bitter contrast that brightens the plate. They crisp in seconds and smell herbaceous and warm, like a fleeting autumn smell. Offer Tobasco on the side for anyone wanting vinegary heat. Avoid attempting to fry too many leaves at once because they can clump and become soggy rather than crisp.
Notes
- Temperature matters, keep the oil around 375°F for a crisp exterior and tender interior. Use a thermometer and monitor between batches because temperature drops when you add more pieces.
- Dry shellfish well, pat clams and oysters with paper towels before dredging. Moisture causes splatter and prevents an even crust from forming.
- Don’t overcrowd the pot, fry in small batches to keep the oil temperature steady and prevent soggy results. Overcrowding is the fastest route to greasy coating.
- Use neutral high smoke point oil, choose canola or grapeseed so the oil won’t impart flavors and can sustain high heat required for quick crisping.
- Fry sage quickly, the leaves crisp in seconds and add an aromatic lift, but do them in a tiny batch so they remain light and crunchy.