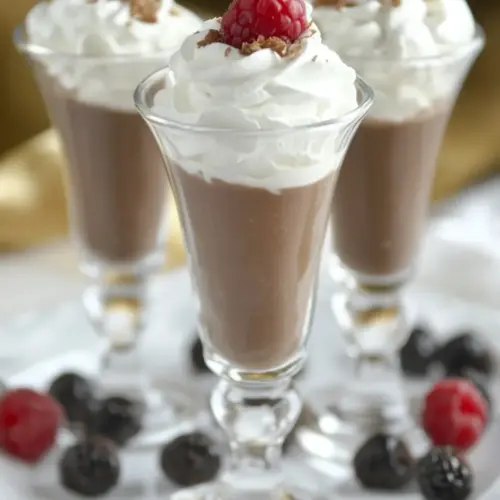
French Silk Shooters
French Silk Shooters are creamy, silky chocolate shots that pack rich cocoa flavor into tiny, elegant portions. Smooth butter and melted unsweetened chocolate create a luxuriously textured base, topped with pillowy whipped cream for contrast. These little desserts are perfect for entertaining or a cozy finish to a dinner, offering an easy yet impressive sweet that guests will request again and again.
Equipment
- Stand mixer
- Paddle attachment
- Shot glasses
- Spatula
- Whisk
- Mixing Bowl
Ingredients
- 4 tablespoons (1/2 stick) butter, at room temperature Softened to room temperature and creamed to provide a rich, silky base and smooth mouthfeel for the shooters; contributes fat that carries flavor and stabilizes the emulsion.
- 1/3 cup sugar Granulated sweetener used to balance the bitterness of the chocolate and to help aerate the butter when creamed, creating lightness in the mousse-like texture.
- 1 ounce unsweetened chocolate, melted and cooled Melted and cooled to evenly distribute intense cocoa flavor without graininess; adds deep chocolate richness and structure to the custardy filling.
- 1/2 teaspoon vanilla extract Added for aromatic depth and to enhance the overall flavor profile; a small amount brightens the chocolate and rounds out sweetness.
- 1 large pasteurized egg--Davidson's Safest Choice brand preferred Beaten into the mixture to incorporate air and contribute to the custard-like body; pasteurized choice ensures safety while providing richness.
- 1/3 cup heavy whipping cream Whipped to soft peaks and folded in to contribute volume and a light, creamy texture; supplies extra fat for smoothness and luxurious mouthfeel.
- 2 tablespoons powdered sugar Sifted into the cream or batter to add fine sweetness and help stabilize whipped textures; dissolves easily for a silky finish.
- 1/2 teaspoon vanilla Used as an additional flavoring point to reinforce vanilla notes and balance sweetness; a small measure enhances aroma and complexity.
- 1/3 package Whip-It (optional whipped cream stabilizer) Optional stabilizer blended with whipped cream to help maintain peak structure and prevent weeping, especially for make-ahead or warmer-service preparations.
Instructions
- In the bowl of a stand mixer with the paddle attachment, cream butter and sugar for about 2 minutes, till light and fluffy. Stop and scrape the sides of the bowl with a spatula frequently during the mixing process.: The immediate sensory cue is the change in texture, from dense to aerated and pale, with a soft, velvety sound as the paddle spins. The why here is air incorporation, which gives the final mixture lift and silkiness. A common mistake is rushing or using butter that is too warm, which makes the mixture greasy rather than airy. If you hear a slick, slapping sound or see separation, stop, chill briefly, and then resume at a lower speed.
- With the mixer running, gradually add the melted chocolate and vanilla.: You will notice the bowl developing a glossy sheen as the melted chocolate integrates, and the aroma of cocoa will become more pronounced. Adding the chocolate slowly prevents the butter from seizing and ensures a smooth emulsion. If you add it too quickly, the mixture can split or become grainy. A tip is to add in a thin stream while the mixer runs at medium speed, and scrape down the sides so everything combines evenly.
- Add the egg, and beat at medium speed for 5 minutes. Divide the chocolate mixture between shot glasses.: At this stage you will feel the mixture gain volume and a mousse like lightness, while the sound of the mixer remains steady and even. The egg acts as both binder and aerating agent, creating structure. Beating long enough is essential; under beating leaves the texture dense, while over beating risks losing the silkiness. A common error is adding the egg when the chocolate is too hot, which can cook the egg. Ensure the melted chocolate is cooled before mixing in the egg.
- Whip cream with a splash of vanilla, a couple tablespoons of powdered sugar, and Whip-It, if desired. Top each shooter with whipped cream and raspberry or chocolate curls if desired.: As you whip the cream , watch for the transition from fluid to soft peaks, then to firmer peaks. The sound changes to a rhythmic whipping, and the aroma becomes creamy and fresh. The powdered sugar sweetens and the optional stabilizer helps the peaks hold. Over whipping will turn the cream grainy and then buttery, so stop as soon as you reach the consistency you want. A common mistake is waiting too long to sweeten, which can slow peak formation, so add sugar early in the whipping process.
- Chill in the refrigerator for at least 4 hours before serving.: The contrast of the glossy chocolate base and the pillowy white cream is visually appealing, and you will notice a cool temperature contrast when you serve chilled shooters. Fresh raspberries add a bright, tangy note and chocolate curls emphasize cocoa flavor. Avoid piling on heavy garnishes that can overpower the delicate proportion. One mistake is adding warm garnish which melts the topping, so use cool or room temperature decorations.
- Chill in the refrigerator for at least 4 hours before serving: During chilling, flavors meld and the texture firms to that perfect spoonable consistency. You might notice the scent of chocolate becomes more integrated and the surface takes on a slight sheen. Chilling is essential for texture and for food safety when using a pasteurized egg. Common errors are not chilling long enough, which makes the shooters too soft, or chilling uncovered, which can dry the surface; cover them loosely to prevent odors or skinning.
Notes
- Butter temperature: Make sure your butter is soft but still cool to the touch. Too soft and it will not trap air properly when creamed with the sugar. If your kitchen is warm, chill the butter briefly to firm it up before beating.
- Chocolate handling: Melt the unsweetened chocolate gently over a double boiler and let it cool to warm or room temperature. If the chocolate is too hot when added, it can melt the butter and scramble the egg, causing a broken texture.
- Egg safety: This recipe uses a pasteurized egg to reduce food safety concerns. If you have any doubts about raw eggs, use pasteurized eggs only, and avoid making this for highly vulnerable guests.
- Whipping cream timing: Chill the bowl and whisk for the cream if possible, it whips faster and produces more stable peaks. Add powdered sugar early to help stabilize the foam.
- Make ahead strategy: These shooters can be prepared and chilled up to 24 hours in advance if you use the optional Whip-It stabilizer in the topping. For the best texture, wait to add delicate garnishes until service time.
- Serving temperature: Serve well chilled from the fridge so the texture is set and the flavors feel balanced; too warm and the shooters will feel overly rich and loose.