Football Cookie Cake
Football Cookie Cake is a giant, shareable cookie with creamy peanut butter and melty chocolate chips, perfect for game day or parties. This easy, crowd pleasing dessert balances chewy interior and golden edges, delivering rich flavor and fun presentation. It makes a memorable centerpiece and is simple enough for beginner bakers to enjoy. Try it for your next gathering and watch it disappear.
Equipment
- Electric Mixer
- 9-inch Round Cake Pan
- Foil
- Cooking spray
- Microwave-safe Bowl
- Offset Spatula
- Knife
Ingredients
- 1/2 cup unsalted butter softened Softened to spread easily into the dough and provide a tender, rich texture, unsalted butter helps bind ingredients while allowing precise control over salt content. Creaming it with sugars incorporates air for a lighter crumb and contributes to the cookie cake’s buttery flavor profile.
- 3/4 cup peanut butter Creamy and flavorful, peanut butter contributes moisture, structure, and a pronounced nutty taste while enhancing chewiness. Balancing fat and protein, it enriches the dough and complements chocolate elements throughout the cake.
- 3/4 cup packed brown sugar Packed to ensure consistent sweetness and moisture, brown sugar adds a deep, caramel-like flavor and helps retain chewiness in the finished cookie cake. Its molasses content encourages a darker color and a slightly sticky, soft texture.
- 1/4 cup granulated sugar Granulated sugar provides clean sweetness and aids in creaming with butter to introduce air and a light crumb. It also helps with spread and crisp edges when baking at the correct temperature.
- 1 egg Beaten lightly to add richness and act as a binding agent, the egg contributes moisture, structure, and stability to the dough. Proteins in the egg help set the cookie cake during baking and improve overall tenderness.
- 1 teaspoon vanilla Added for aromatic sweetness, vanilla enhances and rounds out the flavors of the cookie cake without overpowering other ingredients. Its extractive compounds deepen the perception of other flavors like chocolate and peanut butter.
- 1 tablespoon milk Introduced in small amount to adjust batter consistency, milk adds moisture and helps achieve the desired dough pliability for spreading into a cake shape. It can also slightly enrich the flavor and tenderness of the finished product.
- 1/2 teaspoons salt Measured to control seasoning, salt balances sweetness and enhances overall flavor perception while strengthening gluten networks slightly. Proper salt level ensures the peanut butter and chocolate flavors are more pronounced and harmonious.
- 1/2 teaspoon baking soda Included as a leavening agent, baking soda helps the cookie cake rise modestly and promotes browning for an appealing crust. It reacts with acidic components to create lift and a tender crumb structure.
- 1 1/2 cups flour Added to provide bulk and structure, flour forms the framework of the cookie cake by developing gluten when mixed, which gives chewiness and stability. Proper measurement prevents a dense or overly dry texture.
- 1 cups chocolate chips Folded in to distribute chocolate flavor and pockets of melted sweetness, chocolate chips provide texture contrast and rich chocolate bursts throughout the cake. Their inclusion creates gooey spots when slightly melted during baking.
- 1 cup chopped peanuts optional Tossed in optionally to add crunchy texture and intensified nutty flavor, chopped peanuts contribute additional protein and bite. They also enhance the visual appeal and complement the peanut butter base when included.
- 1 cup chocolate chips Added again to intensify chocolate presence or for layering, a second portion of chocolate chips increases fudgy pockets and balances the nutty, sweet components. Repeating chocolate chips ensures even distribution of chocolate throughout the cake.
- 1 teaspoon vegetable oil or shortening Used sparingly to adjust consistency and sheen when melting or decorating, vegetable oil or shortening prevents chocolate from seizing and creates a smoother drizzle or coating. It also helps thin melted chocolate for easier piping or spreading.
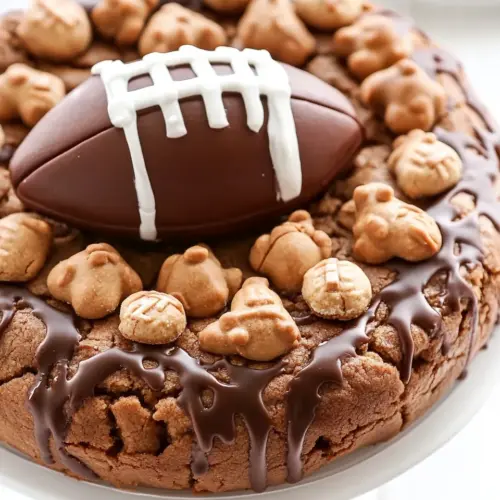
- 1 tablespoon white frosting or melted white chocolate Applied as a finishing touch to draw the football design, white frosting or melted white chocolate provides contrasting decoration and sweet glaze. A small amount is enough to pipe laces and highlights that make the cookie cake resemble a football.
Instructions
- Cream butter, peanut butter, and both sugars in the bowl of an electric mixer fitted with the paddle attachment, about 1 minute. Add egg, vanilla, milk, baking soda, and salt and mix until combined. Slowly add flour and mix until dough just comes together, scraping the sides of the bowl as necessary. Stir in 1 cup chocolate chips and nuts.: The bowl will smell sweet and nutty as the unsalted butter , peanut butter , and sugars emulsify, producing a pale, slightly fluffy mixture. I like to scrape the sides once or twice so everything mixes evenly, and you should see the granulated sugar begin to dissolve into the butter. This step matters because it incorporates air into the dough, helping with texture. A common mistake is creaming for too long which can make the mixture overly soft; stop once it looks even and slightly lightened in color. Listen for a low, even sound from the mixer, not a high pitch which indicates overbeating.
- Line a 9” round cake pan with foil and spray with cooking spray. Press dough into pan.: Right after adding the egg , vanilla , a splash of milk , baking soda , and salt , the mixture will become glossy and slightly looser. I gently fold these in rather than whip them hard to avoid toughening the dough. This step ensures the leavening is evenly distributed, which affects rise and crumb. A common error is adding these when the butter is too warm, which can curdle the mix; if you see separation, chill briefly and then continue. You should smell the vanilla bloom as the ingredients mingle.
- Preheat oven to 350°F. Bake for about 18-22 minutes, until the top is golden brown. Let cool completely before continuing.: As you sprinkle in the flour , the dough transitions from glossy to a cohesive mass that pulls away from the bowl. I stop mixing when I no longer see large streaks of dry flour, so the dough stays tender instead of overworked. Overmixing activates gluten and can make the cake dense, so stop when everything is combined and a paddle leaves definite swirls. The dough should feel soft and slightly tacky to the touch.
- To make the football: make two cuts in the cookie cake, 1” apart right on each side of the center. (It’s like you’re cutting it in half but you’re making two long cuts just off center.) Remove the 1” cookie piece.: When you fold in the chocolate chips and optional chopped peanuts , the dough gains little pockets of color and texture. I do this by hand with a spatula to preserve the chip shapes and to evenly distribute the nuts. This step matters for bite contrast and visual appeal. Avoid smashing the chips into tiny bits by overworking; you want whole bits that melt while baking. The aroma of peanut and chocolate will become more pronounced here.
- Melt remaining 1 cup of chocolate chips with oil or shortening in the microwave on high in 30 second increments, stirring between each. (The oil is to help keep the chocolate from seizing.): Pressing the dough into the lined pan, you should feel it compact and spread to the edges with gentle pressure. The surface will be slightly dimpled from your fingers, which is fine because it smooths during baking. This pressing creates a uniform thickness important for even bake. Common mistakes include leaving thin spots which can burn, so check for even thickness across the pan. The dough should hold its shape and not slump in the center when you move it to the oven.
- Use a knife or offset spatula to spread some melted chocolate inside the cut halves of the cookie, then press them together to seal. Once the chocolate hardens, the cookie will stick together. You now have a football shaped cookie cake!: During baking you will notice the kitchen filling with an irresistible nutty, buttery scent and the edges turning golden. The center should look set, not jiggly, and the top should be lightly golden, signaling readiness. Let it cool completely so the structure firms and the melted chips reset, which prevents breakage when cutting the football shape. A common problem is removing it too hot, which can cause crumbling; patience here pays off. You can test the center by a gentle press, it should bounce back slightly.
- Pour the remaining chocolate over the top and spread evenly. Chill to set the chocolate, then pipe on the laces using white frosting or melted white chocolate.: make two cuts in the cookie cake, 1” apart right on each side of the center. (It’s like you’re cutting it in half but you’re making two long cuts just off center.) Remove the 1” cookie piece : The small removed strip creates the indentation that becomes the football seam, and the remaining halves will form the rounded ends. Work on a flat surface and use a steady, even hand with a long knife to make clean cuts. This shaping matters for the final look and how well the two halves align. A typical mistake is cutting too widely, which changes proportions; measure carefully and keep the cuts straight. You may feel a slight resistant crunch if the cookie edges are firmer, that is normal.
- Melt remaining 1 cup of chocolate chips with oil or shortening in the microwave on high in 30 second increments, stirring between each: As you heat, the chips will soften and become glossy, and stirring will encourage a smooth emulsion with the vegetable oil or shortening . The scent becomes rich and chocolatey, and you will see the mixture go from grainy to fluid. This step keeps the chocolate from seizing and ensures it coats smoothly. Avoid overheating which causes burning or graininess; stop microwaving when most chips are melted and stir until smooth. If you see lumps that do not melt with stirring, the chocolate may have seized.
- Use a knife or offset spatula to spread some melted chocolate inside the cut halves of the cookie, then press them together to seal. Once the chocolate hardens, the cookie will stick together. You now have a football shaped cookie cake: The melted chocolate acts as an edible adhesive, and when you press the halves together the seam will look neat and uniform once set. Apply a thin, even layer so the halves meet without sliding. This technique matters because it stabilizes the shape for pouring chocolate on top. A common issue is using too little chocolate which can lead to the halves separating; use enough to form a secure seal but not so much that it oozes out excessively.
- Pour the remaining chocolate over the top and spread evenly. Chill to set the chocolate, then pipe on the laces using white frosting or melted white chocolate: Pouring the glossy chocolate creates a smooth, shiny shell over the cookie cake, and chilling it quickens setting so the surface becomes firm. When piping the laces, use a steady hand and a slightly thick frosting for crisp lines that hold. This finishing touch turns the cake into a recognizable football, and the contrast of white on dark chocolate is visually striking. A typical mistake is trying to pipe on a warm surface; ensure the top is set so the laces keep shape. The final product should look polished and slice cleanly once the chocolate is cold.
Notes
- Room temperature butter: Use properly softened unsalted butter to ensure even creaming and a tender crumb, not melted or rock hard butter.
- Peanut butter texture: Smooth peanut butter yields a uniform dough while chunky creates extra crunch, choose based on your texture preference.
- Chocolate quality: Higher quality chocolate chips melt more evenly and taste richer, improving both flavor and appearance.
- Handling the dough: Press the dough gently and evenly into the pan to avoid thin spots that can overbake, using light, consistent pressure.
- Chilling after coating: Chill the cake after pouring the melted chocolate chips to set the coating and make piping the laces cleaner and easier.
- Optional peanuts: If you use the chopped peanuts, fold them in last and keep pieces fairly large for a pleasant contrast to the soft cookie.