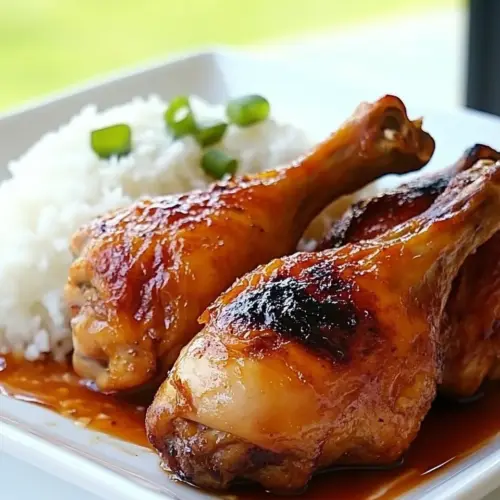
Five Spice Roasted Chicken Legs
Five Spice Roasted Chicken Legs combine warm aromatic spices, savory soy, and fresh garlic and ginger for a crispy skinned, juicy weeknight dinner. This easy to follow roast yields tender, flavorful meat with caramelized edges, perfect for an easy weeknight dinner or casual gathering, and a reliable recipe to make again and again.
Equipment
- Oven
- Roasting Pan
- Wire Rack
- Blender
- Resealable bag
- Instant read thermometer
Ingredients
- 3 lb s6 chicken legs (thighs and legs attached), fat trimmed Trimmed and meaty, provides the primary protein and substantial flavor when roasted; holds marinades well and crisps beautifully under high heat. Supplies rich juices and texture contrast between skin, thigh, and drumstick for a satisfying main course.
- 6 cloves of garlic Pounded or minced to release pungent oils, adds bright aromatic depth and savory bite to the marinade; helps tenderize meat slightly and balances sweet and salty elements. Contributes a sharp, garlicky backbone that enhances the overall savory profile.
- 1 large shallot Thinly sliced or minced to contribute a mild oniony sweetness and subtle floral aroma to the marinade; softens during cooking and melds with other aromatics. Adds complexity without overpowering, supporting both savory and sweet flavors.
- 1 tbsp grated fresh ginger Finely grated to deliver warm, citrusy heat and a fresh zing that lifts the marinade; acts as a natural tenderizer and pairs well with soy and garlic. Imparts a vibrant, slightly spicy note that brightens the finished chicken.
- 1 tbsp agave, or sugar Used as a sweetening agent to balance salty and savory elements while promoting caramelization on the chicken surface; dissolves easily into the marinade for even coating. Adds a subtle sweetness and glossy finish when roasted.
- 1/4 cup reduced sodium soy sauce, tamari for gluten free Provides the essential salty, umami-rich base for the marinade and helps penetrate the meat for savory depth; choose reduced-sodium to control saltiness and tamari for gluten-free needs. Contributes complex soy flavors that pair with five-spice and aromatics.
- 1/2 tsp Chinese five-spice powder Added sparingly to introduce warm, slightly sweet licorice and clove notes characteristic of Chinese cuisine; enhances savory-sweet balance and complements ginger and soy. Acts as a signature spice that defines the overall flavor profile.
- freshly ground black pepper Freshly ground to season and bring a bright peppery heat that rounds out the marinade; applied to taste for mild spice and aromatic lift. Helps sharpen flavors and contrasts the sweet and umami components.
Instructions
- In a blender combine the marinade ingredients; blend until smooth.: As you puree the mixture, inhale the immediate perfume of fresh garlic and ginger mingling with the anise notes from the five spice, which tells you the aromatics are active. The blender creates a silky emulsion so the marinade clings to the chicken , ensuring even flavor penetration. If the mixture seems too thick, a tablespoon of water will help it flow, but avoid watering it down excessively since concentration equals depth. Common mistakes include under blending, which leaves large pieces that do not incorporate evenly, and over blending for too long at high speed, which can slightly warm the mixture and dull volatile aromatics.
- Place the chicken in a large, resealable zip-top bag or container and pour in the marinade. Toss the chicken inside the bag to cover evenly with the marinade and refrigerate for 6-8 hours or as long as overnight.: When you massage the marinade into each piece, you should see the skin become glossed and the meat take on a deeper hue, which indicates good coverage. The cold marinade helps flavors sink in slowly, producing tender, well seasoned meat. Refrigeration also keeps bacteria at bay while the aromatics do their work. A typical error is marinating at room temperature, which can encourage bacterial growth; always refrigerate. Another common issue is using too little marinade, leaving pockets of the chicken unseasoned, so ensure each leg is well coated.
- Preheat oven to 400°F.: You will notice a clean, toasty scent as the oven reaches temperature, which primes the environment for caramelization. Preheating ensures the chicken begins to sear immediately when it goes in, aiding in a nicely browned exterior while locking juices inside. If you skip preheating, the meat may cook unevenly and become tougher. Verify your oven with an oven thermometer if you suspect temperature drift, because inaccurate heat leads to under or overcooked poultry.
- Place the chicken on a rack in a foil lined roasting pan. Create a loose tent over the chicken with foil.: Lifting the legs onto a rack allows hot air to circulate, producing even browning. The foil lined pan keeps cleanup simple, and tenting preserves moisture during the initial roast phase. You should see gentle steam under the tent, which signals the meat is staying hydrated. A pitfall here is wrapping too tightly, which traps steam and prevents the skin from crisping later. Make sure the tent is loose enough to allow some airflow while still protecting the surface.
- Roast the chicken in the center of the oven 30 minutes; remove foil and continue to cook, basting occasionally until the internal temperature is 165°-170°F, about 45 minutes longer (Insert thermometer between the leg and the thigh).: Early in the roast, the kitchen fills with the fragrance of caramelizing sugars and toasted spices, a cue that the exterior is developing color. After removing the foil, the surface will begin to shimmer as fats render and sugars darken, creating audible little pops and a subtle crackle as the skin tightens. Basting adds shine and layers more flavor, though be judicious to avoid cooling the pan significantly each time. Use an instant read thermometer to check doneness by inserting it between the leg and thigh; the correct temperature ensures safety and juiciness. One common mistake is relying solely on color; some well colored pieces can still be underdone, so always verify temperature. Another issue to avoid is overbasting, which prevents the exterior from crisping properly.
Notes
- Swap the sweetener Use the suggested agave or sugar amounts as a baseline and experiment with a touch more for a deeper caramelized finish, but monitor the oven closely to prevent burning.
- Use tamari for gluten free Tamari provides the same umami backbone as reduced sodium soy sauce while accommodating gluten free needs, just watch overall salt if your tamari is not labeled reduced sodium.
- Marinate longer for more depth If you have time, marinate overnight to intensify the aroma and flavor, but avoid exceeding 24 hours to prevent textural breakdown from too much acid exposure.
- Adjust five spice to taste If you prefer a milder anise note, reduce the five spice slightly; conversely, add a pinch more for a bolder, slightly sweet spice character.
- Trim fat for cleaner roasting Trimming excess fat before marinating reduces flare ups and leaves a lighter final dish while still preserving thigh richness.