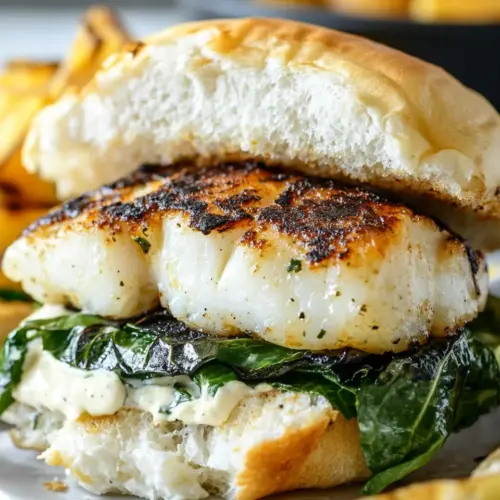
Fish Burger with Charred Lettuce and Tarragon Mayo
Fish Burger with Charred Lettuce and Tarragon Mayo is a quick, flavorful sandwich featuring crispy seared white fish, smoky charred lettuce, and a creamy tarragon mayonnaise. This easy weeknight dinner balances bright lemon, fresh herbs, and a tender flaky texture for an irresistible bite, perfect when you want something fast yet impressive.
Equipment
- Fry pan
- Stick blender
- Jug or Tall Container
Ingredients
- 3 tablespoon plain flour Coat fish or dredge other ingredients lightly to provide a dry surface that helps create a crisp exterior when frying or searing. Use as a base for seasoning so flavors adhere and to give a pleasant mouthfeel to the finished burger.
- 1/2 teaspoons salt Season prepared coatings or fillings to enhance overall taste balance and to bring out natural flavors in the fish. Sprinkle into batters or dustings to ensure even saltiness throughout each bite.
- 1/4 teaspoon white pepper Add a subtle heat and aromatic lift to batters, dressings, or rubs, helping to round out the seasoning profile. Use sparingly to avoid overpowering delicate fish flavors while contributing gentle warmth.
- 4 skinless fillets white fish (~125 g/4.5 oz each) See notes Provide the primary protein and texture for the burger, offering a tender flake and mild flavor that pairs well with strong condiments. Select fillets of similar size for even cooking and handle gently to maintain moistness.
- 1 tablespoon olive oil Moisten or help sear fish surfaces while imparting a fruity, slightly bitter note that complements herbs. Rub onto lettuce or bread before charring or to lightly coat fillets for pan-frying.
- 8 large lettuce leaves Provide crisp, refreshing layers in the burger that add a cool contrast to hot fish and creamy sauces. Char or grill briefly to introduce smoky depth while retaining crunchy texture.
- 1 tablespoon extra virgin olive oil Dress lettuce or drizzle on rolls to add bright flavor and mouth-coating richness; choose extra virgin for pronounced olive fruitiness. Use sparingly when charring greens to prevent excess sogginess while enhancing caramelization.
- 4 soft bread rolls sliced open Hold components together and provide a substantial base for the burger, contributing chew and absorbency for sauces. Prefer soft rolls to balance the flaky fish without overwhelming its texture.
- 2 lemons cut in half Brighten the overall dish with high-acid bursts that cut through richness and elevate herbs and mayonnaise. Squeeze over fish, lettuce, or finished burgers just before serving for fresh citrus aromatics.
- 250 ml vegetable oil Create a hot oil bath suitable for deep-frying or shallow-frying to quickly crisp the fish coating while sealing in juices. Maintain proper temperature to ensure even browning without excessive oil absorption.
- 2 teaspoon lemon juice Add a subtle tartness to dressings or mayonnaise, balancing richness and enhancing herbaceous notes. Stir into sauces to sharpen flavors and provide a clean finish on the palate.
- 2 teaspoon dijon mustard Emulsify with lemon juice and other wet ingredients to create a cohesive sauce or batter with tangy background. Use in small amounts to support acidity without dominating milder components.
- 2 teaspoon fresh tarragon Introduce a distinctive anise-like herbaceousness that pairs exceptionally well with seafood, lifting richness and adding complexity. Chop finely and distribute through sauces or mix into fillings for consistent flavor.
- pinch salt Adjust seasoning levels in sauces, batters, or salads to achieve a well-rounded taste that complements fish and herbs. Sprinkle in small pinches while tasting to avoid over-salting delicate components.
- pinch pepper Balance flavors by adding a trace of sharpness that heightens other ingredients; use in tandem with salt for seasoning on the fly. Grind fresh or use pre-ground to maintain control over intensity.
- 1 egg Bind wet and dry components in batters, coatings, or emulsified sauces; contribute structure and richness to the mayo or dredge for frying. Beat lightly when combining to integrate ingredients smoothly and avoid overworking.
- 1 cup store bought mayonnaise Provide creamy richness and a stable base for mayonnaise-based sauces that bind the burger components. Choose a neutral-flavored store bought mayonnaise to keep preparation quick while delivering smooth texture.
- 2 teaspoon chopped fresh tarragon Deliver a concentrated herbal punch and fresh flavor when folded into sauces, marinades, or mayonnaise. Sprinkle chopped tarragon into the mayo to create aromatic highlights that complement the fish.
- 1 teaspoon lemon juice Brighten and lift finished sauces and salads with a final acidic note that ties components together and cleanses the palate. Use sparingly as a finishing touch to avoid overpowering the herb and mayonnaise balance.
Instructions
- Pour the oil into a jug that will fit the heat of your stick blender.: The oil should be at room temperature and poured into a container tall enough to immerse the head of your stick blender, which helps form a steady emulsion. When you position the blender properly, you will hear a humming, and the oil will begin to thicken as air is incorporated. The visual cue is the mixture becoming opaque and glossy. If your container is too wide, the blender head may not reach the oil properly and the emulsion can fail, so choose a snug vessel.
- Add in the Dijon mustard, lemon juice, salt, pepper and tarragon.: These aromatics and acids are the backbone of the mayo, and adding them before the egg helps set flavor parity. You will notice a bright, herby scent as the tarragon meets the acid. The mustard gives slight grain and tang that stabilizes the emulsion. A common mistake is underseasoning now and trying to correct after the oil is added, which is harder to balance.
- Then carefully crack the egg in, be careful not to break the yolk.: Keeping the yolk intact initially helps you position the blender head over it for a clean start. The yolk carries lecithin which is essential for emulsification. When you crack the shell gently, you preserve the yolk for a controlled beginning. Broken shells or a yolk with white mixed in can make it trickier to start a glossy mayo.
- Place the head of the stick blender over the yolk and then turn the speed to high and slowly bring the blender up through the oil.: Start with the blender head resting at the bottom so the yolk, mustard, and acid can emulsify with a small amount of oil, then lift slowly as the mixture thickens. You will feel the viscosity change under the blender and see a transformation to a creamy, homogeneous texture. Pulling the blender out too quickly or pouring oil too fast are the principal causes of a broken emulsion, so move steadily.
- You should have a glossy tarragon mayonnaise within seconds.: A successful emulsion will look silky and chant a mild sheen under light, and the aroma of tarragon will be more pronounced. The mayonnaise should cling to a spoon in a ribbon. If it looks separated or watery, you can rescue it by starting with a fresh yolk and slowly whisking the broken mayo into it.
- Mix the tarragon together with the mayo and add a spritz of lemon juice.: Folding in the remaining chopped tarragon releases herb oils into the mayonnaise and the final lemon juice brightens it. You should smell fresh herb notes and a lifted citrus edge. Overworking the mixture will bruise herb leaves, releasing bitter notes, so fold gently.
- Mix the flour, salt and white pepper together in a shallow bowl.: Combining these dry seasonings creates an even coating for the fish , ensuring each fillet picks up a balanced amount of seasoning. The texture will be fine and powdery, and the aroma will be lightly seasoned. Dumping flour directly onto a wet fillet can clump, so keep the bowl shallow for controlled dredging.
- Add each fillet of fish and give it a light dusting of the flour.: Press the fillet into the flour briefly so a thin film forms, shaking off excess to avoid a cakey exterior. You will see the surface go matte with a delicate dusting, and this layer will crisp in the pan. Too much flour is a frequent misstep that yields a gummy rather than crisp crust.
- Place a large heavy based fry pan over a medium heat and add the olive oil. Once it is hot, add the fish and cook for 2 minutes on each side.: The pan should be hot enough that the oil shimmers, producing an immediate sizzle when the fillet lands. You will hear a lively hiss and see edges take golden color after about two minutes, creating a slight crust while the inside stays flaky. If the pan is not hot enough, the fish will steam and fail to brown properly, so preheat thoroughly.
- Turn the heat on the fry pan up to high and once it is smoking hot add the lettuce leaves and the extra virgin olive oil.: At this point the pan should produce thin wisps of smoke, and adding the leaves will make them sizzle and char quickly. The leaves will collapse slightly and develop glossy, darkened patches. Work fast because overexposure to high heat will char them to a bitter black.
- Allow the lettuce to char and spit. Once it has some colour and is glossy from the oil, remove from the pan and sit it on top of the fish.: The charring gives a nutty, smoky edge and the surface will glisten from the oil. Placing the hot, charred lettuce on the fillet allows residual heat to mingle. Leaving the leaves on the pan too long will make them papery and dry rather than pleasantly wilted.
- Add the lemon to the pan, cut side down and turn off the heat. Leave the lemons to char whilst you assemble the burger.: The cut lemon will take on caramelized notes and a caramel scent as it rests in the warm pan. These wedges are ideal for squeezing over the finished sandwich. Keep an eye on them, because if the pan is too hot they can char to an acrid bitterness.
- Add a good layer of the mayo to the bottom of each bun. Add a fillet of fish and two charred lettuce leaves.: The mayo should be creamy and slightly tangy, providing a silky counterpoint to the warm fish and smoky lettuce . Assemble quickly so the roll soaks up just a hint of sauce without collapsing. Overloading the bun with sauce can make it soggy rather than luxurious.
- Remove the charred lemon wedges from the pan and serve immediately.: Serving right away preserves the textural contrast between warm, crisp fish and the glossy lettuce. A final squeeze of the hot charred lemon over the sandwich brightens every bite. Delaying service will cause the bun to soften and the charred edges to lose their appeal.
Notes
- Choose uniform fillets: Select fillets similar in thickness so they cook evenly, preventing dry edges or undercooked centers.
- Dry the fish thoroughly: Patting the fish dry before dredging helps the flour adhere and ensures a crisp exterior instead of a soggy coating.
- Control oil temperature: Heat the pan until the oil shimmers but is not smoking violently to get a good sear without burnt flavor.
- Sear then char: Sear the fish first at medium heat, then raise the heat to high for quick charring of the lettuce to protect the fish from overcooking.
- Steady emulsion: When using the stick blender, start low at the yolk then lift slowly through the oil to create a glossy mayo that will not split.
- Finish with grilled lemon: Squeeze the charred lemon over the assembled burger to cut through the fat and liven the flavors just before serving.