Favorite Christmas Pancakes
Favorite Christmas Pancakes are a quick, colorful breakfast combining creamy banana, tender whole wheat, and a whisper of leafy greens for a festive twist. These pancakes are fluffy yet hearty, easy enough for a weekday and charming enough for holiday brunch, delivering warm aromas and a satisfying texture, making them a compelling reason to start the morning with something both wholesome and celebratory.
Equipment
- Greenpan Nonstick Pan
- Vitamix Blender
- Storage Containers
Ingredients
- 2 cups baby spinach (lightly packed) Wilt lightly and provide vibrant color and added nutrients; baby spinach blends smoothly into batter making pancakes more nutritious without strong flavor. Use lightly packed measurement to avoid excess moisture which could thin the batter; finely chop or pulse for even distribution.
- 1 cup sliced banana (very ripe; about 2 small bananas) Sweeten and add natural creaminess when mashed; sliced banana contributes moisture and helps bind the batter while offering caramelized notes during cooking. Use very ripe bananas for optimal sweetness and easier blending, and slice or mash uniformly to ensure consistent texture.
- 2 eggs Bind ingredients and add structure through coagulation when cooked; eggs help pancakes rise slightly and create a tender crumb. Beat lightly before adding to combine yolk fats and whites for even incorporation into the batter.
- 3/4 cup milk Thin and hydrate the batter while contributing tenderness; milk controls consistency and interacts with dry leavening to create steam for lift. Use the specified amount to achieve a pourable batter, and adjust minimally if other add-ins alter thickness.
- 1 teaspoon vanilla extract Enhance overall sweetness and aromatic complexity; vanilla extract brightens flavors and complements banana and cinnamon. Measure carefully as extract is concentrated, and stir into wet ingredients for even distribution.
- 1 teaspoon cinnamon (optional) Warm and deepen flavor profile with subtle spice; cinnamon adds warmth that complements banana and vanilla without overwhelming the pancake. Marked as optional, include to taste and mix into dry ingredients for even dispersion.
- 1/4 teaspoon salt Improve flavor balance and strengthen gluten network slightly; salt enhances sweetness and rounds out other tastes in the batter. Use the small measured amount to avoid salty notes and ensure even mixing with dry ingredients.
- 1 cup whole wheat flour Provide bulk, fiber, and structure; whole wheat flour yields a heartier texture and nutty flavor compared to refined flour. Sift or whisk with leavening for uniformity and measure by spooning into the cup to avoid dense pancakes.
- 2 teaspoons baking powder Leaven and create lightness by producing gas when activated; baking powder helps pancakes rise and become fluffy during cooking. Level the teaspoons for consistent lift and ensure freshness for reliable performance.
Instructions
- Add all ingredients to a blender except the flour and baking powder. Blend on high until very well combined, about 20-30 seconds, or until you no longer see any noticeable flecks of spinach.: Right after turning on the blender you will notice a fresh, green aroma that quickly softens into a sweet banana fragrance; the sound will move from a chunky thrum to a steady whirr as the baby spinach and banana break down. This is when the mixture becomes visually uniform, showing a smooth, pale green hue instead of bits of leaf. The reason this blending step matters is that it fully hydrates the wet ingredients and creates an emulsion that helps the batter cook evenly, avoiding streaks of raw greens. A common mistake is underblending, which leaves flecks of spinach that can feel fibrous or undercooked on the griddle. If you hear uneven chopping or see visible green pieces, pulse a few more seconds until the texture is silky. Make sure the eggs and milk are well incorporated so the batter has a consistent viscosity; this will help the pancakes spread properly when poured.
- Stir or pulse in the flour and baking powder. Thoroughly combine without over-mixing.: As you fold the dry ingredients in, you should notice the batter thicken and develop a slightly denser sheen. The sound shifts to a quieter paddle against the blender jar or bowl if you are mixing by hand, and visually you will see the batter reach a smooth, ribbonlike flow. This step is essential because gentle combining keeps the gluten from developing too much, which would make pancakes tough rather than tender. The correct texture at this stage is cohesive and slightly thick, with no dry pockets of whole wheat flour or lumps of baking powder . A typical error is vigorous mixing, which produces elastic batter and dense pancakes; to avoid that, stir until just combined. If the batter feels overly stiff, a tablespoon or two of milk will loosen it to the proper pourable consistency.
- Warm a nonstick or cast iron skillet or griddle over medium heat and coat with oil or butter. Pour small rounds of batter onto the hot surface—the batter should spread fairly thinly on its own—and let cook until bubbles form on the surface and the surface is mostly set, about 3-4 minutes.: As the pan heats, you will smell the oil warming and perhaps a faint toasty note; when you test with a drop of batter it should sizzle gently. Pouring the batter will produce soft, circular puddles that will begin to form tiny bubbles, a key visual cue that the interior is cooking. The surface will shift from glossy to slightly matte as proteins set and moisture moves to the top. This timing encourages even browning and helps create small air pockets that give a tender crumb. One pitfall is using too high a heat which browns the exterior before the center sets; aim for a steady medium heat so the pancakes cook through without burning. Keep a close eye on color: a warm golden brown signals readiness to flip.
- Flip and cook for an additional 3 minutes, or until fully cooked.: When you slide a spatula under the pancake, you want a golden underside that resists tearing; that is your cue to flip. After flipping, listen for a gentle hissing that indicates heat contact, and watch the top for finish cues such as tiny steam vents or a set, less glossy look. The additional cooking time allows the interior to finish cooking and the outside to achieve a balanced brown. This stage matters because it develops the final texture and flavor through gentle caramelization of the banana and the whole wheat flour . Avoid flipping too early, which can lead to undercooked centers, or flipping multiple times, which deflates the pancake and ruins the edge crispness.
- Continue to prepare the rest of the batter, keeping the finished pancakes warm in a 200 degree F oven if desired.: As you cook batches, stack them on a plate or a sheet and pop them into a warm oven to keep them supple and ready to serve. The oven keeps pancakes warm without drying them out, preserving a soft interior and preventing chilling between batches. If you skip the warming step, the pancakes can cool and lose that fresh just-made tenderness, so the oven is a helpful trick when serving several people. A common mistake is overheating the oven, which can desiccate the pancakes, so stick close to the recommended temperature.
- Serve warm with fruit, maple syrup, or another favorite dip.: The final service is all about contrasts, so I like pairing these pancakes with bright, sliced fruit for freshness and maple syrup for classic sweetness. The aroma at this point will be inviting, with caramel notes from the griddle and a tender, wheaty scent from the stack. Serving warm keeps the texture ideal and makes the pancakes feel freshly made. One trap is drizzling syrup too early which can make the pancakes soggy; serve syrup on the side if you want to preserve surface texture.
Notes
- Sheet pan version To make a sheet pan pancake, increase the whole wheat flour by 2 tablespoons to 1 cup plus 2 tablespoons. Line a quarter or half sheet pan with parchment so the pancake releases easily. Pour the batter and spread it to about one half inch thick, top with fruit if you like, then bake at 400 degrees F for 10 to 14 minutes until a tester is clean. Let it cool mostly before slicing because the pancake is tender and can tear if cut too soon.
- Gluten free swap Use buckwheat flour in place of the whole wheat flour and increase the milk to 1 full cup to reach the right batter consistency. Buckwheat offers a nutty flavor that plays nicely with banana and spinach, and the extra milk compensates for the absorbency difference. Whisk gently after adding the flour to avoid overworking the batter.
- Dairy free option Substitute nondairy milk such as almond or oat and cook the pancakes in coconut oil or another preferred oil. Nondairy milks can vary in thickness, so you may need to adjust the amount slightly to achieve the same pourable batter. Coconut oil can add a hint of tropical aroma, which pairs well with the banana.
- Egg free approach Use a commercial egg replacer like the one from Bob's Red Mill or a liquid egg substitute suitable for cooking; note that some homemade flax or chia eggs do not perform as well here. The egg replacer maintains structure so the pancakes still hold together and brown. Follow the package ratios for the replacer to ensure proper binding.
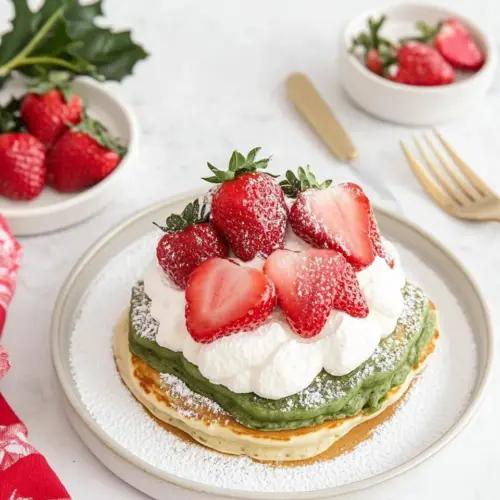
- Serving accents Serve with sliced red fruit such as strawberries or raspberries for a festive look, and offer whipped cream or maple syrup on the side. Bright fruit adds acidity and color that complements the nutty pancakes, while syrup provides classic sweetness. Keep the syrup separate if you want to avoid sogginess on the stack.