Fajita Bowl
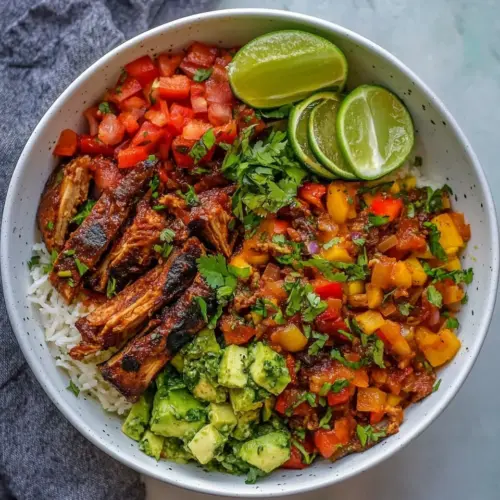
Fajita Bowl is a quick, flavorful meal featuring seared, spiced chicken with creamy guacamole and bright Homemade Salsa. This easy weeknight dinner delivers smoky, spicy, and fresh contrasts in every bite, perfect for busy summer evenings. It’s customizable, fast to pull together, and satisfying enough to share, making it an ideal reason to cook tonight.
Equipment
- Skillet
- Tongs
- Knife
- Cutting Board
Ingredients
- 1 tablespoon oil Heatable fat used to brown and cook the chicken, providing a nonstick surface and carrying flavors; helps distribute spices evenly and promotes even searing for better texture. Choose a neutral oil for high-heat cooking to prevent burning and off-flavors, and measure carefully to control calories and mouthfeel.
- 1 chicken breast cut in half lengthwise Protein cut thinly for quick, even cooking and to absorb seasonings; provides the main substantive element of the bowl and pairs well with bold spices and fresh toppings. Pat dry before seasoning to improve browning and slice uniformly to ensure consistent doneness across pieces.
- 1 teaspoon salt Saline seasoning applied to enhance natural flavors and improve juiciness; helps proteins retain moisture and balances vibrant spices. Sprinkle evenly and taste as you go, since salt levels vary by product and can be adjusted to suit dietary needs.
- 1/4 teaspoon cumin Warm, earthy spice that adds subtle smokiness and depth to the seasoning mix; complements other Mexican-inspired flavors and enhances savory notes. Use sparingly due to its concentrated flavor, and toast lightly if using whole seeds to release oils.
- 1 teaspoon black pepper Pungent ground spice that provides contrast and a peppery bite; helps brighten the overall flavor profile and accentuates savory elements. Grind fresh if possible for maximum aroma, and balance with salt and aromatics to prevent overpowering the dish.
- 1/2 teaspoon onion powder Dry seasoning offering a mild sweet-onion flavor that rounds out the spice blend; helps build background savory notes without adding texture. Sprinkle lightly and combine with wet ingredients or oil to distribute flavor evenly over the chicken.
- 1 teaspoon chilli powder Paprika-based spice mix that contributes heat and smoky depth, defining the fajita-style profile; enhances color and lends a characteristic warm spiciness to the meat. Adjust quantity to control spice level and consider using a smoked variety for extra complexity.
- 1 1/2 teaspoons oregano Herb with bright, slightly bitter notes that adds Mediterranean contrast and aromatic lift to the spice blend; supports the savory mix and complements citrus or tomato components. Crumble dried leaves between fingers before adding to release essential oils and aroma.
- 1/2 teaspoon garlic powder Aromatic powder that delivers a concentrated garlic flavor without added moisture; strengthens savory character and layers with onion powder for a fuller taste. Use measured amounts to avoid overwhelming the dish, and combine with oil to help it adhere to the chicken.
- 1 1/2 cups Cooked rice or Lettuce or Chips Base layer component providing bulk and texture, serving as a vehicle for toppings and sauces; offers either a neutral, hearty starch with rice, a crisp fresh base with lettuce, or crunchy contrast with chips. Choose according to desired bowl style and portion to balance the meal.
- 1 cup Homemade Salsa Fresh tomato-based condiment bringing acidity, sweetness, and herbaceous notes; brightens the bowl and adds moisture to complement the seasoned chicken and base. Adjust chunkiness and spice level to taste, and spoon over just before serving to maintain texture.
- 1/2 cup Guacamole Creamy mashed avocado mixture that adds richness, coolness, and healthy fats; balances spicy and acidic elements while contributing a smooth texture to the bowl. Keep guacamole chilled and add citrus to prevent browning if preparing ahead of time.
- 1/4 cup chopped onions Crunchy aromatic that introduces sharpness and subtle sweetness, providing textural contrast and foundational flavor under the seasoned chicken. Rinse if desired to soften bite, and chop uniformly for even distribution across servings.
- 1 jalapeno sliced Fiery pepper providing bright heat and fresh vegetal flavor when sliced; adds a sharp kick and visual interest to the bowl while allowing control over spice intensity. Remove seeds and membranes to reduce heat, or leave them for a stronger punch, and handle with care to avoid skin irritation.
- 1/4 cup diced tomatoes Juicy fresh fruit vegetable contributing acidity and color, enhancing freshness and balancing rich components like guacamole and oil; provides light sweetness and a pleasant burst in each bite. Dice finely for even coverage and to integrate well with other toppings.
Instructions
- Season the chicken liberally with the spices. Preheat the oil in a skillet over medium high heat. Use a stove top grill pan if you have one. Otherwise, any skillet works.: The aroma of the spice blend should be noticeable as it hits the warm oil , with warm, earthy notes from the cumin and oregano . You want the pan hot enough that a drop of water dances on the surface, this ensures immediate searing and prevents the chicken from steaming. A common pitfall here is using a pan that is not hot enough, which results in pale, limp meat instead of a golden crust. If your spices seem to clump, pat the seasoning onto the chicken rather than rubbing vigorously, which helps it adhere evenly. Listen for a lively sizzle the moment the pieces touch the skillet, that is your cue the surface is caramelizing properly.
- Sear the chicken breasts for 3-4 minutes per side until it cooks through.: As the chicken sears you should see the edges darken to a rich golden brown, and the surface will develop small blistered spots from the direct heat. The sizzling sound will calm to a steady hiss as moisture evaporates, and a quick press with tongs will feel springy rather than soft. This quick high heat locks in juices and builds flavor through the Maillard reaction, which is why you avoid frequent flipping. A trap to avoid is flipping too often, which prevents a good crust from forming and causes loss of moisture.
- Remove the chicken from the skillet and cover before slicing.: After cooking, the meat will still be carrying residual heat that continues to redistribute juices. Covering helps the chicken rest without cooling too fast, and it will result in juicier slices. You should notice the surface steam slightly under the cover, and the meat will firm up a touch as it equilibrates. A mistake is slicing immediately, which lets the juices run onto the cutting board instead of staying inside the meat, leaving it drier when eaten.
- Slice the chicken into half an inch strips.: When you slice, the interior should be opaque with a faint blush near the center if it is perfectly cooked, and the texture will be tender and slightly springy. Keeping the slices uniform helps each piece warm evenly in the bowl and makes assembly look appealing. Use a sharp knife to make clean cuts, because sawing motions tear the fibers and release juices prematurely. If the meat feels very hot to the touch or the juices run clear immediately, give it a minute more to settle before cutting.
- Assemble the fajita bowl. Add the base to your bowls, choose either rice or salad or chips or tortillas or a combo.: The first sensory hit when assembling is visual, layers of color from the base and toppings. Warm rice will steam softly, creating a cozy backdrop, while crisp lettuce offers a refreshing crunch. The base choice affects mouthfeel, so consider balancing creamy elements like guacamole against crunchy chips . Avoid piling everything in a lump, instead arrange in sections so each forkful can mix textures and flavors intentionally.
- Drizzle some salsa over the base layer, and start assemble the bowls. Add chicken, guacamole, fresh ingredients and finish off with a squirt or lemon and extra salsa!: The bright acidity of the Homemade Salsa will cut through the richness of the guacamole and any oil left on the chicken , and the lemon adds that elevated citrus brightness. As you add toppings, notice the contrast in textures and aromas, the coolness of the guacamole against the warm, spiced chicken . A frequent misstep is overdressing the base, which can drown textures, so add bold elements in moderation and taste as you go.
- Serve right away and enjoy!: The final bowl should offer a mosaic of temperatures and textures, with steam rising from the warm components and fresh produce providing crispness and zip. Encourage diners to mix elements to discover favorite combinations. If you let the bowl sit too long, the base may absorb the juices and the chips will soften, so serving promptly preserves those intended contrasts.
Notes
- Switch the base: Try warm rice for comfort, crisp lettuce for a lighter option, or crunchy chips to add salt and texture. Each base shifts the eating experience, so pick based on the mood and occasion.
- Control the heat: Remove seeds from the sliced jalapeno to mellow the spice, or leave them in for more kick. Balance spicy bites with creamy guacamole if needed.
- Prep ahead: Make the Homemade Salsa and guacamole a day ahead to let flavors meld; just add avocado on the day you serve to keep it bright if you prefer.
- Double the seasoning: Mix larger batches of the spice blend and store it in a sealed jar so you can season chicken quickly for weeknight meals without measuring each time.
- Finish with acid: A quick squirt of lemon over the assembled bowl brightens everything and lifts heavier elements, turning an ordinary bite into a memorable one.