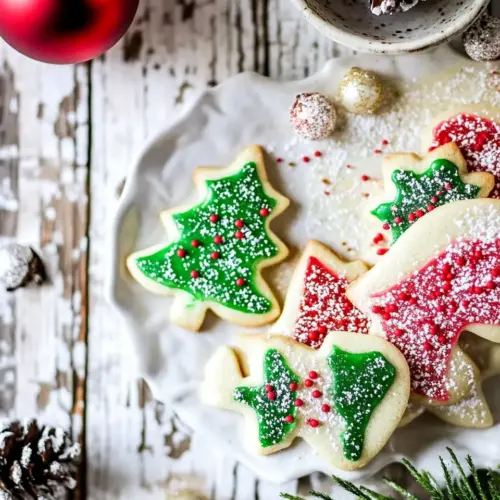
Eggnog Scented Sugar Cookies with Easy Vanilla Icing
Eggnog Scented Sugar Cookies with Easy Vanilla Icing are tender, spiced holiday cookies with a creamy, aromatic finish. The cookies offer a slightly crisp edge and soft center, while the smooth vanilla icing sets beautifully for decorating. Perfect for cookie exchanges and festive gatherings, these easy to make treats bring cozy winter flavors to your kitchen and make excellent gifts and party plates.
Equipment
- Stand mixer or electric mixer
- Mixing Bowls
- Rolling Pin
- Cookie cutters
- Baking Sheet
- Parchment Paper
- wire cooling rack
Ingredients
- 3 sticks (1 1/2 cups) unsalted butter softened Cream thoroughly to incorporate air and create a tender, flaky cookie structure while providing rich flavor and moisture throughout the dough.
- 1 1/4 cups granulated sugar Sweeten the dough and help with creaming to create lift and a slight crunch at the cookie edges for balance.
- 1 vanilla bean seeds removed (optional) Infuse an intense, aromatic vanilla flavor when scraped into the batter; seeds add visual flecks and concentrated fragrance for a gourmet touch.
- 1 1/2 teaspoons pure vanilla extract Enhance and deepen vanilla flavor while rounding out the overall aroma; helps intensify sweetness perception and complements the eggnog notes.
- 1/2 teaspoon almond extract *optional Add a subtle almond-carmel note to heighten complexity; use sparingly to avoid overpowering the delicate eggnog and vanilla flavors.
- 1 egg at room temperature Bind the dough and provide structure through proteins; also contributes moisture, richness, and slight leavening when creamed with butter and sugar.
- 1/3 cup high quality eggnog Introduce classic holiday flavor and extra moisture, lending a creamy, spiced note that complements nutmeg and creates a signature eggnog taste.
- 4 1/2 cups all purpose flour Provide the bulk of the dry structure and determine the cookie’s texture; adjust handling to avoid overworking for tender results.
- 1 teaspoon baking soda React with acidic components to gently leaven the cookies and produce a lighter crumb and subtle rise during baking.
- 1/2 teaspoon salt Balance flavor and enhance the dough’s structure by strengthening gluten slightly; also controls sweetness and rounds out taste.
- 4 cups powdered sugar Create a smooth, thick icing base that sets to a silky finish when combined with meringue powder and liquid for decorating.
- 2 tablespoons meringue powder Stabilize and help set the icing while providing structure and glossy finish; allows the icing to dry firm enough for decorating.
- 6 -8 tablespoons water Thin the icing to desired consistency for flooding or piping; adjust gradually to control flow and drying time for decorations.
- 1 vanilla bean seeds removed Impart a concentrated vanilla aroma and visible specks in the icing or dough; seeds deepen flavor and elevate presentation.
- 1/4 teaspoon nutmeg Contribute warm, nutty spice that defines the eggnog profile and pairs with vanilla and almond for authentic seasonal flavor.
- assorted food coloring, holiday sprinkles and/or candies, to decorate (optional) Add color, texture, and festive detail to finished cookies; use sparingly to enhance appearance without altering flavor balance.
Instructions
- To make the cookies, cream the butter, sugar, vanilla bean seeds, vanilla extract and almond extract in a large bowl or bowl of a stand mixer until light and fluffy, about a full 3-5 minutes.: The aroma at this stage should be sweet and fragrant, with the unsalted butter and granulated sugar turning pale and airy, which signals trapped air for lift. You will notice tiny bubbles in the mix and a lighter color, this is the visual cue you want. The sound is a gentle, steady whir from the mixer rather than a harsh grinding, meaning the ingredients are combining smoothly. This creaming step matters because it sets the structure and texture, helping cookies be tender rather than dense. A common mistake here is undercreaming, which yields heavy cookies, or overcreaming, which can make the dough too soft; stop once the mix looks pale and holds texture. If the mixture starts to look greasy, pop the bowl in the fridge for 10 minutes to firm the butter.
- Add the egg and eggnog and mix until evenly combined. Add half the flour, baking soda and salt, beating until combined. Then add the remaining flour and beat until the dough forms a ball.: You should smell a richer, custardy note from the egg and eggnog at this point, and the batter will change from fluffy to more cohesive, slightly glossy and smooth to the touch. The tactile cue is a dough that pulls together but is not sticky. The reason for adding flour in two parts is to avoid overmixing the gluten, which keeps cookies tender. Watch for a dough that just comes together, a common error is overbeating after the flour which toughens the result. If the dough seems too sticky, rest it briefly in the fridge to firm up before rolling.
- Generously flour your work surface. Divide the dough in half and flatten each half into a disk.: The cool, slightly firm disks make them easier to roll and cut; you should feel a pliable, cool dough that does not stick to your hands. Flour the board until it looks dusted but not buried, and press the dough into even disks so they chill uniformly. This step is about control, because a warm, soft disk will spread too much. A typical problem is skipping the flour and having the dough cling to the rolling pin; using a light dusting prevents that without drying the dough out.
- Roll out the dough to 1/4 inch thickness. Make sure you are using enough flour or your dough will stick. You can also roll the dough out between two pieces of wax paper. Cut out the cookies into your desired shapes. Carefully transfer the cookies to a parchment lined baking sheet. Cover the baking sheet and place the baking sheet in the freezer, freeze until very firm, about 25 minutes. Roll out the leftover scraps, and repeat with the remaining disk of dough.: As you roll, notice the dough surface becoming smooth and slightly cool to the touch; this indicates the right temperature. The even 1/4 inch thickness is the key visual cue, as any thinner will brown too quickly and any thicker will change the bake time. Using wax paper helps prevent sticking and keeps edges clean. Transferring the shapes carefully to the baking sheet keeps them intact; I use a thin spatula for this. The freezing step firms the fats so the cookies hold their shape and yields a clean edge after baking. A common mistake is underfreezing, which allows shapes to spread and lose definition.
- Preheat oven to 350 degrees.: You will feel the kitchen warm and smell a faint dry heat as the oven reaches temperature, and a steady, accurate preheat is essential so the cookies begin baking immediately with consistent oven spring. Preheating also ensures the first cookies do not overbake while the oven warms. An error to avoid is putting the pan in before the oven is fully hot, which alters timing and texture. Use an oven thermometer if your oven runs cool or hot to get predictable results.
- Bake the cookies on the middle rack of the oven for 12-15 minutes or until just lightly golden brown. Do not over bake. Cool on the baking sheet five minutes and then transfer to a wire cooling rack to cool completely.: When correctly baked you will see faint golden edges and a set center, and the smell will be warm, buttery, and spiced. The sound when you tap the edge is a quiet, firm click, not a hollow ring. Letting them cool on the sheet for five minutes lets them finish gently while setting; moving them too soon risks breakage. Overbaking is the most common issue, leading to dry cookies, so pull them when they still look slightly pale in the center.
- To make the icing, combine the sugar and meringue powder in the bowl of an electric mixer fitted with the paddle attachment. Mixing on low speed, add 6 tablespoons water. Mix until icing holds a ribbon-like trail on the surface of the mixture for 5 seconds when you raise the paddle. Add the vanilla bean seeds and nutmeg, mix until just combined.: The texture you want is glossy and smooth with a slow, ribbon like fall from the paddle, which indicates the right viscosity for flooding and piping. You will notice a sweet, spiced perfume as the vanilla bean and nutmeg integrate. This stage matters because the right consistency ensures the icing sets without cracking. A frequent mistake is adding too much water at once, making the icing runny; add it slowly and test the ribbon. If the icing stiffens, a few drops of water will revive it.
- Frost the cooled cookies and decorate as desired. I like to keep things simple and use holiday sprinkles to decorate most of my cookies. You can also use food coloring and color the frosting red, green or whatever colors you like. To pipe the icing onto the cookies, add the icing to a gallon size ziploc bag (or a piping bag), then snip off a small portion of the corner off.: When you frost, the smooth, cool feel of the icing meets the cookie and creates a slight sheen; the frosting should settle and firm within an hour depending on humidity. Decorating is where you can be playful, adding sprinkles or a thin piped border for definition. The why here is presentation and texture contrast, as the firm icing pairs with the tender cookie. A common issue is decorating while the cookies are warm, which causes the icing to melt and slide off; always frost completely cooled cookies.
Notes
- Swap extracts carefully Use almond extract sparingly if you want a nutty undertone, but omit if you prefer a cleaner eggnog profile. A little goes a long way and will change the whole aroma.
- Adjust icing thickness Add water a teaspoon at a time until you reach a ribbon stage for flooding, or keep it stiffer for piping detailed edges. I always test on parchment first so I know the set time.
- Freeze dough for convenience Portion and freeze disks for up to one month, then slice or thaw briefly before cutting and baking. This saves active time on busy days while preserving flavor.
- Color the frosting Use gel coloring to avoid thinning the icing, and mix small amounts to get pastel or vibrant tones depending on your decorating plan. Gel gives strong color with minimal impact on consistency.
- Decorate simply or elaborately Keep it minimal with sprinkles for a classic look, or pipe borders and fill for a polished finish. I choose simple for casual gatherings and more ornate piping for gifts.