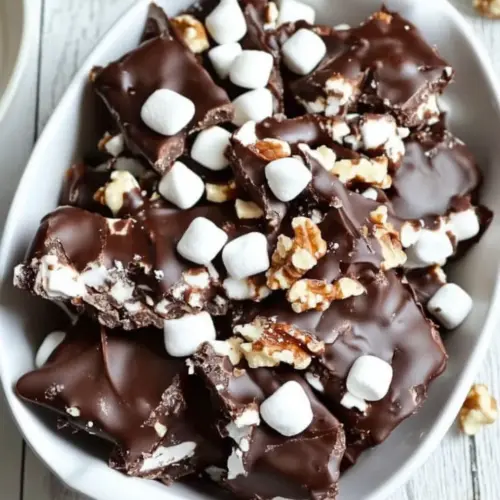
Easy Rocky Road Candy Recipe with Walnuts and Marshmallows
Easy Rocky Road Candy Recipe with Walnuts and Marshmallows is a creamy and crunchy treat that is easy to make and perfect for gift giving. Silky chocolate envelops pillowy marshmallows and toasted walnuts for a satisfying texture contrast, making it a favorite for parties and holidays. Quick to assemble, this crowd pleasing candy is worth making for its taste and ease.
Equipment
- Baking Pan
- Spatula
- saucepan or double boiler
Ingredients
- 20 ounces chocolate Melted helps bind the candy together and provides the rich, glossy chocolate base that carries flavors; choose quality chocolate for better texture and mouthfeel. Melted chocolate sets firm when cooled, creating the signature crunchy-snap or chewy-silky contrast depending on temper and formulation. Melted chocolate also acts as the primary sweetener and flavor vehicle in the rocky road.
- 15 large marshmallows quartered Quartered adds pillowy texture and sweet, bouncy contrast that brightens each bite; cutting large marshmallows into quarters distributes them evenly through the chocolate mixture. Quartered marshmallows introduce soft pockets that offset the crunch of nuts and allow small air pockets, improving overall mouthfeel. Quartered pieces also soften slightly when mixed, creating a pleasant chewiness without overpowering the other components.
- 1/2 cup chopped walnuts Chopped provides crunchy contrast and nutty richness, bringing savory, toasty notes that balance the sweetness of chocolate and marshmallows. Chopped walnuts contribute textural complexity and healthy fats that help the candy feel substantial and satisfying. Chopped pieces also add aromatic depth and visual interest when folded into the rocky road mixture.
Instructions
- Lightly spray a baking pan with nonstick spray. Layer the bottom of the pan with a third of the melted chocolate.: The faint scent of oil and the cool metal of the pan tell you it is ready, and the film of spray prevents the candy from sticking when it sets. This step matters because it makes removal clean and keeps edges intact, making your pieces look neat. A common mistake is over spraying, which can cause small oily spots on the chocolate, so apply a light, even mist and wipe any heavy pools with a paper towel.
- Line pan with marshmallows and pour nuts on top.: As the warm chocolate flows, it should glisten and spread like a rich lacquer across the pan, catching light and creating a base that will anchor the toppings. This initial layer sets the visual and textural foundation, so pour slowly to achieve an even coat. If you rush, the chocolate can pool unevenly and create thin spots that break when cutting, so take your time and tilt the pan gently to even it out.
- Pour remaining melted chocolate on top. Gently spread chocolate over marshmallows and nuts.: When you add the quartered marshmallows they should rest partially submerged, with edges peeking through the glossy chocolate. Sprinkle the chopped walnuts so they nestle among the marshmallow pieces, giving crunchy islands throughout. This layered assembly matters because it balances sweetness and texture in each bite. One misstep is clustering too many toppings in one area, which leads to uneven distribution in pieces, so spread them out mindfully.
- Let it set at room temperature. Break or cut into pieces.: The second pour should envelop the toppings, muffling air pockets and creating a cohesive slab, the warm chocolate making everything shine as it settles. It is important for binding the candy so it does not crumble apart. If the top pour is too thin, the candy may not hold, so ensure your chocolate remains fluid but not scorching. Avoid re heating repeatedly, which can dull the gloss and alter texture.
- Gently spread chocolate over marshmallows and nuts: Using a spatula or the back of a spoon, glide the surface until smooth, watching for stray peaks or trapped air. The sound is quiet, the surface becoming satin as you work, and the gentle pressure ensures the toppings are embedded without being crushed. This technique keeps the edges crisp and the interior structured. A common error is pressing too hard, which can flatten marshmallows and make the texture one dimensional, so be gentle and patient.
- Let it set at room temperature: Place the pan on a cool surface and resist the urge to move it. As the slab firms, the chocolate will lose its glossy sheen slightly and become matte, and the scent will mellow. Setting at room temperature helps avoid condensation that sometimes occurs with refrigeration, which can cause sugar bloom on the surface. If you store it in a humid spot while setting, you may notice a sticky or tacky finish, so choose a dry, stable area and give it time to go fully firm.
- Break or cut into pieces: Once firm to the touch, use a sharp knife or your hands to break the slab into serving pieces, each revealing pockets of marshmallow and walnut. The break should be clean, with crisp edges and visible inclusions. Cutting allows you to create uniform pieces, while breaking gives a rustic look. If the chocolate is not fully set, pieces will smear, so ensure it is completely cool and firm before portioning.
Notes
- Choose quality chocolate, because the chocolate flavor dominates the recipe; opt for a bar you enjoy eating on its own to ensure a rich final result.
- Work quickly but calmly, the chocolate sets as it cools, so have toppings ready and avoid long pauses that let the chocolate thicken.
- Keep a warm water bowl nearby, for occasional gentle reheating if the chocolate loses gloss while you assemble the pan.
- Evenly distribute marshmallows and walnuts, so each piece offers a pleasing combination of textures and flavors.
- Store at room temperature in a cool, dry place, not in the fridge, to prevent condensation and preserve a clean finish on the chocolate.