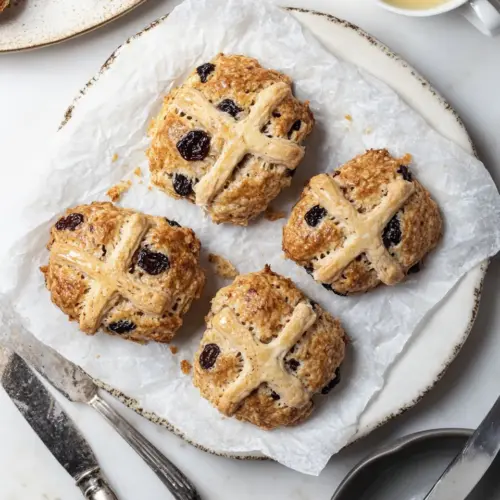
Easy Raisin Hot Cross Scones
Easy Raisin Hot Cross Scones offer a tender, spiced crumb with chewy raisins and bright dried citrus. These easy to make scones are perfect for spring brunch or an Easter morning, delivering warm cinnamon aromas and a golden crust that looks bakery worthy. Make them for a cozy gathering or quick weekend treat, they reheat beautifully and are irresistible straight from the oven.
Equipment
- Mixing Bowl
- Whisk
- Pastry Cutter
- Grater or knife
- Baking Sheet
- Parchment Paper
- Oven
Ingredients
- 305 grams of cake flour Measure precisely to ensure a tender, lightly structured crumb; cake flour's lower protein content yields softer scones and helps create a delicate texture when combined with cold butter.
- 60 grams of white sugar Add sweetness and aid in browning; white sugar balances the spices and fruit while contributing to caramelization on the scone surface during baking.
- 1/2 tsp baking powder Provide gentle leavening and light lift; baking powder reacts during baking to help scones rise and produce a tender, airy interior.
- 1/2 tsp baking soda Contribute additional leavening and slight tang; baking soda reacts with acidic components like buttermilk to enhance rise and create browning.
- 2 tsp mixed spice Impart warm, aromatic flavor; mixed spice blends complement the fruit and give the scones a classic spiced character throughout the dough.
- 1 tsp cinnamon Add warm, sweet-citrus notes; cinnamon deepens the overall spiced profile and pairs well with raisins and sultanas.
- 1/2 tsp ground ginger Bring a subtle spicy warmth; ground ginger adds brightness and a hint of heat that balances the sweeter spices.
- 1/2 tsp salt Enhance overall flavor and control taste balance; salt heightens sweetness and spices while rounding out the dough's flavor.
- 130 grams of cold butter grated or cut into small cubes Create flaky layers and richness; cold butter, grated or cubed, is worked into the flour to form steam pockets that produce tender, layered scones.
- 100 grams raisins and sultanas Provide chewy, fruity sweetness and texture; raisins and sultanas distribute bursts of concentrated flavor throughout the scones.
- 30 grams of dried citrus peel Contribute concentrated citrus aroma and slight chew; dried citrus peel brightens the flavor and complements the dried fruit and spices.
- 250 ml buttermilk Add moisture and tang for tender crumb; buttermilk reacts with baking soda to leaven and gives a soft, slightly tangy interior.
- 1 tsp vanilla extract or essence Introduce fragrant depth and sweet vanilla notes; vanilla extract enhances the overall aroma and complements the spices and fruit.
- 1 egg to brush the tops Create a glossy, golden finish on the tops; beaten egg brushed before baking promotes attractive color and a slightly firmer crust.
- Sugar to sprinkle optional Provide optional sparkle and extra sweetness on top; sprinkling sugar before or after baking gives a pleasant crunch and visual appeal.
Instructions
- Add the flour, sugar, baking powder, baking soda and spices to a bowl and give it a mix.: You will notice a pale, evenly blended dry mix with specks of spice throughout, and the aroma of mixed spice and cinnamon will be the first clear signal that you are building the flavor base. Use your hands or a whisk to ensure there are no concentrated pockets of leavening, because uneven distribution can create spots that rise too quickly, then collapse. A common mistake is measuring directly over the bowl and compacting the flour, which can lead to dense scones, so measure separately and add gently. If the mix seems slightly lumpy from spices, that is fine, just ensure the leavening is spread evenly so the final texture is uniform.
- Add the butter to the bowl and using your fingers or a pastry cutter rub it into the flour until it resembles a fine crumb. You want most of the butter incorporated at this stage.: As you work the cold butter into the dry ingredients, you will hear a soft rubbing sound and see the mixture change from powdery to a texture like fine breadcrumbs or coarse sand with tiny butter pieces. Those tiny butter bits are essential because they melt in the oven to create layers and tenderness. Keep the butter cold, and work quickly; warm hands or overworking will cause the butter to smear and the scones to lose flakiness. If the butter starts to clump or becomes greasy, pop the bowl into the fridge for a few minutes to firm it back up.
- Add the raisins, sultanas and citrus peel and mix to combine.: When you fold in the raisins , sultanas , and dried citrus peel , the mixture will show little pockets of fruit and flecks of peel, adding visual interest and bursts of flavor. Ensure the fruit is evenly distributed by turning the bowl and folding gently, because uneven distribution can leave some scones overloaded while others are bare. A frequent error is adding too many dried fruits at once, which can steal moisture from the dough and make shaping harder, so keep the portions as listed. If the fruit seems clumped, separate pieces with your fingers so they spread evenly through the dough.
- Add the vanilla to the buttermilk and give it a good mix, then add this to the dry ingredients. Mix this briefly until just combined and then tip it out onto a floured surface (it can be crumbly at this stage). Briefly knead/pull the dough together. There should not be any flour visible. Press it out to form a thick disk about 2.5 cm – 3 cm high.: Once you stir the vanilla into the buttermilk , the liquid will smell sweet and rounded, and when poured over the dry mix you will hear a soft, moistening sound as the crumbs absorb the liquid. Mix briefly and only until the dough just comes together, because overmixing develops gluten and makes scones tough. At this stage the dough may look crumbly but should hold when pressed together. A typical mistake is adding extra liquid if the dough seems dry, so resist that urge; instead, knead briefly to bring it together. If you do need more moisture, add a splash at a time to avoid an overly wet dough.
- Using a sharp knife cut this in the 8 triangles (as you would cut a pizza), or using a sharp 5 cm– 6 cm cookie cutter, cut out the scones. Push whatever dough is left over together to make more rounds until all the dough is used.: When you turn the dough onto a lightly floured surface, you will feel a soft, slightly tacky mass that holds shape when gently pressed. The brief knead should feel effortless, and you will see the dough come together without visible loose flour. Patting it into a thick disk ensures even rise and a tender interior. Avoid heavy kneading which makes the dough elastic and results in dense scones. If the dough sticks, dust the surface and your hands sparingly; too much extra flour will dry the dough and change the final texture.
- Beat the egg and brush only the tops of the scones with this (not the sides). Sprinkle over a little sugar if you want a crunchy topping. Place the scones on a lined baking sheet and then put them in the fridge while you preheat the oven.: As you slice the disk into wedges or use a cutter, you will see clean edges and tidy portions that will rise evenly in the oven. If using a knife, press straight down in a single motion to avoid sealing the layers shut, and if using a cutter, press firmly without twisting to preserve the lift. Commonly, people twist the cutter which seals edges and prevents proper rise, so avoid twisting. Gather scraps together gently to form more rounds, but do not overwork the dough, as repeated handling will tighten the texture.
- Preheat the oven to 200 C/400 F and bake the scones for 20 – 22 minutes until golden brown and well risen. If necessary, loosely cover the scones with tin foil to prevent over-browning.: Brushing the tops with beaten egg gives a glossy, golden finish, and a light sugar sprinkle will caramelize into a slight crunch. Chilling the shaped scones helps the butter firm up again so they rise taller and flake better. If you skip chilling, they may spread instead of rising. A typical oversight is brushing egg on the sides, which can glue the scones to each other; stick to the tops only to keep them distinct.
- Preheat the oven to 200 C 400 F and bake the scones for 20 to 22 minutes until golden brown and well risen if necessary loosely cover the scones with tin foil to prevent over browning: In the oven you will hear a gentle crackle as steam escapes and see the scones puff and turn a rich golden brown. The aroma will deepen, with the spices and dried citrus peel becoming more pronounced. Use the visual cue of a deep golden top and a well risen center to know they are done; an underbaked scone will feel heavy and pale. If the tops brown too quickly, tent with foil to allow the centers to finish cooking without burning the exterior. Opening the oven repeatedly lowers temperature and can prevent proper rise, so check quickly toward the end of baking.
Notes
- Chilling matters Cold dough yields taller scones, so chill shaped rounds for at least 10 minutes; this firms the butter and prevents spreading in the oven.
- Measure by weight Weighing the cake flour produces more consistent results than cups, helping the dough retain the right moisture balance every time.
- Plump dried fruit If your raisins or sultanas seem dry, give them a quick soak in warm water or a splash of the buttermilk, then drain; this keeps the fruit juicy inside the scone.
- Control browning If the tops are coloring too quickly, tent with foil midway through baking to let the centers finish without over browning the crust.
- Make ahead and freeze Bake and cool completely, then freeze in a sealed container for up to three months; reheat at a low temperature to revive texture before serving.