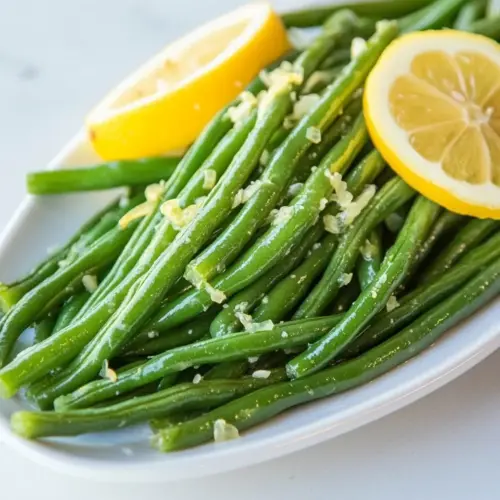
Easy Garlic Lemon Green Beans
Easy Garlic Lemon Green Beans are a bright, garlicky side with a crisp snap and fresh citrus finish. These quick green beans become slightly blistered in olive oil and finish with lemon zest for a vibrant, easy weeknight side that pairs with many mains. Make them for speedy dinners when you want something fresh, flavorful, and crowd friendly.
Equipment
- Large Pot
- Large Skillet
- Paper towels
Ingredients
- 1 pound green beans fresh, ends trimmed Trimmed and crisp, provides the main vegetable body and fresh, slightly sweet flavor to the dish while offering a satisfying crunch when properly cooked. Holds up well to quick sautéing or blanching and soaks up seasonings for balanced bites.
- 1 tablespoon olive oil Light and fruity, lubricates the pan and helps conduct heat for even cooking while contributing subtle richness. Enhances flavor absorption and prevents sticking during the quick sauté.
- 3 garlic cloves finely minced Aromatic and pungent, imparts savory depth and a warm garlicky backbone when minced finely to release oils quickly. Brightens the overall profile and melds with the fat for even distribution of flavor.
- 1 teaspoon lemon juice Bright and acidic, adds a clean citrus tang that lifts the dish and balances the richness from oil and garlic. Helps to accentuate the fresh green flavors and provides a subtle contrast to the beans.
- 2 teaspoons lemon zest Concentrated and zesty, delivers intense lemon aroma and burst of citrus oils that amplify brightness without extra acidity. Sprinkled near the end, it preserves volatile oils and fresh lemon character.
Instructions
- Bring a large pot of water to a boil on high heat. Once boiling, add the green beans and cook, boiling, for 3 minutes.: The kitchen fills with the sharp, clean sound of boiling water when you bring it to a rolling boil, and that vigorous movement ensures even cooking for the green beans . Using enough water prevents the temperature from dropping when you add the beans, which keeps them cooking uniformly. A common mistake is crowding the pot with too many beans at once, which can leave them unevenly blanched and limp. Keep the lid off so you can watch for a full boil, and make sure the water is lively before adding the beans so you get the quick, bright blanch you want.
- Drain the beans and lay them on a paper towel and gently pat dry.: You will notice the water quiet a little as the beans are added, then resume its rapid bubble. After about 3 minutes the beans should turn a vivid green, which signals the cell walls have been softened while the interior remains crisp. The smell is faintly vegetal and clean, not starchy. Overcooking is the usual error here, so set a timer and keep the time short to preserve that toothsome texture. If the beans are thicker than usual, you might add 30 seconds, but err on the side of slightly underdone since they finish in the skillet.
- Heat the olive oil in a large skillet on medium heat. Once hot, add the green beans and garlic. Cooking, stirring often, until the beans just begin to blister. Add the lemon juice and 1 teaspoon of the zest. Cook until the beans are tender but still a bit crunchy.: When you drain, steam rises and the beans feel hot and slightly pliable. Laying them on a towel and patting removes surface water so the olive oil can adhere and the beans can blister in the pan, rather than steam. If you skip this drying step, the oil will sputter and the pan will steam, preventing caramelization. A troubleshooting tip is to spread them in a single layer to cool quickly, which makes pan finishing more effective and helps avoid sogginess.
- Sprinkle with remaining zest and serve.: The pan will begin to shimmer slightly when the olive oil is ready, releasing a soft, warm aroma. Heating the oil patiently sets the stage for quick, even toasting of the garlic and for the beans to blister where they hit the surface. If the oil smokes, it is too hot and will make the garlic bitter, so reduce the heat and let it cool a touch. Using a wide skillet ensures more surface contact for blistering, which gives pleasing color and a hint of caramelization.
- Once hot, add the green beans and garlic: As the beans meet the hot oil you hear a bright sizzle and see small pops of moisture. The garlic should perfume the oil almost immediately, filling the kitchen with a warm, savory scent. Stirring often encourages even blistering and prevents the garlic from burning in any one spot. A common misstep is adding garlic too early, which leads to browned or bitter pieces, so add it with the beans so it toasts gently during motion. Watch for small golden flecks, which indicate the garlic has released its aroma without turning bitter.
- Cooking, stirring often, until the beans just begin to blister: You will see tiny browned spots appear where the beans touch the skillet, and the sound softens to a gentle pop. Blistering adds a toasty layer of flavor that contrasts with the bean's fresh interior. Stirring frequently distributes heat and avoids hot spots that can char the garlic. If you notice large blackened areas, the pan is too hot, so lower the heat and stir more often to preserve a pleasant roasted note instead of acrid charring.
- Add the lemon juice and 1 teaspoon of the zest: The moment you add the lemon juice , the aroma shifts, bright and citrusy, cutting through the oil and garlic. Acidity wakes up flavors and balances the richness of the oil, so it is crucial to add it toward the end to keep its vibrancy. Mixing in just 1 teaspoon of the lemon zest here helps the citrus integrate and cling to the warmed beans. A troubleshooting note is to add juice slowly and taste, because too much acid can overwhelm the other flavors.
- Cook until the beans are tender but still a bit crunchy: At this stage the beans should yield under a bite but keep a pleasant snap, and you will notice a sweeter, roasty scent from the blistered areas. Texture is everything, so check a bean by tasting; it should not be mushy, nor should it be raw. If they are taking longer to reach the right point, reduce the heat and cover briefly to let steam finish them gently, then uncover to evaporate excess moisture. Overcooking is the typical mistake here, so stop when you still feel a little resistance.
- Sprinkle with remaining zest and serve: The final sprinkle of lemon zest delivers an immediate hit of fragrant oils and a bright, citrusy finish that lifts the whole pan. Visually, the tiny flecks of zest make the dish feel polished, and on the palate they provide lively contrast to the toasted garlic. Serve promptly so the aroma and texture are at their peak. If you let it sit too long, the beans will cool and lose some of their crisp charm, so bring the pan to table or transfer to a warm serving dish quickly.
Notes
- Adjust garlic intensity: If you prefer a milder garlic note, simply reduce to 2 garlic cloves or mince more coarsely so the flavor is gentler. This keeps the aromatic profile but lets the green beans shine more.
- Use different oil levels: For a lighter finish, use a scant teaspoon of olive oil and toss quickly at the end; for more sheen, stick to the listed tablespoon. The amount of oil changes mouthfeel but not the core flavors.
- Finish with zest at the table: Grating extra lemon zest over each bowl right before serving elevates the aroma and gives guests a fresher citrus hit. It’s a simple flourish that has high impact.
- Maintain bean texture: If you want extra snap, shorten the blanch by 30 seconds and allow the skillet to finish them; if you prefer more tenderness, blanch a touch longer but cool briefly so they do not go mushy.
- Scale for a crowd: Multiply ingredients and use a wide sheet pan to blanch in batches, then finish in a very large skillet or toss gently with warmed oil and garlic in batches to ensure even blistering.