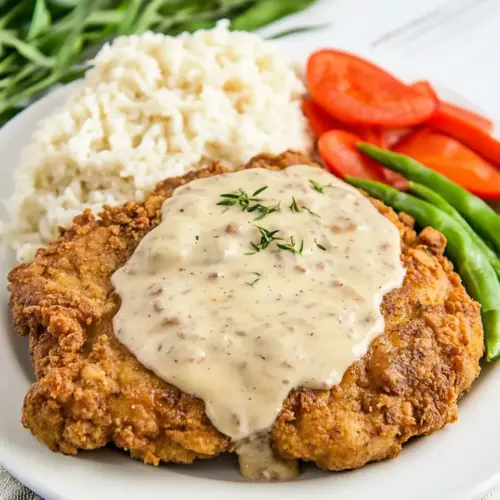
Easy Cracker Barrel Country Fried Steak
Easy Cracker Barrel Country Fried Steak brings a crispy golden crust and tender interior in a comforting, easy weeknight dinner. The double dredge with all-purpose flour and saltine cracker crumbs plus a buttermilk soak creates a perfectly textured coating that sizzles and sings. Ideal for a cozy family meal, this recipe delivers diner style satisfaction with minimal fuss, worth making for the nostalgia and texture alone.
Equipment
- Deep fryer or large pot
- Thermometer
- Wire Rack
- Baking Sheet
- Shallow Dishes
Ingredients
- oil for frying Used for frying and achieving a crisp, golden crust on the steak; maintain a neutral oil with a high smoke point and enough quantity to shallow- or deep-fry. Monitor oil temperature to ensure even cooking and prevent sogginess, and reuse only if clean. Carefully drain cooked steaks on a rack or paper towels to preserve texture.
- 1 1/2 cups all-purpose flour Provides the primary coating for dredging the steaks, delivering structure and a crunchy exterior when fried; mix thoroughly with seasonings for consistent flavor. Helps the buttermilk batter adhere and creates the classic country-fried crust that browns evenly. Can be seasoned further if a stronger savory profile is desired.
- 1/2 cup saltine cracker crumbs Adds an extra crunchy texture and subtle saltiness to the breading, complementing the flour for a more complex crust. Crush uniformly to avoid large shards that might create uneven frying, and mix into the flour for balanced distribution. Enhances mouthfeel without overpowering the other seasonings.
- 1 1/2 teaspoons salt Balances and enhances overall seasoning levels in the coating and batter; measure carefully to avoid oversalting. Dissolve some in the wet mixture if desired to ensure even distribution, and adjust based on dietary preferences. Works together with pepper to build savory depth in the crust.
- 2 teaspoons ground black pepper Provides sharp, pungent heat and savory depth to the seasoning mix; freshly ground pepper offers brighter flavor. Distribute evenly through the flour and cracker crumbs to season the exterior, and consider personal spice tolerance when measuring. Complements salt and the richness of the meat.
- 1 cup buttermilk Tenderizes and flavors the steaks while helping the dry coating adhere; its acidity and thickness create a sticky base for the flour. Combine with water to thin slightly if needed, and allow steaks to soak briefly for better absorption. Contributes a subtle tang that enhances overall richness.
- 1/2 cup water Thins the buttermilk to create an even batter and adjust coating viscosity; use to reach a consistency that clings without dripping excessively. Add gradually until the desired texture is achieved for proper adhesion of the flour mixture. Helps control how much breading collects on each steak.
- 1 pound tenderized cube steaks Serves as the main protein for the dish and benefits from tenderizing to achieve a soft, biteable texture after frying. Pound or buy pre-tenderized cube steaks to ensure uniform thickness and quicker, even cooking. Season and dredge thoroughly to build a flavorful, crispy exterior while keeping the interior juicy.
Instructions
- Pour 3 to 4 inches of oil into a deep fryer or large pot, and heat the oil to 350°F.: The air will fill with a faint nutty note as the oil nears temperature, and you should see a slow shimmering surface when it is ready. Maintaining a steady 350°F is crucial for an even golden crust without overcooking the inside, because too hot oil will burn the coating and leave the steak undercooked, while too cool oil will soak the breading. Use a thermometer and adjust the burner in small increments, watching for a consistent shimmer, and listen for the gentle, steady hiss that indicates the oil is ready. A common mistake is crowding the pot which drops the temperature rapidly, so fry in batches to keep that heat steady.
- Combine the flour, cracker crumbs, salt, and pepper in a shallow dish. Mix well.: When you mix these dry ingredients, smell the pepper and toasted cracker notes emerging, which hints at the flavor the crust will deliver. Even distribution is important so the seasoning is consistent across the steak surface, and the mixture should look uniform in color. Stirring fully prevents pockets of plain flour or concentrated pepper, and it ensures each bite carries the intended savory balance. Watch out for over mixing which can compress the crumbs; gentle folding is best.
- In another shallow dish, combine the buttermilk and water. Mix well.: The liquid will smell tangy from the buttermilk , and the slight thinning from the water produces a soak that clings without becoming a batter. This helps the coating adhere in layers, which creates a durable crust. Keep this mixture chilled until use because cooler liquid helps the breading set on the meat more reliably. A typical error is using a very thick soak that encourages clumping rather than an even cling.
- Dip the cube steaks into the flour mixture and shake off the excess.: You will feel the dry mix lightly tack to the damp surface of the meat, and the visual cue is an even dull coating. Shaking off excess prevents a gummy layer from forming when the meat hits the wet soak. This initial flour layer acts as a primer so the buttermilk can adhere evenly; skip this and the subsequent layers may slide. One mistake to avoid is overcoating, which creates an overly thick crust that can stay doughy inside.
- Dip the flour-coated cube steaks into the buttermilk, shake off the excess.: The buttermilk should cling and darken the surface slightly, and you will hear a faint drag as you lift the steak. This step hydrates the first flour layer and activates the binding for the final dredge, contributing to a cohesive crust. Letting excess drip off keeps the breading texture light rather than soggy. A common misstep is leaving the steak submerged too long which can make the coating fall away during frying.
- Dredge the cube steaks in the flour again.: The second dry coat will feel slightly tackier than the first and should have an even coverage that hides the meat surface. This creates the signature double-layered crust; the first layer primes and the second locks everything together for frying. Press gently so crumbs adhere without compacting the mixture, and ensure edges are well covered where oil can exploit thin spots. Avoid pressing too hard which compresses the crumb structure and prevents a crisp finish.
- Place the breaded steaks on a wire rack resting on a baking sheet. Allow the breading to set up for 5 minutes. This helps to set the breading on the steak.: The resting time allows the coating to dry and adhere, which reduces loss of crumbs in the oil and promotes an even crust. You should notice the surface go from glossy to slightly drier, and it will feel more robust to the touch. This short pause improves frying results because a set coating resists falling off when it hits hot oil. Skipping this rest often leads to patchy breading and loss of texture.
- Place the breaded steaks into the hot oil. Fry the steaks for 3 to 5 minutes on one side, until the sides of the meat start to brown and the top of the meat starts to cook.: When the steaks hit the oil you will hear an enthusiastic sizzle, and small bubbles should surround the edges. Look for the sides to develop a deepening golden shade and for the top to change from raw sheen to a more opaque, cooked look. This sensory feedback signals that the crust is forming and the interior is warming. Keep an eye on oil temperature because it will drop slightly when the meat is added; adjust the heat to maintain a steady 350°F . A misstep here is moving the steaks too soon which can tear the crust before it sets.
- Gently flip the steaks away from you to avoid splashing hot oil onto yourself, and fry for 3 to 5 minutes on the other side.: You will hear a renewed sizzle and see even bubbling as the second side browns, and the color should match the first side when done. Flipping away from your body minimizes the risk of hot oil splatter, and using tongs or a spatula gives you control so the crust remains intact. Fry until both sides are uniformly golden brown, watching for any dark spots that indicate oil too hot. A common problem is overbrowning because the oil was too hot or the steak was left too long on one side.
- When both sides are golden brown and crispy, remove the steaks from the hot oil and drain on a clean wire rack over a baking sheet.: The finished steaks will glisten slightly then settle into a satisfyingly crisp shell as they drain, and the aroma will be warm and savory. Draining on a rack prevents steam from making the crust soggy, preserving that fresh fried crunch. Let them rest briefly to allow internal juices to redistribute so each bite remains tender. Placing them on paper directly can trap moisture and soften the coating, which is a frequent mistake.
Notes
- Use a neutral high smoke point oil such as vegetable or canola oil to achieve steady browning without imparting extra flavors, and monitor the temperature with a thermometer so you keep it around 350°F.
- Double dredge for durability by applying a light initial flour coat before the buttermilk and finishing with a second flour coat, which produces a crust that holds up during frying and slicing.
- Do not overcrowd the pot because adding too many steaks at once drops the oil temperature and yields uneven, oily crusts; fry in small batches for consistent color and texture.
- Let the coating rest briefly on a wire rack before frying so it sets and adheres better to the steak, reducing the chance of the breading falling off in the oil.
- Watch visual cues such as a steady shimmer on the oil surface and an even golden brown on the edges, these signs are more reliable than exact timing alone because stovetops vary.