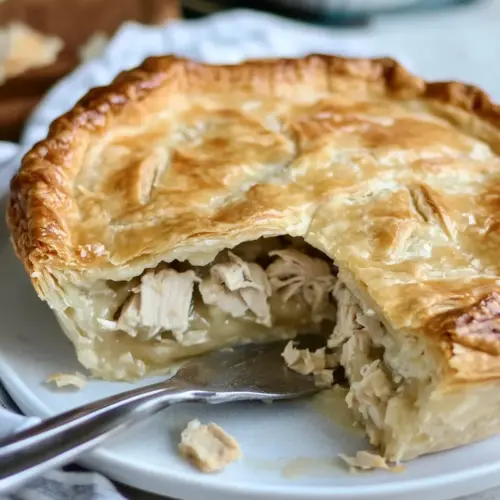
Easy Chicken Pie
Easy Chicken Pie is a creamy, comforting pot pie with a flaky crust and tender shredded chicken. This easy weeknight dinner delivers savory, cozy flavors and a golden top that tempts the whole table. It’s perfect for feeding a crowd or prepping ahead for holidays and gatherings, making it a practical and satisfying choice to make tonight.
Equipment
- Oven
- Deep pie plate
- Mixing Bowl
- Pastry Brush
Ingredients
- 2 lbs chicken breast - cooked and cut into bite sized pieces or shredded Cooked and cut into bite sized pieces or shredded provides the protein and texture for filling, lending hearty substance to each pie bite. Enhances savory flavor and soaks up the creamy sauce while remaining moist during baking.
- 2 refrigerated pie crust Refrigerated pie crust supplies the flaky pastry enclosure that holds the filling together and creates contrasting textures. Keeps preparation simple by eliminating homemade dough work and browns nicely for an appealing finish.
- 2 tbs flour Flour acts as the thickening agent when combined with fat to create a roux, giving body to the sauce that coats the chicken and vegetables. Ensures a smooth, clingy filling that prevents the pie from becoming watery when baked.
- 1/3 cup chicken stock Chicken stock adds concentrated savory flavor and moisture to the sauce, amplifying the chicken's taste and providing a rich base for the filling. Balances creaminess and helps achieve the desired consistency when reduced with milk and flour.
- 1/3 cup whole milk Whole milk contributes creaminess and richness to the sauce, softening the texture and creating a smooth mouthfeel. Works with flour and stock to form a cohesive, velvety filling that sets nicely in the crust.
- Salt and pepper to taste Salt and pepper to taste season the filling and bring out natural flavors of the chicken and sauce, allowing for balanced savory notes. Enables individual adjustment so the finished pie suits personal preference.
- 2 tbs butter Butter supplies fat for the roux and adds richness and a glossy finish to the sauce while enhancing overall flavor. Melts quickly to help cook the flour and integrate with liquids for a smooth thickening base.
- 1 beaten egg Beaten egg provides an egg wash to brush the pastry, promoting golden color and a slight sheen on the crust after baking. Also helps seal pastry edges and contributes to an attractive, finished appearance.
Instructions
- Preheat the oven to 450. Press the pie crust into the bottom of a deep pie plate. Pinch along the edges. Scatter the shredded chicken into the pie crust. Whisk together the flour, stock and milk and then pour over the chicken. Salt and pepper the chicken according to taste. Cut the butter into small pea size pieces and place around the dish.: You should feel the heat start to warm the kitchen before the pie goes in. The idea is to give the pastry an initial blast of heat so the top and edges begin to set and brown quickly. Listen for the quiet hum of the oven as it hits temperature, and open the door carefully to avoid heat loss. A common mistake is placing the pie in a cooler oven which can lead to a soggy crust. If your oven temperature fluctuates, use an oven thermometer to confirm accuracy.
- Unroll the second pie crust onto the top of the pie. Pinch the edges together to form a seal. Paint the top of the pastry crust with the beaten egg.: The crust should sit snugly against the plate, following the contours so there are no air pockets. As you press, feel for thin spots and gently press them thicker. The tactile feedback—firm but not stretched—is important because a loose edge can bake unevenly. Avoid stretching the dough which will lead to springs back and shrinkage during baking.
- Bake at 450 x 20 minutes and then 375 for an hour. Allow to rest for 10 minutes before serving so that the juices will congeal.: Pinching seals the base crust to the plate and shapes the rim for the top crust to meet. As you work, notice the slight resistance as the dough compresses; this is normal. If the edges are too thin, they will brown and crisp too fast. A mistake to avoid is overworking the dough which warms the fat and makes the crust tough.
- Scatter the shredded chicken into the pie crust: Place the chicken evenly so each slice gets a good balance of meat. The sound is a soft thud as the pieces settle; visually the meat should form a relatively flat bed. If you mound the chicken too high, the filling may not set properly and the top crust could split. Make sure to distribute the pieces rather than piling them in one spot.
- Whisk together the flour stock and milk and then pour over the chicken: As you whisk, the mixture will transform from thin streaks to a unified, slightly glossy sauce. Pouring it over the chicken should create a gentle pooling that soaks around the pieces. You want the sauce to coat without drowning the meat; if it seems too thin, let it sit a minute to thicken. One common error is leaving lumps of flour, so whisk until smooth before adding.
- Salt and pepper the chicken according to taste: Sprinkle seasoning sparingly and taste a small spoonful of the filling if possible. The seasoning will become more pronounced during baking, so aim for balanced, not bold. A mistake is oversalting at this point; the stock and butter already add sodium, so adjust carefully and retaste after the filling has had a minute to rest.
- Cut the butter into small pea size pieces and place around the dish: The butter will melt into the filling creating tiny pockets of richness that make the finished bite luscious. The visual cue is small shiny beads that slowly disappear as the butter melts. If you place the butter too close to the crust edge, it can cause greasy spots, so dot more centrally. Avoid using very large pieces because they will not distribute evenly.
- Unroll the second pie crust onto the top of the pie: As you lower the top crust, align it gently so it sits flat and covers the filling completely. The pastry should drape smoothly without tearing; if there are tears, patch them by pressing scraps together. A sloppy top can trap steam in odd places, leading to uneven baking. If the crust wrinkles, smooth them outward toward the rim for an even finish.
- Pinch the edges together to form a seal: Use your fingers to crimp the two crusts so the filling stays contained while baking. The tactile feedback is important here; a firm seal prevents juices from leaking out and making a mess. If the seam is loose, juices can escape and burn on the pan, causing smoke and an uneven bake. Avoid over sealing which can crimp air vents closed and cause steaming.
- Paint the top of the pastry crust with the beaten egg: The egg wash should be applied in a thin, even layer so the crust turns glossy and golden. Use a pastry brush and sweep lightly to avoid pooling. The aroma as it browns will be rich and slightly sweet as the proteins in the egg caramelize. Too heavy an application can burn in spots, so brush with restraint.
- Bake at 450 x 20 minutes and then 375 for an hour: That initial high heat sets the crust and encourages browning, then the lower temperature lets the filling cook through gently without overbrowning. Watch for a deep golden color and gentle bubbling near vents as signals of doneness. Avoid opening the oven repeatedly which drops temperature and interferes with proper baking. If the edges brown too quickly, tent them with foil to protect them while the center finishes.
- Allow to rest for 10 minutes before serving so that the juices will congeal: Resting lets the filling thicken and makes cleaner slices. You will notice the bubbling slow and the filling settle, which is the right cue. Cutting too soon leads to runny slices and lost structure. Be patient; the flavors also meld during this short rest which improves the overall balance.
Notes
- Choose the right chicken, cook it gently and cool before shredding to keep the filling from becoming watery.
- Measure the thickener carefully, whisk the flour into the liquid until completely smooth to avoid lumps in the sauce.
- Evenly distribute butter, dot small pieces across the filling so richness melts into the sauce rather than pooling.
- Use an oven thermometer, many ovens run hot or cold and a thermometer ensures your crust browns at the intended rate.
- Brush with egg wash lightly, a thin coat gives a glossy finish without leaving raw patches or pooled egg.
- Cool before slicing, rest for 10 minutes so the sauce firms and you get clean, presentable slices.