Easy Bunny Cupcakes
Easy Bunny Cupcakes are a light, nutty gluten free cupcake with fluffy buttercream and playful marshmallow ears, perfect for spring gatherings. The tender crumb from almond flour and the silky unsalted butter frosting create a delightful contrast that is both festive and approachable, making them an ideal easy weekend bake for family celebrations.
Equipment
- Mixer
- Muffin Tin
- Parchment paper liners
- Spatula
- Piping Bag
Ingredients
- 1 cup almond flour Adds a tender, moist base and provides structure while keeping the cupcakes grain-free; blends with eggs and sweeteners for a soft crumb and gentle almond flavor.
- 1 tablespoon coconut flour Absorbs moisture to lighten the batter and prevent sogginess; helps create a finer texture and balances the high-fat almond flour.
- 1 teaspoon baking powder Leavens the batter by releasing gas when heated, giving rise and a light crumb; pairs with baking soda for optimal lift in quick breads.
- 1/2 teaspoon baking soda Neutralizes acidic components and enhances rise when combined with baking powder; contributes to a finer, more tender crumb.
- Pinch of fine sea salt Enhances flavor depth and balances sweetness; helps bring out the nutty and vanilla notes while subtly sharpening other flavors.
- 3 eggs Binds ingredients, adds richness, and contributes to structure and moisture; eggs also help with a tender crumb and lightness.
- 3 tablespoons honey or pure maple syrup Sweetens naturally while adding moisture and a hint of floral or caramel notes depending on choice; helps create a delicate, not overpowering sweetness.
- 2 tablespoons unsweetened applesauce Provides moisture and reduces the need for additional oils, contributing to tenderness and a light texture while keeping cupcakes moist.
- 1 teaspoon vanilla extract Adds aromatic sweetness and rounds out flavors; enhances the overall flavor profile and complements almond and coconut notes.
- 1 cup unsalted butter Contributes richness and a creamy mouthfeel when softened into frosting or batter; provides stability and flavor to buttercream.
- 3 cups powdered sugar Creates a smooth, sweet frosting texture when creamed with butter; adds structure and sweetness to the frosting for decorating.
- 1 teaspoon vanilla extract Adds aromatic depth and balances frosting sweetness; enhances overall flavor while complementing vanilla in the batter for cohesion.
- 1 tablespoon almond milk or nut-milk of choice more if needed Thins frosting for spreadability and helps achieve desired consistency; adds a touch of creaminess without altering flavor much.
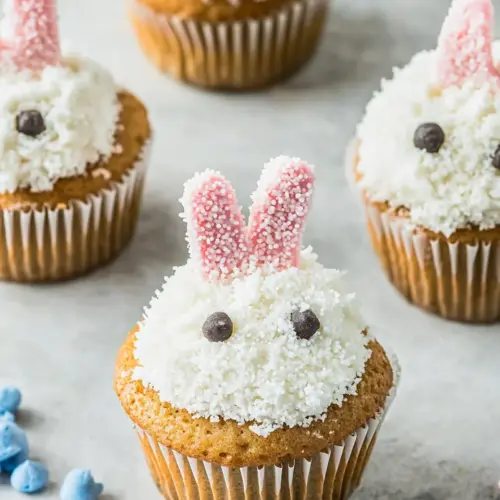
- 9 marshmallows not mini marshmallows Forms the marshmallow ears or decorations when melted and shaped; provides stickiness and sweetness for assembling cupcake toppers.
- 1/2 cup colored sugar Adds color and sparkle to decorations, creating playful detailing for bunny faces or carrots; provides visual contrast and sweetness.
- 1 cup unsweetened shredded coconut Provides a fluffy, textured coating for decorations such as bunny tails; adds mild coconut flavor and a snow-like appearance.
Instructions
- Preheat the oven to 350°F and line 9 muffin tins with parchment paper liners or silicone liners.: Warmth in the oven signals the start and ensures even rising; as it preheats you will notice a gentle warmth and that familiar dry oven scent. This step matters because consistent oven temperature helps the cakes bake uniformly, preventing underdone centers or overbrowned edges. A common mistake is skipping liners or using worn pans that change bake times, so use reliable muffin tins and allow the oven to reach full temperature before putting the batter in. If you open the oven too often while baking, you will lose heat and risk uneven domes.
- In a bowl, whisk together the almond flour, coconut flour, baking powder, baking soda, and salt until well blended.: The moment you whisk these dry elements, you will see the mixture take on a uniform pale tone, and it will smell faintly nutty from the almond flour . Proper blending distributes the leavening so each cupcake rises evenly; uneven distribution can produce pockets of baking powder that leave bitter spots. A typical pitfall here is failing to break up clumps, especially in the almond flour or powdered leaveners, so sift or whisk thoroughly to avoid dense lumps in the batter.
- Add the eggs, honey, applesauce, and vanilla extract and mix until smooth.: As you combine these wet ingredients, the batter will begin to take on a glossy sheen and slightly thicken as the eggs emulsify with the liquids. The honey lends a deep, floral sweetness while the applesauce keeps moisture without added oil. This step is crucial because proper emulsification prevents separation during baking; under-mixing leads to streaks of wet and dry, while over-mixing can overwork the structure. Avoid running the mixer at high speed for too long, which can incorporate excess air and create crumbly texture.
- Pour into the lined muffin cups, filling each about 1/2 full, and bake for 15 to 20 minutes, or until a toothpick inserted in the middle comes out clean.: As the batter hits the warmed tins, you will see the surface settle and then begin to rise in the oven, developing gentle domes and a hint of golden edges. The smell will shift toward baked cake notes with a light nutty aroma. Using the right fill level prevents overflow and promotes even rise; overfilled cups can spill and underfilled ones may be too small. Do not assume the shorter time is always enough; test with a toothpick, and if crumbs cling, give them a little more time but watch closely to avoid drying out the crumb.
- While cupcakes cool, make the frosting: In a stand mixer fitted with a whisk attachment or using a hand mixer, mix the butter for 1 minute. Add the powdered sugar and mix on low speed until well blended, then increase the speed to medium and beat until fluffy, about another 3 to 5 minutes. Add the vanilla and almond milk. Continue to beat on medium speed for 1 minute, adding an additional tablespoon of almond milk, or more, if needed for a soft consistency.: In a stand mixer fitted with a whisk attachment or using a hand mixer, mix the butter for 1 minute : Whipping unsalted butter starts the frosting journey, creating a pale, airy base that will trap air and lighten the final texture. The butter should smell clean and slightly sweet; if it smells sour, it is past its prime. This initial whip matters because properly aerated butter helps the powder sugar incorporate more smoothly, avoiding gritty pockets. A common issue is using butter that is too cold, which will not aerate well, or too warm, which will break down and make the frosting greasy.
- Apply the frosting in a mound on the cupcake with a spatula or using a piping bag fitted with a circle piping tip.: When you add the powdered sugar , the mixer will thump briefly, then the mixture will become thick and pale. Increasing speed encourages a silky, cloud like texture. The sugar must be incorporated slowly to prevent a sugar cloud in your kitchen, and beating long enough produces a stable buttercream that holds shape. If you rush this and keep the speed high immediately, you risk a dusty explosion and uneven texture; if you do not beat it enough, the frosting will be heavy and not hold peaks.
- Cut the marshmallows in half on a diagonal. Dip the cut side in the colored sugar. Place each ear on top of the buttercream frosting, pushing in slightly to adhere. Sprinkle the flaked coconut on top of the buttercream frosting.: Adding a teaspoon of vanilla extract brings the frosting into harmony with the cupcakes, and the almond milk loosens the texture to make it pipeable. The smell of vanilla will bloom, and the frosting will become smoother with each addition. Add the milk gradually because too much will produce runny frosting that cannot hold the marshmallow ears upright. If your frosting becomes too thin, refrigerate briefly and rewhip to firm it up, rather than adding more sugar which will make it overly sweet.
- Cupcakes will keep in the refrigerator for up to 3 days.: The last aeration round polishes the texture into a glossy, spreadable cream that catches light as you swirl it. This finishing beat is why the frosting feels silky on the tongue and not chalky. Be mindful with extra milk, because every teaspoon shifts consistency substantially; add a little at a time to reach the desired softness. A frequent error is adding too much at once and trying to salvage it with more sugar, which alters taste and texture.
- Apply the frosting in a mound on the cupcake with a spatula or using a piping bag fitted with a circle piping tip: When you mound or pipe, the frosting should hold peaks but still look soft and inviting. The tactile sense of a smooth, cool buttercream and the visual of a neat mound are satisfying. Using a piping bag gives a cleaner finish, while a spatula offers a rustic charm. Overworking the frosting while smoothing can melt it slightly from your hands; work quickly and chill briefly if it gets too soft.
- Cut the marshmallows in half on a diagonal: The diagonal cut exposes a fresh, sugary surface that holds the colored sugar beautifully, creating crisp edges that mimic bunny ears. The marshmallow will feel pillowy and slightly sticky to the touch; dipping the cut side immediately prevents it from sealing and losing adhesion. Use a sharp knife for clean cuts, and if the marshmallow stretches, chill briefly to firm it for neater slices. Avoid tiny mini marshmallows here, as they are too small for the visual effect.
- Dip the cut side in the colored sugar: The colored sugar adheres to the tacky marshmallow surface, creating a sparkly finish. You will see the granules catch the light and enhance the playful look. Doing this quickly while the cut is fresh ensures better adhesion; letting the cut sit will form a skin that repels the sugar. A common oversight is pressing too hard and squashing the marshmallow, so dip gently and rotate for even coverage.
- Place each ear on top of the buttercream frosting pushing in slightly to adhere: Gently pressing the ears into the frosting secures them without flattening the mound; you should hear a soft give when they nestle in. Positioning two ears gives the cupcakes personality and keeps decorations stable during transport. If you press too hard, the frosting will compress and the visual will collapse, so steady hands are best here. If the ears wilt during transit, pipe a small frosting patch behind each ear as extra support.
- Sprinkle the flaked coconut on top of the buttercream frosting: The shredded coconut creates the nest texture, and as you sprinkle it, you will notice a subtle coconut aroma. It adds contrast to the glossy buttercream and hides imperfect piping. Scatter it with a light hand to keep the overall shape tidy. If you use wet hands or a damp tool, the coconut can clump; keep everything dry during this step.
- Cupcakes will keep in the refrigerator for up to 3 days: Chilling firms the frosting and preserves the marshmallow ears and coconut texture, though refrigeration can slightly change the buttercream mouthfeel. Store in an airtight container to prevent the cupcakes from absorbing other fridge odors and to keep the coconut crisp. A common issue is condensation if you move them directly from cold to warm, which can make coconut soggy; let them rest briefly at room temperature before serving for best texture.
Notes
- Swap the sweetener Replace the honey with pure maple syrup for a deeper, woodsy note that pairs wonderfully with the nutty crumb.
- Toast the coconut Lightly toast the unsweetened shredded coconut for a nuttier, more caramelized flavor, keeping an eye so it does not brown too dark.
- Adjust frosting sweetness Reduce the powdered sugar by a quarter cup and add a splash more almond milk if you prefer a less sweet, lighter buttercream.
- Create mini versions Bake in mini muffin tins and reduce baking time to create bite sized bunny treats ideal for parties.
- Make the nests textured Mix a tablespoon of shredded coconut with the frosting edge before applying to create a more integrated nest effect that clings better for transport.