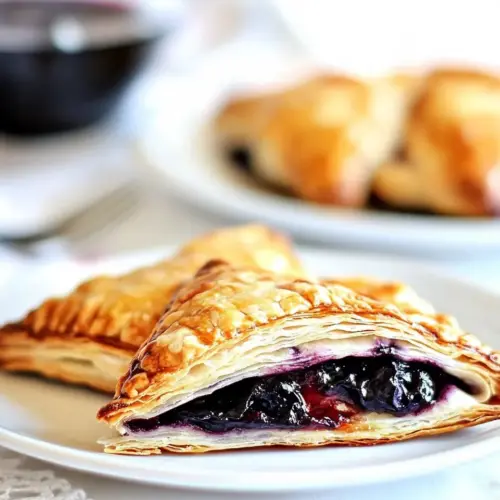
Easy Blueberry Turnovers
Easy Blueberry Turnovers are flaky, crispy, and delightfully fruity, combining creamy cheese and bright lemon zest with glossy blueberry filling. Perfect for an easy breakfast or an effortless dessert, these turnovers deliver bakery quality with minimal effort, making them a smart choice for easy weekend brunches and casual gatherings.
Equipment
- Baking Sheet
- Parchment Paper
- Pastry Brush
- Knife or pastry cutter
- Small Bowl
Ingredients
- 1 sheet puff pastry thawed Provide a flaky, buttery base that puff up into layers when baked; thawing ensures pliability and even rolling without cracking. Handle gently to preserve the laminated texture and create a light, golden turnover shell when baked.
- 4 tablespoon cream cheese softened Bring a smooth, tangy richness that contrasts with the sweet filling; softening makes it easy to spread and blend with lemon zest. Incorporate evenly to create a creamy layer that adds moisture and a subtle savory note to each turnover.
- 2 teaspoon lemon zest Add bright citrus aroma and a zesty bite that cuts through sweetness; finely grate only the colored outer layer of the peel to avoid bitterness. Sprinkle evenly into the cream cheese to lift flavors and provide a fresh finish to the filling.
- 8 tablespoon blueberry pie filling Provide the primary sweet fruit component with jammy texture and concentrated blueberry flavor that fills the turnovers; spoon appropriate portions to avoid overfilling. Choose a well-drained spoonful to maintain structure while offering bursts of fruit in every bite.
- 1 egg Enrich and glue pastry edges when beaten for an egg wash; whisk briefly to combine yolk and white for even gloss. Brush on before baking to achieve a golden-brown, shiny finish that improves appearance and helps seals.
- 1 tablespoon water Thin and loosen the egg for an even, brushable wash; whisk into the beaten egg to create a smoother consistency. Use sparingly to control gloss level and ensure the egg wash spreads without pooling or dripping.
- powdered sugar for dusting Provide a delicate, sweet finish when dusted over cooled turnovers; sprinkle lightly to avoid overpowering the filling. Use as a visual enhancement and subtle sweetness that balances the tartness of lemon and blueberries.
Instructions
- Preheat oven to 400 degrees F.: Warmth from a properly preheated oven ensures the puff pastry rises quickly and evenly, creating crisp layers and a tender interior. When the oven reaches temperature, you should notice a dry warm air flow if you open the door briefly, and a stable oven gives consistent browning. A common mistake is putting pastries into a cold oven which makes them greasy and flat, so always wait for the full preheat cycle. For consistent results, place the rack in the center; too low and the bottoms may brown too fast.
- Line a baking sheet with parchment paper.: The parchment provides a nonstick surface and helps the underside of the turnovers brown without sticking. You will feel the slight texture of the sheet under the pastry when pressing gently. If you skip this, the turnovers may adhere to the pan and tear when you try to remove them. Make sure the sheet lies flat, creases can imprint the pastry.
- In a small measuring cup beat the egg with one tablespoon of water.: This glossy egg wash gives puff pastry a beautiful golden sheen and helps seal edges. The mixture should be smooth and slightly frothy when whisked, with a uniform color. If you under-beat, the wash will apply unevenly and streak; if you over dilute with water the shine will be muted. Use a fork or small whisk for even blending.
- Unroll the puff pastry. Gently roll it out to seal all three parts of the sheet.: You want to lightly press seams so the sheet behaves as a single uniform surface, but avoid excessive rolling which compresses the layers and prevents lift. You should feel the layers still yielding under gentle pressure, and the pastry should remain cool to the touch. Rolling too aggressively causes dense, tough pastry; if that happens, chill briefly before continuing.
- Cut the sheet into 4 even squares.: Accurate portions promote even baking and presentation. When you cut, the pastry should give a clean edge and maintain its layers. Use a sharp knife or pastry cutter for neat lines. Uneven pieces will bake at different rates, causing some to overbrown while others finish undercooked.
- With a pastry brush, brush the edges of each square with the egg wash.: This thin adhesive layer helps seal each turnover and encourages a glossy perimeter. Apply gently, you should see a light sheen without pooling. If you brush too vigorously you can disturb the pastry layers, and if you miss spots the seal can open during baking. Keep the wash close at hand to work swiftly.
- Place 1 tablespoon of cream cheese on each square. Spread gently with a butter knife.: The softened cream cheese should feel cool and spreadable, creating a thin cushion that prevents the filling from soaking the pastry. Spread it inward from the center, leaving a border for sealing. If the cheese is too warm it will melt into the pastry, risking a limp base, so chill briefly if needed.
- Sprinkle with 1/2 of a teaspoon of lemon zest.: The tiny, fragrant grains of lemon zest add brightness; you should smell a fresh citrus note when you lift the zest to the pastry. Distribute evenly so each turnover has balance. Using too much can impart a bitter note from the pith, so measure carefully.
- Top with 2 tablespoons of blueberry pie filling. Spread gently but do not cross the egg wash brushed edges.: The blueberry pie filling should be glossy and slightly viscous, with whole berries visible if possible. Place it gently to avoid pushing through the pastry layers. Overfilling will cause leaks and sticky pans, a common error, so stick to the measured spoonfuls for tidy results.
- Fold each square to make triangles.: When you fold, you should feel a slight resistance as the layers come together and the filling nestles inside. Align the corners so the triangles look symmetrical. If you fold sloppily the turnovers may bake unevenly, so take a moment to match edges before sealing.
- Seal the edges with a fork.: Pressing the tines creates a decorative crimp and ensures the turnover stays closed, you will hear a light ripping sound as the fork compresses the layers. This mechanical seal helps prevent filling leakage. If you do not press firmly enough the turnovers can open while baking, so make sure the fork impressions are clear and continuous.
- Place the triangles on the prepared sheet.: Space them with breathing room so hot air can circulate and each pastry puffs independently. You should notice a slight chill from the tray against the base of the pastries. Crowding leads to uneven oven spring, so spread them at least an inch apart.
- Brush each turnover with the egg wash.: A final glaze adds uniform color and sheen, the brush strokes should be smooth and cover the top without dripping over the sides. When done, they will have a soft, wet gleam that bakes to glossy brown. If you apply too much, the wash can pool and burn, so give a light, even coat.
- If you like, you can cut out little hearts from more puff pastry dough and place them on brushed turnovers.: These decorations add charm and will adhere when you press them gently into the wash. You should see the shapes sit neatly on top, and they will brown slightly faster due to their thinness. Avoid heavy ornaments that trap moisture, as they can flatten the puff.
- Bake turnovers for 18 to 20 minutes, or until puffed and nicely browned.: In the oven you will hear a soft expansion sound and witness the pastry inflate and separate into visible layers, the tops turning a rich golden color. The aroma will shift to a warm, buttery sweetness. Underbaking yields soggy interiors, while overbaking can dry and darken the fruit, so watch the color closely near the end of the time window.
- Remove from oven and let sit to cool to room temperature.: Cooling lets the filling set and prevents burning your mouth on hot fruit. You will notice the jam thicken slightly and the pastry crisp as it cools. Cutting or dusting too soon can smear the filling, so allow adequate rest. If you rush serving, the filling may be molten and runny.
- Dust with powdered sugar and serve.: The final dusting of powdered sugar offers a delicate sweet finish and a pretty visual contrast against the browned pastry. Use a fine sieve for an even layer. Apply after cooling; if applied while warm, it will dissolve and look wet rather than snowy.
Notes
- Keep ingredients cold: Cold puff pastry and slightly chilled cream cheese result in better oven spring and flakiness, so work quickly and return pastry to the fridge if it warms.
- Measure the filling: Using exactly 2 tablespoons of blueberry pie filling per turnover prevents leaks and keeps the bottoms crisp rather than soggy.
- Light egg wash is key: Thin the beaten egg with 1 tablespoon of water for an even glossy finish without drips that can caramelize and darken.
- Chill between steps if needed: If the pastry softens while you work, pop it in the fridge for 10 minutes to firm up and restore layer definition.
- Use a sharp cutter: A clean blade for cutting the pastry gives crisp edges that seal better, avoiding ragged cuts that encourage openings while baking.