Easy Banana Cake with Caramel Filling
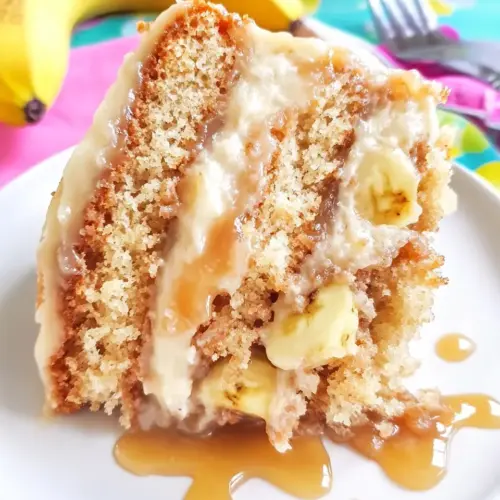
Easy Banana Cake with Caramel Filling is a moist, creamy banana cake with a gooey caramel center and tangy cream cheese frosting. The recipe blends tender banana crumb with a buttery caramel filling for an indulgent, yet approachable dessert that's perfect for family gatherings and easy weeknight baking, making it a must try when you want something both cozy and show stopping.
Equipment
- 9-inch Round Cake Pans
- Parchment Paper
- Mixing Bowl
- Hand Mixer
- Microwave-safe Bowl
- Wire Rack
- Pastry bag
Ingredients
- 115.25 ounce box yellow cake mix Provide a pre-mixed base for the cake batter, supplying flour, sugar, leavening, and flavoring that streamline preparation. Ensure measured quantity yields a large or multi-layer cake according to package-equivalent directions. Combine thoroughly with wet ingredients to achieve a consistent batter and even crumb.
- 3/4 cup water Add moisture and help hydrate dry ingredients while facilitating proper batter consistency. Adjust liquid to match the specific cake mix instructions, ensuring neither too dry nor too thin a batter. Mix evenly to avoid pockets of dry mix and promote uniform rise.
- 1/3 cup vegetable oil Contribute fat that tenderizes the crumb, adds richness, and improves mouthfeel in the cake. Incorporate with eggs and water to emulsify the batter for a smooth texture. Use at room temperature to blend more easily and create a consistent batter.
- 3 large eggs Bind ingredients, provide structure and leavening aid through trapped air, and add richness to the cake. Beat into the batter until fully incorporated for lightness and uniform texture. Use large eggs to maintain expected moisture and protein balance in the recipe.
- 2 overripe bananas smashed Supply natural sweetness, moisture, and banana flavor while adding density and tenderizing qualities to the finished cake. Mash thoroughly to create a smooth purée that distributes evenly through the batter. Use overripe bananas for maximum sweetness and banana aroma.
- 1/4 teaspoon baking soda Enhance leavening by reacting with acidic components or caramel to promote lift and a lighter crumb. Measure precisely to avoid an off taste or overly rapid rise that can collapse the cake. Sift or mix in well with dry ingredients to ensure even distribution.
- 11 ounce bag caramel squares or bits (unwrapped if wrapped) Provide a sweet, chewy caramel center or filling that melts slightly when warmed, offering rich toffee notes. Unwrap if necessary to prevent paper remnants in the filling and melt gently to avoid scorching. Stir until smooth and use as a layer, swirl, or filling as directed.
- 1/2 cup heavy whipping cream Create a silky caramel sauce when heated with caramel squares, adding creaminess and preventing separation. Warm gently and whisk with caramels until fully combined for a glossy filling consistency. Use chilled or slightly cooled as needed to maintain shape in the cake assembly.
- 1/2 cup unsalted butter softened Supply fat and richness to frostings and fillings while contributing a smooth, spreadable texture when softened. Cream with other dairy components to achieve stable, airy frosting that holds structure on the cake. Keep at room temperature for easier incorporation.
- 8 ounces cream cheese softened Add tang, creaminess, and stability to frostings, balancing sweetness while contributing a dense, smooth texture. Soften to room temperature to prevent lumps and beat until fully smooth for the best consistency. Use to complement the caramel and banana flavors without overpowering them.
- 3 cups powdered sugar Sweeten and thicken frostings, providing a powdered texture that dissolves into dairy bases for stable whipped or creamed icings. Add gradually to control sweetness and achieve desired stiffness for spreading or piping. Sift if clumpy to ensure a smooth final frosting.
- 1 teaspoon vanilla extract Enhance overall flavor by adding a warm, aromatic vanilla note that rounds out sweet components without altering texture. Measure carefully to avoid overpowering delicate banana and caramel flavors. Stir into frosting or batter near the end to preserve aromatic strength.
- 1/4 teaspoons salt Balance sweetness and enhance other flavors by providing a subtle savory contrast that lifts the cake's profile. Incorporate a small measured amount to avoid detectable saltiness while improving crumb structure and flavor clarity. Dissolve or mix uniformly into wet ingredients for even distribution.
Instructions
- Preheat oven to 350°. Line two 9-inch round cake pans or three 8-inch round cake pans (see note) with parchment paper and butter and flour them (or use floured cooking spray). You will have some batter left over.: The warm, slightly sweet smell that fills the kitchen as the oven approaches 350° signals readiness. You should hear the faint hum of the oven and feel a steady warmth when you open the door for a moment. This even heat is crucial so the cake rises uniformly and the exterior sets just as the interior finishes cooking. A common mistake is putting the cake into an oven that is not fully preheated, which can cause uneven rise and a dense middle. If your oven runs hot or cool, use an oven thermometer to ensure accurate temperature.
- Mix cake mix, water, oil, eggs, bananas, and baking soda in a large bowl on low for 1 minute. Increase speed to medium and beat for 2 minutes.: As you combine the boxed yellow cake mix with the water , oil , eggs , smashed bananas , and baking soda , you will notice the batter change from powder to a glossy, thick mixture that smells faintly of banana and egg. The initial low speed helps hydrate dry ingredients without a cloud of flour, then medium speed aerates the batter and incorporates air for lift. The why here is that this sequence yields a uniform crumb and prevents over mixing. Over mixing is the typical error, which can lead to a tight, rubbery texture, so stop once ingredients are evenly combined and the batter is smooth.
- Fill prepared pans equally.: When you distribute batter into the lined pans, you will see the batter level itself but still hold a small peak in the center. I use a scale or measure by eye to ensure each pan gets the same amount, because equal portions bake at the same rate. If pans are unevenly filled, one layer can finish sooner and become dry. A helpful tip is to tap the pans gently on the counter to release large air pockets, which smooths the surface and reduces large holes in the crumb.
- Bake for about 30-40 minutes until a toothpick comes out clean. (Time will depend on size of pan.) Cool in pan for at least 10 minutes, then turn out onto a rack to cool completely.: During baking you will watch the edges pull slightly away from the pan and the top will turn a golden hue. The scent of warmed bananas and butter will grow stronger, and you may hear a faint settling sound as the cake finishes setting. The toothpick test tells you the interior is no longer wet with batter, but avoid overbaking because that dries the cake. A typical issue is relying solely on time; pan size affects timing, so start checking at the lower end of the range and remove the cake when the toothpick shows only a few moist crumbs, not wet batter.
- While the cake is in the oven, add the caramels and heavy whipping cream to a microwave safe bowl. Heat on HIGH for 2 minutes. Let it sit for one minute, then whisk until caramel is completely melted (reheating as needed).: The cake is very delicate when hot, so letting it rest for about 10 minutes allows the crumb to firm up so it will release cleanly from the pan. You will feel a subtle drop in warmth when you transfer it to a rack, and steam will lift from the surface. Cooling on a rack prevents soggy bottoms by allowing air to circulate. A common slip is trying to frost a warm layer, which causes frosting to melt and slide, so be patient and wait until layers are fully cool.
- Once caramel is completely melted, place in the refrigerator to cool completely.: When you microwave the unwrapped caramels with heavy whipping cream , the bowl will soon radiate a warm, sweet aroma and the mixture will look lumpy at first, then glossy as it smooths. Letting it sit for one minute off heat lets residual warmth finish melting the pieces without scorching. This gentle method preserves a smooth, cohesive caramel. Overheating is the usual mistake, which can cause the caramel to seize or burn, so reheat in short bursts and whisk between intervals.
- When getting ready to frost the cake, remove cooled caramel from the refrigerator. It will be stiff. Beat with a hand mixer until the caramel becomes more creamy, only a few minutes. Now it is like a thin frosting you can fill your cake with.: As the caramel chills, it firms and becomes easier to manipulate, losing some shine and becoming more set. In the fridge the filling will thicken, which is important so it does not run when you assemble. If it becomes too hard, allow it to come to room temperature briefly or beat it to soften. Avoid leaving it unrefrigerated too long because it may be too loose and seep through your frosting barrier.
- Beat butter and cream cheese until fluffy. Slowly beat in powdered sugar, 1 cup at a time, mixing until frosting has formed. Mix in vanilla.: Once chilled, beating the caramel briefly on low will transform it into a pipeable, slightly spreadable consistency. You should see it turn from stiff to glossy and smooth after a few minutes, and it will smell rich and butter forward. This step matters because it creates the desirable, spreadable filling that stays in place. A pitfall is overbeating into a grainy texture, so stop when it becomes smooth and slightly soft.
- To assemble your cake, place some frosting in a pastry bag fitted with your choice of tip (I used a 1 M). If needed, trim the top of your cake layers to make them level.: When you whip the softened butter and softened cream cheese , the mixture will lighten in color and gain volume, becoming airy. Gradually adding the powdered sugar keeps the frosting silky rather than gritty. The vanilla ties the flavors together. This technique ensures a stable frosting that pipes well; rushing by adding all the sugar at once can lead to a heavy, clumpy texture.
- Place one layer on cake plate. Pipe a rim around the edge with cream cheese frosting, creating a barrier for the caramel filling. Evenly spread caramel on the bottom layer. Place top cake layer on the caramel. Frost the cake as desired.: As you pipe a rim of cream cheese frosting around the edge of the first layer, you will create a visual wall that holds the caramel in place. Spread the caramel inside that ring so it sits like a glossy jewel on the crumb. When you place the top layer and frost the exterior, the contrast between the matte frosting and shiny caramel center is delightful. A frequent mistake is skipping the rim and having the caramel ooze out, so take the extra minute to pipe that barrier for a tidy finish.
Notes
- Soften dairy properly Ensure your butter and cream cheese are room temperature so they blend smoothly, giving you a silky frosting without lumps.
- Check oven temperature Use an oven thermometer to confirm your oven reads 350°, which prevents under or overbaking due to inaccurate dials.
- Unwrap caramels before melting Remove wrappers from the caramels so they melt evenly and avoid any paper or foil in your caramel mixture.
- Beat caramel briefly after chilling Chilled caramel can be stiff, so a short beat transforms it into a spreadable consistency without becoming too loose.
- Pipe a frosting barrier Creating a rim with cream cheese frosting keeps the caramel contained and ensures neat slices when serving.