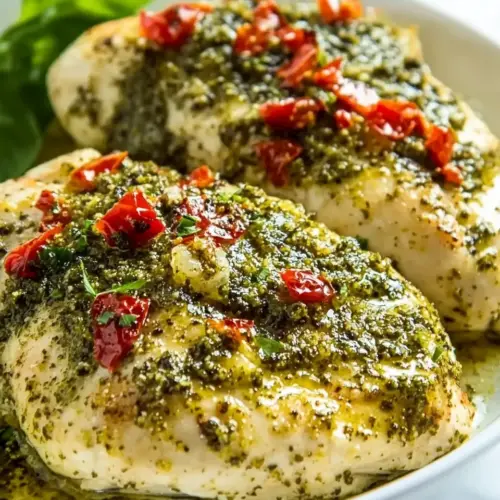
Easy Baked Pesto Chicken
Easy Baked Pesto Chicken is a creamy, herbal, and easy weeknight dinner that pairs juicy chicken with bright basil pesto, toasted walnuts, and grated parmesan for savory depth. The fast bake and quick pesto make it ideal for busy evenings while still tasting like a special meal, perfect when you want something fresh and comforting tonight.
Equipment
- Oven
- 13 x 9 x 2 inch baking dish
- Food processor or blender
- Medium sized skillet
- Rolling Pin
- Instant read thermometer
Ingredients
- 2 1/2 pounds boneless skinless chicken breast pounded to 3/4-inch thickness Pounded to an even 3/4-inch thickness, provides uniform cooking and tender texture for an easy baked chicken main course. Helps absorb flavors from the pesto and toppings while preventing dryness during baking.
- 1 tablespoon olive oil Used to lightly coat the chicken to promote even browning and help seasonings adhere during cooking. Adds a subtle fruity richness that complements the pesto and roasted tomatoes.
- salt and pepper to taste Used to season the chicken to taste before and after baking to enhance overall flavor balance. Provides basic savory seasoning that brings out the natural taste of the chicken and other components.
- 1/2 cup extra-virgin olive oil Used as a base for emulsifying the fresh pesto, contributing richness and a smooth mouthfeel. Supplies healthy monounsaturated fat that enhances flavor and helps carry fat-soluble aromas.
- 1/2 teaspoon kosher salt Used to season the pesto and other components with a clean, crunchy saltiness that elevates flavors. Gives precise control over salinity for balanced taste in the dish.
- 1/4 teaspoon black pepper Used to add mild heat and depth to the pesto blend, balancing the salt and herbs. Provides subtle earthy bite that intensifies overall flavor without overpowering delicate basil notes.
- 1 cup packed basil Packed and blended into the pesto, offering bright, aromatic herbaceousness and the characteristic basil flavor. Contributes freshness and green color while pairing well with garlic, cheese, and olive oil.
- 1 cup packed baby spinach Packed and folded into the pesto to add mild, leafy sweetness and extra nutrients while extending the herb base. Helps create a milder, slightly earthier pesto and increases volume affordably.
- 3 cloves unpeeled garlic Used unpeeled for blending into the pesto to impart pungent, savory depth and aromatic warmth. Roasting or blending mellows raw sharpness and integrates garlic flavor throughout the sauce.
- 1/4 cup walnuts plus more for garnish Used in small pieces within the pesto to add buttery crunch and nutty undertones, and reserved more for garnish for texture contrast. Provides richness and depth that enhances the herbal and cheesy components.
- 1/4 cup grated parmesan cheese plus more for garnish Used grated into the pesto for salty, umami-rich savory character and sprinkled more for garnish to finish the dish. Adds creamy mouthfeel and nutty complexity that rounds out the pesto flavor.
- 1 cup diced tomatoes Used fresh and diced as a bright, juicy topping that cuts through the richness of pesto and cheese, adding acidity and color. Contributes freshness and a pleasant contrast in texture when spooned over the baked chicken.
Instructions
- Preheat the oven to 450 degrees Fahrenheit. Drizzle 1 tablespoon olive oil on both sides of 2 1/2 pounds boneless skinless chicken breast. Season it with salt and pepper to taste then place the chicken in a 13 x 9 x 2-inch baking dish.: As the oven warms you will notice the kitchen heat rising and a faint metallic hum from the element engaging, which prepares a hot, even environment that encourages quick searing at the edges of the chicken . Drizzling the olive oil creates a glossy surface that helps the spice adherence and promotes slight browning in high heat, adding flavor through the Maillard reaction. When you press the chicken into the baking dish it should rest flat with room around each piece so air circulates; crowding traps steam and leads to a steamed, pale surface rather than a lightly caramelized one. A common error is skipping the oil which can make the seasoning fall off and leave the top dry. Smell for faint oil and salt on the surface, and visually check that the pieces are evenly spaced before sliding the dish into the oven.
- Bake the chicken until it reaches an internal temperature of 165 degrees Fahrenheit, about 15 to 18 minutes.: During baking you will hear a low sizzling of rendered juices and see the edges take on a subtle golden hue, signals that proteins are tightening and moisture is retreating toward the center. The internal thermometer is the dependable cue to avoid overcooking; aim for 165 degrees Fahrenheit , then remove promptly to let carryover heat settle. If you overbake, the texture becomes dry and stringy, which is the most common mistake here. When you pierce the thickest part the juices should run clear and the surface should yield slightly under a finger but spring back, indicating tender, fully cooked meat. Rest the chicken several minutes after baking to allow juices to redistribute for a juicier bite.
- Place 1 cup packed basil and 1 cup packed baby spinach in a resealable plastic bag. Use a rolling pin to lightly bruise the herbs and greens. Transfer to a food processor or blender.: Bruising the herbs in a sealed bag releases volatile oils, increasing fragrance and flavor extraction when you process them. The tactile press and rolling action will make the leaves collapse slightly and smell intensely herbal. Moving them into the food processor immediately preserves the aroma, as exposed leaves oxidize quickly and lose vibrancy. Avoid over bruising to the point of pulping, which can yield a muddy texture; you want soft, fragrant leaves that still have some structure. The visual cue is bright green, not wilted brown, showing freshness has been retained.
- Heat a medium-sized skillet over medium heat. Toast 3 cloves unpeeled garlic until the outsides are lightly browned, shaking the pan occasionally, about 8 minutes. Remove the garlic skin and add it to a food processor.: Toasting whole garlic mellows its sharpness and adds deep, nutty notes that become almost sweet. As you shake the pan, listen for a faint crackle and watch for specks of golden brown on the papery skins. Once toasted, let the cloves cool slightly so the flesh slips out of the skin easily, releasing a caramelized aroma that will enrich the pesto. A common slip is to let the cloves char black, which creates a bitter undertone; aim for light browning. When you press the cloves, they should feel soft and slightly yielding, an indication that they will blend into a silky, mellow paste.
- Place 1/4 cup walnuts in the same pan and toast over medium heat, 3 to 4 minutes. Transfer to the food processor.: Toasting the walnuts awakens their oils and adds a warm, toasty depth that counterbalances the bright herbs. You will smell a pleasantly nutty aroma and see the nuts take a little color at the edges. Move them to the processor as soon as they color to prevent scorching. A toasted walnut should be crisp and aromatic; if it tastes bitter the pan was too hot. This step improves mouthfeel and helps the pesto achieve a satisfying, slightly coarse texture rather than a flat puree.
- Add 1/2 teaspoon kosher salt and 1/4 teaspoon black pepper to the food processor. Process the pesto mixture by pulsing five times to help break down the greens.: The initial pulses are all about control, breaking down stems and nut fragments while preserving some texture so the pesto does not become too smooth. You will notice a green cloud rising as bits churn, and the aroma will intensify. The salt and pepper start building seasoning that layers with the parmesan later; under-salting is a frequent mistake and can make the final sauce dull. Use short pulses to avoid overheating, which can darken the color and produce a bitter note.
- Turn the food processor on low speed, as it's running slowly drizzle in 1/2 cup extra-virgin olive oil until a smooth pesto with some smaller pieces is formed, about 10 seconds from start to finish.: Emulsifying the olive oil into the greens creates a silky texture that coats the chicken beautifully. The slow drizzle encourages the oil to bind with the greens, producing a cohesive sauce rather than separated oil. You should see a glossy, emerald mixture with tiny flecks of herb and nut, not a completely liquefied paste. If you add the oil too quickly the pesto may split, leaving a slick layer; if that happens gently pulse to reincorporate. The scent should be fresh and herbaceous with a warm, nutty undertone.
- Add 1/4 cup grated parmesan cheese to the pesto and process on low speed for 5 seconds. Taste and season the sauce with salt and pepper as desired. Transfer pesto to a small bowl.: Stirring in parmesan rounds the flavor and adds savory umami that complements the toasted nuts and herbs. After a few quick pulses the cheese blends while preserving texture. Taste the pesto to confirm balance; if it needs more acid or salt, make tiny adjustments. Avoid adding large amounts of cheese at once, which can dominate the delicate herb profile. The finished sauce should be savory, aromatic, and slightly creamy when scooped.
- Brush some pesto sauce on each cooked chicken breast. Transfer to a serving platter.: Brushing warm chicken with pesto allows the flavors to meld while the meat rests, and the heat slightly releases the herb oils for an aromatic finish. Apply a thin layer first, then add more to taste; visual cues include a glossy coating that clings to the surface. If you spoon the pesto on too heavily it can pool and feel oily, so aim for an even, attractive smear. After brushing, let the chicken sit briefly so the sauce settles into the surface.
- Top chicken with additional chopped walnuts and parmesan cheese, and 1 cup diced tomatoes. Serve extra pesto sauce on the side.: The final garnishes provide contrast: crunchy chopped walnuts , savory grated parmesan , and bright diced tomatoes that add acidity. When you plate, the colors should pop against the golden edges of the chicken , inviting immediate bites. Serving extra pesto on the side lets guests adjust intensity. A common oversight is adding wet tomatoes too early which can make the surface soggy; add them just before serving for best texture.
Notes
- Adjust pesto texture: Pulse less for a chunkier pesto, or blend longer for a silkier finish depending on whether you prefer little nutty bites or a smooth spread.
- Control oiliness: If your pesto tastes too oily, add an extra handful of greens or a splash of lemon juice to brighten and bind flavors without adding fat.
- Make ahead: Prepare the pesto a day in advance and store it airtight in the refrigerator to let flavors meld, then bring it to room temperature before using.
- Extra garnish: Keep chopped walnuts and grated parmesan on the side so diners can customize crunch and saltiness to their taste.
- Bring heat carefully: If you like a hint of spice, add a pinch of black pepper or a light dusting of red pepper flakes to the pesto, but start small so the herbs remain front and center.