Easy Animal Cupcakes
Easy Animal Cupcakes are playful, moist chocolate cupcakes topped with creamy frosting and whimsical candy features. The texture is fudgy and tender, the frosting is smooth and slightly tangy, and the sparkling sugar adds a pleasant crunch. Perfect for easy weeknight baking or kid friendly parties, these cupcakes are fun to decorate and guaranteed to impress.
Equipment
- Muffin Pan
Ingredients
- 3 large eggs Whisk together to provide structure, lift, and moisture; eggs help bind the batter and trap air during baking, producing a tender crumb and stable cupcake base suitable for decorating.
- 3/4 cup vegetable oil Measure and pour to add richness and moisture; vegetable oil contributes a soft, tender texture and keeps cupcakes moist for several days without altering flavor.
- 3/4 cup sour cream full-fat, or full-fat vanilla Greek yogurt Spoon or scoop in to add density, creaminess, and a slight tang; full-fat sour cream or full-fat vanilla Greek yogurt enriches the batter and enhances tenderness while adding subtle flavor complexity.
- 1 tablespoon vanilla extract Stir in to enhance sweetness and aroma; vanilla extract elevates the overall flavor profile, rounding out chocolate notes and complementing the frosting and decorations.
- 1/2 cup buttermilk or see note 1 Pour in to thin the batter and add gentle acidity; buttermilk contributes tenderness and reactiveness with leavening, helping create a moist crumb—see note for substitutes if needed.
- 1 (15.25-ounce) package chocolate fudge cake mix uncooked Empty and fold into the wet ingredients as the primary dry base; the chocolate fudge cake mix supplies the chocolate flavor, leavening agents, and consistent texture for quick, reliable cupcakes.
- 1 (3.4-ounce) package chocolate instant pudding and pie filling uncooked Sprinkle or whisk in to intensify chocolate flavor and add density; chocolate instant pudding mix boosts richness, improves moistness, and helps create a fudgier, more flavorful cupcake interior.
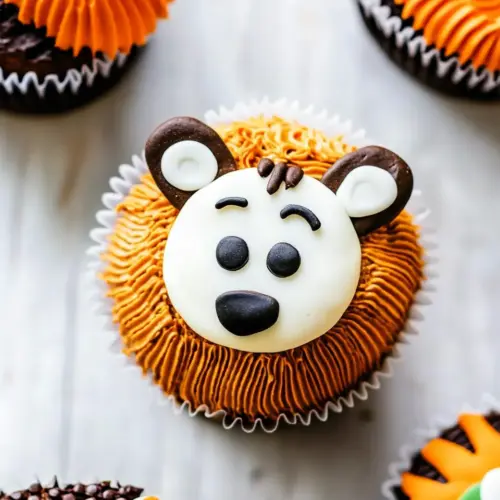
- 1 (16-ounce) container cream cheese frosting or your favorite homemade frosting Spread or pipe on cooled cupcakes as the sweet finishing layer; cream cheese frosting provides tangy sweetness and a thick stable surface for attaching candies and decorating into animal faces.
- White sparkling sugar Shake or dip to add sparkle and texture; white sparkling sugar creates highlights and a playful shimmer on frosted surfaces, making the cupcakes look festive and catching light on decorations.
- Black candy melts Melt and shape to create precise black details; black candy melts are ideal for forming small features like eyes or noses, providing smooth, glossy accents that adhere well to frosting.
- Brown M&M's Place or press into frosting to form colored facial features; brown M&M's serve as handy, uniform candy pieces for eyes, noses, or other animal markings and add a bit of crunch.
- Black decorating gel Squeeze or draw to add fine black lines and details; black decorating gel provides an easy, edible way to create whiskers, mouths, and other small facial expressions that require precision.
Instructions
- Preheat oven to 350°F. Line a muffin pan with liners and set aside.: The room fills with a clean, warm anticipation as the oven warms up and the ambient air takes on a faint toasty note; proper oven heat ensures even rise and a tender crumb, and preheating prevents under baked centers. A common mistake is putting batter into a cold oven which leads to poor rise and dense cupcakes, so always wait until the oven reaches the full temperature.
- In a large bowl, briskly whisk the eggs for 20 seconds. Add the vegetable oil, sour cream, vanilla, and buttermilk. (If you don't have buttermilk, combine 1/2 cup milk with 1/2 tbsp white vinegar in a separate cup and let sit for 5 minutes, then add to mixture.) Mix.: The liners create a smooth barrier between batter and pan, preserving the cupcake's shape and making removal effortless, while the faint crinkle sound as you press them in signals readiness; uneven liners can cause lopsided baking, so center each liner carefully to avoid uneven walls during rise.
- Add in the cake mix and pudding mix (both not prepared) and stir to combine. (Do not over-stir or beat in too much air.): The whisking introduces air and the sound is a soft, rhythmic beat that hints at volume building, producing a brighter, more open crumb; under whisked eggs can yield dense texture, so whisk until slightly frothy but not overly foamy to avoid a tough bite.
- Fill up the liners 3/4 the way full and bake for 17–20 minutes or until a toothpick inserted in the center comes out clean.: The batter will become silkier and glossy as you incorporate these, releasing a subtle dairy aroma that promises tenderness; combining these wet elements at once ensures even distribution, while overmixing after adding dry ingredients can lead to a gummy crumb, so fold gently.
- Remove and allow to cool completely.: After the brief rest the milk thickens slightly and the scent sharpens, mimicking the tang of buttermilk which helps tenderize gluten; skipping this acidic step can reduce the cupcake's lift and tenderness, so use the swap when needed.
- Frost the cupcakes smoothly with a butterknife.: The batter should appear homogeneous and slightly thick, with faint glossy streaks indicating proper emulsification; the texture should neither be watery nor excessively stiff, and the aroma balances chocolate notes once dry mix is added; avoid vigorous beating which traps excess air and causes big tunnels on baking.
- Pour the white sparkling sugar into a bowl and dip the frosted cupcakes into the sugar. Gently press to coat all the frosting in the sprinkles.: As you fold the dry mixes into the wet, you will notice a dark, cocoa aroma intensifying and the batter gaining weight; this combination yields a fudgy, moist crumb and steadies the structure for decorating; resist over stirring because that can develop toughness, a frequent misstep.
- Frost the back of a black candy melt and adhere it to the bottom half of the cupcake. Add 2 M&M's for ears.: The ideal batter feels slightly dense and smooth, with minimal bubbles on the surface, and this restraint creates cupcakes with a tender, even crumb; too much whisking will lead to coarse holes and a dry mouthfeel, so stop as soon as ingredients are combined.
- Use the black sparkle gel to add hair to the zebra (between the M&M's), stripes, eyes, and a smile face to the candy melt.: The batter should settle into each liner with a small domed surface, and you can hear the quiet plop as you spoon it in; filling to this height prevents overflow while allowing a nice dome that accepts frosting; overfilling causes spilling and underfilling yields shallow cupcakes that struggle to support decorations.
- Bake for 17 to 20 minutes or until a toothpick inserted in the center comes out clean: During baking the kitchen fills with the warm, chocolate scent and the tops spring slightly when touched, both signs of doneness; testing with a toothpick ensures centers are set, and removing too soon results in gummy middles, so err on the side of the longer time if unsure.
- Remove and allow to cool completely: As they cool, the cupcakes settle and internal steam dissipates, softening the crumb; touching them too early can mar their tops and cause frosting to slide, so cooling fully prevents melting; impatience here is the most common decorator error.
- Frost the cupcakes smoothly with a butterknife: The act of spreading creates a satiny frosting layer that reflects light subtly and holds the sparkling sugar; a butterknife gives control and a gently swooping motion yields a clean surface; using warm hands or a warm knife can make frosting too soft, so work swiftly and with cool tools for stability.
- Pour the white sparkling sugar into a bowl and dip the frosted cupcakes into the sugar: The sugar clings with a soft crunch and a little shimmer, giving a tactile contrast to the creamy frosting and a festive look; press gently so the sugar adheres without tearing the frosting; pressing too hard can scrape off the frosting and ruin the finish.
- Gently press to coat all the frosting in the sprinkles: The motion is tactile and satisfying as the sugar settles, and it seals edges so decorations have a solid foundation; uniform coating helps reflect light evenly on each cupcake; uneven pressure will cause patchy coverage, so be consistent.
- Frost the back of a black candy melt and adhere it to the bottom half of the cupcake: The warm candy melt makes a glossy patch that sets firm, forming a snout or face base, and the scent of melted candy is faint but sweet; pressing briefly secures the piece until it hardens; overheating the candy can cause it to seize and become grainy.
- Add 2 M&M's for ears: These colorful discs sit crisply against the frosting and give a playful silhouette, with a subtle clack when placed; they add structure and a tiny crunchy contrast; if you press them too deep they may puncture the frosting and slide off when moved.
- Use the black sparkle gel to add hair to the zebra between the M&M's stripes eyes and a smile face to the candy melt: The gel allows fine lines and facial expressions, giving each cupcake distinct character, and the glistening wet lines catch light beautifully as they dry; avoid heavy blobs which stay tacky and can smear, so use thin lines and let them set undisturbed.
Notes
- Make the milk and vinegar buttermilk substitute by mixing 1/2 cup milk with 1/2 tbsp white vinegar and letting it sit for 5 minutes, this gives acidity to tenderize the crumb when you do not have real buttermilk.
- Room temperature ingredients matter because they emulsify more easily, I always pull the eggs and sour cream out about 30 minutes before baking for a smoother batter and even rise.
- Use a gentle fold when combining dry and wet to avoid overdeveloping gluten, which preserves a soft, tender texture instead of a chewy one.
- Warm candy melts briefly in short bursts in a microwave or use a double boiler, stirring between pulses to prevent overheating and seizing, which makes them grainy and unusable.
- Press M&M's gently into the frosting to secure ears or features, too much force can break their shells and make a sticky mess on your frosting.
- Store properly for best texture in an airtight container at room temperature for up to two days or in the fridge up to five days, and bring to room temp before serving for the best mouthfeel.