Easy 30 Minute Turkey Chili
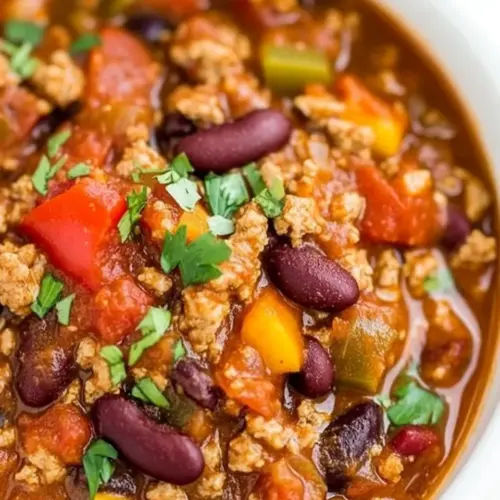
Easy 30 Minute Turkey Chili is a cozy, savory bowl of comfort with lean ground turkey, tender beans, and smoky spices. Bright tomatoes and a touch of sweetness balance the heat, making it an easy weeknight dinner that reheats beautifully. Quick to prepare and family friendly, it’s a reliable choice when you want big flavor with minimal fuss.
Equipment
- Large Dutch oven
Ingredients
- 4 tablespoons olive oil, divided Heat and sauté to provide a cooking fat that browns the turkey and softens vegetables; divided use allows for initial searing and later finishing or adjusting moisture. Add gradually to control texture and prevent sticking while layering flavors throughout the recipe.
- 2 pounds ground turkey, I used extra lean Brown thoroughly to create a lean protein base that absorbs spices and adds savory body to the chili; extra-lean reduces excess grease and keeps the dish lighter. Crumble while cooking to ensure even distribution and quick cooking within the 30-minute timeframe.
- 1 medium/large sweet Vidalia onion, diced small Dice finely and sauté until translucent to add natural sweetness and moisture that balances acidic tomatoes and spices; Vidalia onions impart a mild, sweet flavor without overpowering the chili. Cook until softened to release sugars and meld with the other aromatics for a well-rounded base.
- 1 medium/large red bell pepper, diced small Dice small and sauté with onions to contribute a bright, slightly sweet, and vegetal note that adds color and texture contrast; red bell pepper also enhances the chili's overall flavor complexity. Add early so it softens and integrates with the turkey and spices.
- 3 to 5 garlic cloves, finely pressed or minced Press or mince finely and sauté briefly to release aromatic, pungent heat that deepens savory flavors and adds a fresh bite; adjust quantity depending on desired garlic intensity. Incorporate toward the end of onion and pepper cooking to avoid bitterness from overcooking.
- 2 to 3 teaspoons kosher salt, or to taste* (see Note below) Season generously and adjust to taste to enhance and balance all flavors while helping to tenderize ingredients; kosher salt's coarse grains dissolve well during simmering. Start with the lower amount and taste later, especially if using canned ingredients with added sodium.
- 1 teaspoon freshly ground black pepper, or to taste Grind freshly and add to seasoning mix to provide a sharp, warm peppery accent that enhances other spices; adjust to taste for desired heat level. Use toward the end of cooking to preserve aromatic oils and maintain bright pepper flavor.
- one 15.5-ounce can red kidney beans, I used low-salt, drained and rinsed if desired Drain and add to introduce creamy texture, earthy flavor, and protein that increases heartiness; rinsing lowers sodium if using low-salt preference. Add during simmering to heat through and absorb surrounding flavors without disintegrating.
- one 15-ounce can black beans, I used no-salt added, drained and rinsed if desired Drain and add to contribute contrasting texture and deep, slightly sweet flavor that complements kidney beans; black beans also add fiber and protein for a balanced chili. Rinse if desired to reduce sodium and prevent overly thick, starchy broth.
- one 14.5-ounce can petite diced tomatoes, I used no-salt added Pour in with juices to add bright, acidic tomato pieces that provide body, texture, and tanginess to the chili while contributing liquid for simmering. Choose no-salt-added versions when controlling sodium levels and incorporate evenly for consistent tomato presence.
- one 8-ounce can tomato sauce, plus 8 ounces water used to rinse out can (I used no-salt added) Squeeze out and rinse the can with an equal amount of water to add a concentrated tomato flavor and additional liquid for simmering without needing extra broth. Use the water to loosen and incorporate remaining sauce, ensuring no tomato is wasted while keeping salt low.
- about 8 ounces water, chicken or vegetable broth, optional (see step 5 below) Add up to the specified amount as needed to adjust chili thickness and cooking volume; broth adds savory depth while water keeps the flavor neutral. Reserve as optional to control final consistency based on desired heartiness and simmering time.
- two 4-ounce cans diced green chilis, I used fire-roasted Stir in canned green chilis to deliver mild to moderate heat and a subtle roasted, tangy flavor that brightens the chili; fire-roasted versions add smoky complexity. Add during simmering so their juices meld into the sauce and complement other spices.
- 1 tablespoon cumin Measure and sprinkle to contribute warm, earthy, and slightly citrusy notes that ground the chili's flavor profile and pair well with cumin-based recipes. Toast briefly in the pan with other spices to bloom its aroma before simmering.
- 1 tablespoon chili powder Measure and add to provide a classic chili flavor with smoky, warm chili pepper notes that underpin the dish; adjust quantity to control heat and depth. Combine with cumin and paprika to create a balanced, cohesive spice blend.
- 2 teaspoons smoked paprika, regular paprika may be substituted Sprinkle in to impart a smoky, slightly sweet undertone that enhances the roasted and charred elements; smoked paprika adds depth, while regular paprika can substitute for milder sweetness. Add when seasoning to allow its oils to release during cooking.
- 2 to 4 bay leaves Tuck in whole to subtly aromatize the simmering chili with a mild, herbal bitterness that helps balance rich and sweet flavors; the number used can be adjusted for intensity. Remove before serving to avoid unexpected bites, as bay leaves are typically not eaten.
- 1 to 2 teaspoons granulated sugar, optional and to taste Stir in sparingly to round out acidity and enhance perceived sweetness, balancing tomatoes and chilis; granulated sugar is optional and should be adjusted to taste. Add gradually and taste, especially if canned tomatoes vary in tartness.
- sour cream, green onions, shredded cheese, crushed tortilla chips or crackers Garnish and serve with these accompaniments to add cooling creaminess, fresh onion bite, melty cheese richness, and crunchy texture from chips or crackers; they allow each diner to personalize spice and texture. Offer on the side so guests can top individual bowls to preference.
Instructions
- To a large Dutch oven, add 2 tablespoons olive oil, turkey, and cook over medium-high heat to brown, crumbling it with a spatula as it cooks and tossing it to ensure even cooking. Cook through, about 5 minutes or as necessary.: You will hear a steady sear as the ground turkey hits the hot oil, a soft sizzling that signals moisture is evaporating and browning is beginning. Visually, the meat will change from pink to pale beige and then develop golden flecks where the Maillard reaction concentrates flavor. The scent becomes savory and slightly nutty, which is where much of the final depth comes from. Why this matters, the initial browning locks in savory notes that carry through the chili, preventing a flat, one dimensional outcome. If you crowd the pot the meat will steam instead of brown, losing that toasty aroma, so keep the heat at medium high and give the meat space to contact the pan. A common mistake is stirring continuously; instead let it sit briefly to form color, then break it up. If pieces stick, gently nudge with the spatula rather than scraping aggressively, which preserves the fond on the pan for flavor.
- Add the onions, red pepper, drizzle remaining 2 tablespoons over the top, stir, and cook for about 5 to 7 minutes, or until vegetables have softened, stir intermittently.: When the diced onion and red bell pepper hit the pot they will hiss and immediately begin to soften, releasing sweet vegetal aromas that balance the meat. You will notice the liquid in the pan pull back as the vegetables release moisture, and the edges of the onion will become translucent while the pepper turns tender with a slightly glossy sheen. This stage builds sweetness and complexity, because softened vegetables integrate into the base rather than sitting as raw bits. Why this step matters, gentle cooking transforms sharp raw flavors into mellow sweetness that supports the spices. Troubleshooting tip, if the vegetables brown too fast lower the heat and add a splash of water, or they will scorch and add bitterness. Stir intermittently to ensure even softening, avoid constant stirring which prevents gentle caramelization.
- Add the garlic, salt (Note because I used all low-salt or no-salt added products I use 3 teaspoons salt total; if you’re using salted versions of the other ingredients reduce salt level to 1/2 to 1 teaspoon to start with and add more if necessary), pepper, and cook for about 1 minute, stir intermittently.: The moment you add the garlic you will be hit with a fresh, aromatic burst, but it cooks quickly so keep it brief. You want the garlic softened and fragrant, not browned and bitter, which is why one minute is sufficient. The addition of salt and black pepper at this point helps draw moisture from the vegetables, concentrating flavors and allowing the spices to meld. Why it matters, early seasoning ensures the whole pot develops balanced taste as it simmers. Watch closely because burnt garlic ruins the base. A frequent error is leaving the heat too high; reduce immediately if the garlic begins to darken.
- Add the beans, diced tomatoes, tomato sauce, rinse can out with 8 ounces water and add the water, green chilis, cumin, chili powder, smoked paprika, bay leaves, and stir.: As you add the beans , canned tomatoes , and tomato sauce the pot will steam and the scent will transition to a tangy, spiced aroma. Stirring in the diced green chilis and spices like cumin , chili powder , and smoked paprika releases a dry spice perfume that warms the nose. The added can rinse water captures concentrated tomato flavor that clings to the sides of the can, so include it to maximize depth. Why this matters, combining wet and dry components now lets flavors marry during simmering. A typical mistake is under stirring at this point, which can leave pockets of undissolved spices. Make sure the mixture is uniform so each spoonful is balanced.
- Depending on how thick you like your chili and if you prefer more broth, you may wish to add up to 8 additional ounces water, chicken or vegetable broth.: At this decision point you set texture. Adding water or broth loosens the chili for ladling, while skipping it yields a denser, stew like consistency. You will see the surface shimmer and short boiling ripples when the liquid is sufficient. Why this matters, texture influences perception of flavor and comfort; thinner chili feels more soup like, thicker chili feels more substantial. Beware of adding too much liquid at once; you can always thin later, but you cannot easily reduce an over diluted pot without longer simmering. Taste and adjust gradually.
- Bring to boil and cook for about 10 to 15 or until chili has reduced and thickened some.: As the pot comes to a boil you will hear lively bubbling and see steam rise steadily, then when it reduces to a simmer the surface calms and small bubbles break more slowly. The aroma deepens, becoming richer and more cohesive, and the color will darken slightly as flavors concentrate. This reduction step integrates the spices, softens beans, and deepens mouthfeel. Why it matters, simmer time controls how melded and concentrated the final bowl will be. Common mistake, keeping a rolling boil will toughen ingredients and evaporate too much liquid; reduce to a low boil or steady simmer to control thickness.
- Stir, taste, optionally add sugar to taste (I added 2 teaspoons because the sugar balances the acid from the tomatoes and peppers), and add more salt, pepper, or seasonings to taste.: The tasting moment is sensory rich, with heat, sweetness, acidity, and salt interacting on your palate. If the tomatoes feel too bright a teaspoon or two of sugar will smooth the acidity without making the chili sweet. Adjust salt in small increments until the flavors pop. Why this matters, seasoning at the end lets you calibrate the final balance using all developed flavors. A frequent error is over seasoning early; always taste before adding large amounts of salt or sugar.
- Remove bay leaves.: You will notice the subtle herbal scent lift as you fish out the bay leaves, clearing any residual woody note. Removing them prevents tough, papery bites in the finished bowl. Why this matters, bay leaves are an aromatics tool that give nuance during simmering, but they are not pleasant to eat whole. A common oversight is leaving them in the pot, which surprises bites later.
- Ladle into bowls and optionally garnish with sour cream, green onions, shredded cheese, crushed tortilla chips or crackers.: Serving reveals the final texture, a glossy surface with pockets of beans and softened vegetables. Garnishes like sour cream add cooling creaminess, while green onions bring brightness and crunch. Why this matters, toppings let each person tailor heat and texture, elevating the bowl beyond the base. Avoid adding garnishes too early as they will wilt or melt into the chili; add them right before serving for best contrast.
Notes
- Storage tip: Store cooled chili airtight in the fridge up to five days or freeze portions for up to four months, reheating gently on the stove to preserve texture.
- Flavor development: This chili tastes even better the next day as the spices meld, so consider making it ahead for a dinner party or meal prep.
- Salt guidance: If using low salt canned goods start with 2 to 3 teaspoons total salt, otherwise begin with 1/2 to 1 teaspoon and adjust at the end after tasting.
- Consistency control: Use up to 8 additional ounces of water or broth to loosen the chili, adding gradually until you reach your preferred thickness.
- Topping suggestions: Offer a selection of garnishes like sour cream, green onions, or crushed tortilla chips so guests can personalize their bowl.