Easter Rice Krispie Treats
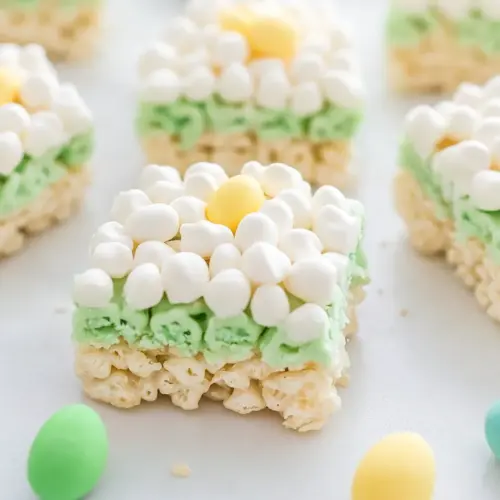
Easter Rice Krispie Treats are crispy, chewy, and irresistibly festive. This easy spring dessert combines gooey marshmallows and crunchy Rice Krispies with a creamy green frosting and colorful Easter Egg Candies for a crowd pleasing bite. Perfect for parties and last minute gatherings, these nests are quick to make and visually delightful, a practical and playful treat you'll want to share.
Equipment
- Microwave-safe Bowl
- Cupcake Pan
- Spatula
- Piping Bag
- Wax paper
Ingredients
- 16 ounces marshmallows Jumbo or mini marshmallows work Provide sticky sweetness and structure by melting into a pliable binder for holding the treats together; use jumbo or mini marshmallows depending on desired texture and chewiness. Warm gently with butter to create a glossy, cohesive mixture that sets as it cools, making the base of the bars.
- 7 cups Rice Krispies Give light, crispy body and classic cereal crunch while absorbing sticky marshmallow binder to form the treat’s crumb. Maintain the specified cup measurement to ensure proper ratio for a chewy yet airy final texture.
- 2 tablespoons unsalted butter Add rich flavor and help prevent sticking when melted into the marshmallow mixture; use unsalted to better control overall saltiness. Melt with marshmallows over low heat to create a smooth, cohesive base without adding excess salt.
- Easter Egg Candies Provide colorful, crunchy decoration and bursts of candy flavor when pressed into the surface of the treats, creating festive Easter appeal. Scatter or press gently to avoid compressing the bars while preserving visual interest.
- green food coloring Tint the marshmallow mixture a vibrant green to evoke spring grass and enhance seasonal presentation; use a few drops to reach desired hue. Add sparingly while mixing to avoid altering flavor or texture and to achieve even color distribution.
- 1/2 cup unsalted butter Contribute richness and moisture when softened into frostings or coatings that may be used for assembly or decoration on bars. Soften before whipping or mixing to ensure smooth incorporation without lumps.
- 3 -4 cups powdered sugar Thicken and sweeten frostings or fillings to a pipeable, stable consistency, allowing for decorative finishes or to bind add-ins. Sift before using to avoid lumps and add incrementally until reaching the desired firmness.
- 1/4 cup milk Loosen and smooth frostings or binders to a spreadable consistency while adding slight creaminess; choose whole or preferred milk for best texture. Add gradually to control consistency and prevent runniness.
- 1 teaspoon vanilla extract Enhance overall flavor with warm, familiar vanilla notes that round out sweetness and complement other ingredients. Use pure vanilla extract for the most pronounced aromatic quality.
Instructions
- Grease cupcake pans and set aside.: The surface should feel lightly slick to the touch, which prevents the nests from sticking as they cool. I use a small amount of butter rubbed with a paper towel into each cup, and you will notice a faint sheen when it's ready. If you skip this step, the edges can adhere and tear when you remove the nests.
- Melt marshmallows and butter in a microwave-safe bowl (I cooked mine for about 2 minutes but kept a close eye and made sure they weren't puffing up too much and falling out of the bowl.): As the marshmallows melt, the aroma becomes sweet and warm, and you will see pockets of glossy liquid forming. Stir frequently to encourage even melting; I stopped mine at about 2 minutes to avoid the marshmallows puffing and overflowing. If you overheat, the mixture can seize and become grainy, so heat in short bursts and stir between each interval.
- Stir together until well blended and pour in Rice Krispies. Stir until well combined.: You should hear a soft crackle as the cereal meets the warm marshmallow, and the mixture will look glossy and evenly coated. Use a sturdy spatula to fold, scraping the sides so there are no dry pockets. A common mistake is over stirring, which can crush the cereal and make the texture dense rather than airy, so fold gently yet thoroughly.
- Spoon into greased cupcake pan and press down with wax paper.: When you press the mixture into the cups, you will feel a warm, slightly sticky mass that compacts into the nest shape. The wax paper prevents sticking and helps you get even depth without burning your fingers. Press with light, even pressure to create a hollow center for the frosting; pressing too hard makes the treats too firm.
- Let set for a half hour.: During this rest the nests cool and firm up, the marshmallow loses surface tackiness, and the structure stabilizes. You will notice the sheen dull slightly and the nests hold their shape when touched. Try not to move the pan while setting, because jostling can create cracks or uneven walls.
- Combine butter, milk, vanilla and 2 cups of your powdered sugar in a large bowl. Mix till smooth and creamy, about 5 minutes. Then add the remaining powdered sugar and food coloring of your choice.: As you cream these together, the mixture becomes glossy and slightly airy, and the scent of vanilla extract becomes pronounced. Beat for about 5 minutes until smooth, then incrementally add remaining powdered sugar and the green food coloring to reach the desired thickness and color. If the frosting is too loose, add more powdered sugar a quarter cup at a time; too much powder makes it dry and crumbly.
- Pipe your frosting into your cookie cups and top with Easter egg candies. ENJOY!: The texture should be velvety and hold soft peaks when lifted with a spoon, which is a good indicator for piping. You'll see the butter transform from opaque to silky, and tiny air pockets will give the frosting a light mouthfeel. Avoid overbeating which can incorporate too much air and make the frosting collapse when piped.
- Then add the remaining powdered sugar and food coloring of your choice: Adding the rest of the powdered sugar tightens the frosting consistency, making it hold shape. Gradually add the green food coloring to control shade and ensure even distribution so you don't get streaks. If the color is uneven, fold lightly until uniform, but try not to overwork the frosting which can cause graininess.
- Pipe your frosting into your cookie cups and top with Easter egg candies: The frosting should glide from your piping bag in soft ridges that mimic grass, creating a nest cradle for the Easter Egg Candies . Press the candies in gently while the frosting is slightly tacky so they adhere, and arrange them for visual balance. A common issue is frosting that is too warm and slips; chill briefly to firm it up if needed.
- ENJOY!: The finished nests offer a mix of textures, from the crisp Rice Krispies to creamy frosting and crunchy candies, and you'll likely hear delighted exclamations when guests bite into them. Serve at room temperature for the best texture. If you store them improperly, the candies can sink into the frosting or the nests can become soggy, so keep them in an airtight container at cool room temperature.
Notes
- Adjust sweetness: Balance the powdered sugar by starting with less and tasting as you go, since sweetness perception varies and you want the frosting to complement the marshmallows.
- Texture control: If you prefer chewier nests, press more firmly into the cups, but be careful not to compress into a dense block which loses the cereal's crispness.
- Even coloring: Dissolve a tiny bit of the green food coloring into the milk before adding to the frosting for a more consistent shade.
- Filling technique: Use a small round piping tip to deposit frosting, working from the outer edge inward to create a neat nest well for the Easter Egg Candies.
- Make ahead: You can assemble nests and store them in an airtight container for a day, but add the candies the same day to keep them bright and crisp.
- Kid involvement: Let children place the candies and choose color shades, it keeps them engaged and proud of the final product.
- Presentation: Arrange nests on a platter lined with parchment for easy transport and an attractive display.