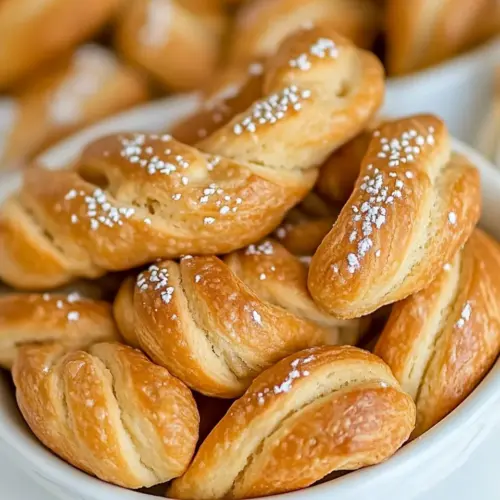
Easter Greek Cookies Koulourakia
Easter Greek Cookies Koulourakia capture bright orange aroma and a buttery, slightly crisp texture in each braided cookie. These easy to shape treats are ideal for gatherings and holiday tables, offering a nostalgic flavor and beautiful golden finish that invites sharing. Make them for a festive brunch or to start a new family tradition with charming shapes and dependable results.
Equipment
- Mixing Bowl
- Electric beaters
- Baking Sheet
- Parchment Paper
- Whisk
Ingredients
- 1 cup unsalted butter room temperature Cream until light and fluffy to provide the rich, tender base and buttery flavor essential for tender koulourakia dough.
- 1 1/2 cups white sugar Sweeten and tenderize the dough while aiding browning; creamed with butter it helps create a soft, delicate crumb and caramelized edges.
- 3 eggs Bind and enrich the dough while adding structure and moisture; beaten eggs contribute to leavening and a glossy finish when used in egg wash.
- 1/2 cup orange juice Moisten and add bright citrus flavor while contributing slight acidity that balances sweetness and enhances gluten development for a soft crumb.
- Zest of 1 orange Provide concentrated citrus aroma and bright zest flavor to infuse the dough with authentic orange fragrance and lift the cookie's profile.
- 6 cups all-purpose flour Build structure and bulk while providing the necessary gluten and starches; sift and mix to achieve the proper dough consistency for shaping.
- 1 teaspoon baking ammonia or baking soda Leaven or tenderize the dough depending on choice; baking ammonia or baking soda creates lift and a light, crisp texture characteristic of traditional recipes.
- 2 teaspoons baking powder Add additional leavening power to ensure proper rise and lightness, complementing other chemical leaveners for an even, airy crumb.
- 1/2 teaspoons salt Enhance overall flavor balance and control gluten strength slightly; salt rounds out sweetness and accentuates other ingredients without overpowering.
- 1 teaspoon vanilla extract Add warm, familiar vanilla aroma and subtle sweetness depth to complement citrus notes and round out the overall flavor profile.
- 1 egg beaten Provide an egg wash when beaten and brushed onto shaped cookies to promote deep golden color, shine, and slight sealing of edges.
- 1/3 cup milk Loosen the dough slightly for easier shaping and add a touch of dairy richness; milk also contributes to browning and tender texture.
Instructions
- In a medium bowl mix flour, salt, baking powder, and baking ammonia or baking soda.: Start by combining the dry all purpose flour , salt , baking powder , and the leavener choice in a bowl, tossing them until they are evenly distributed. You should notice the fine, powdery texture of the flour , and when you lift a spoonful it should fall back in without clumping. This even distribution prevents pockets of salt or leavener, which would create uneven rise or spots of bitter taste. If you see lumps, sift or whisk them out. A common mistake is adding wet ingredients into unmixed dry ingredients, which can lead to streaks of leavener or dense spots; mixing first avoids that.
- Add butter to a large bowl and cream it with beaters. Add sugar gradually. Add orange zest.: As you cream the room temperature butter with the sugar , look for the mixture to become lighter in color and softer in texture, almost fluffy. The creaming traps tiny air bubbles that are crucial for an even, tender crumb. When you fold in the grated orange zest , the mixture will begin to smell citrusy and bright, releasing fragrant essential oils. If the butter looks greasy rather than creamy, it is too warm; chill briefly. Avoid under-creaming, which leaves dense spots, or over-creaming, which can make a fragile dough that spreads.
- Add eggs one at a time alternating with orange juice. Add vanilla extract.: Incorporate each egg one by one, beating until each is fully absorbed before adding the next. Alternate with splashes of orange juice so the mixture stays smooth and does not curdle. The mixture should feel silky and slightly glossy, and the aroma will deepen as the eggs are incorporated. Stir in the vanilla extract near the end to round the flavors. If the mix looks separated, pause and beat gently; temperature differences between ingredients often cause that, so bring items closer to room temperature to prevent it.
- Add flour mix a little bit at a time and mix. You should end up with a soft, pliable dough.: Add the dry mixture in portions, folding or mixing until each addition disappears into the batter, creating a soft, non sticky dough that pulls away cleanly from the bowl. The feel is key here; the dough should be pliable and slightly tacky but not wet. Overworking the dough can develop gluten and make the cookies tough, so stop mixing as soon as the flour is incorporated. If the dough is too dry, the shapes will crack, so add a teaspoon of milk or orange juice only if needed.
- Cover and chill the dough for 30 minutes.: Chilling firms the dough making it easier to shape, and lets the butter relax and the flavors meld. After about thirty minutes the dough will be noticeably firmer and less sticky to the touch. You will also see that any gloss from fats has dulled slightly. Skipping this step often leads to spreading and loss of shape in the oven, so resist the urge to shape immediately if the dough feels soft.
- Preheat oven to 375 degrees F.: While the dough chills, preheat the oven so it reaches 375 degrees F by the time you go to bake. An oven at the correct temperature ensures a quick set of the outer surface, creating that golden exterior while keeping the interior tender. Use an oven thermometer if you suspect your oven runs hot or cold. Baking at a lower temperature will make the cookies pale and dense, while too high a temperature burns the edges before the centers cook.
- Shape as desired, check the Notes for details on how to create the shape.: As you shape, the tactile feedback will tell you when the dough is correct; it should roll smoothly into ropes without cracking. For braids, divide into equal portions, roll into ropes, and gently braid, finishing with tucked ends for a neat look. If you prefer rings, roll ropes and connect the ends, smoothing the join. A common error is over flouring the work surface which dries the outer layer and causes cracking, so work lightly and keep the dough covered if it rests between shapes.
- Line a baking sheet with parchment paper and arrange the cookies on it, 2 inches apart.: The parchment gives a nonstick surface and promotes even browning. Place cookies with about 2 inches between them to allow for slight expansion. You should see a neat layout and anticipate how the cookies will look once golden. Crowding causes sticking and uneven heat distribution. If cookies are too close they may merge into each other, so leave ample space.
- Whisk egg and milk in a small bowl. Brush cookies with the egg and milk mixture. Sprinkle with sesame seeds.: The egg and milk wash will look glossy and slightly opaque when whisked. Gently brush each cookie, ensuring even coverage without pooling in the crevices, then sprinkle with sesame seeds for texture and visual appeal. The wash promotes browning and sets the seeds in place. One pitfall is over brushing which can dissolve delicate shapes; use a light hand to preserve the details.
- Bake in the preheated oven for 10 – 12 minutes, or until golden brown.: As the cookies bake you will notice a warm citrus aroma and the edges turning a pale golden brown. They should sound slightly firm when tapped and the tops will have a glossy sheen from the wash. Remove when edges are set and centers still slightly soft, they will firm as they cool. Overbaking will dry them out, while underbaking can leave a gummy center, so rely on color and touch rather than clock alone.
Notes
- Room Temperature Matters Use truly room temperature butter and eggs so the mixture emulsifies smoothly and the dough achieves the right texture.
- Measure Flour Carefully Spoon and level your all purpose flour or weigh it to avoid a dry, crumbly dough that is hard to shape.
- Zest Before Juicing Grate the orange zest first, then juice to avoid removing fragrant oils accidentally when cutting the fruit.
- Test Bake One or Two Bake a small test cookie to check oven temperature and timing, then adjust the remaining batch if needed.
- Gentle Egg Wash Apply the beaten egg and milk wash sparingly to maintain crisp braid details while still promoting a golden finish.