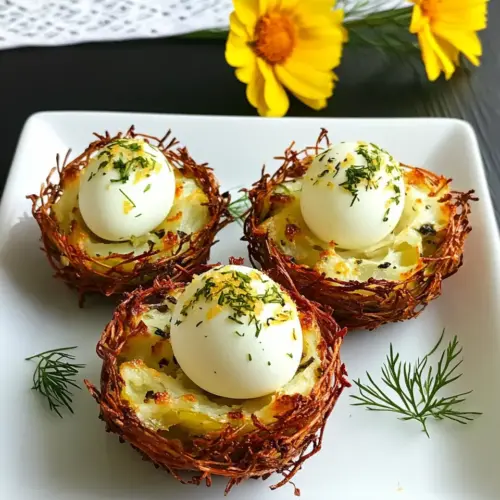
Easter Egg Tart Potato Nests
Easter Egg Tart Potato Nests are crispy, golden potato cups filled with creamy garlic lemon herb cream cheese and topped with sliced hard boiled eggs and a cherry tomato center, perfect for an easy spring brunch or party. The combination of textures is irresistible, offering a crunchy shell and soft, savory filling that makes these ideal as an easy weeknight appetizer or festive bite. Make them for their charm and crowd pleasing appeal.
Equipment
- Muffin Pan
- Mixing Bowl
- Measuring scoop
- Saucepan
- Knife
Ingredients
- 3 large Russet potatoes peeled and shredded (about 2 1/2 cups in total) Peel and shred to provide a sturdy, starchy base for forming the nests; drains and squeezes well to avoid soggy shells, yielding about 2 1/2 cups shredded potato.
- 1/4 teaspoons salt Season lightly to enhance overall savory balance; blends into the shredded potatoes to bring out natural flavors without overpowering the dish.
- 1/4 teaspoon black pepper Season gently to add a subtle bite; balances richness from the potatoes and butter while complementing the herbs used in the recipe.
- 1 teaspoon olive oil Coat the baking surface or potatoes to promote browning and prevent sticking; adds a hint of fruitiness and a healthier fat option compared to butter.
- 2 teaspoons fresh thyme leaves Aromatize and brighten the nests with a woodsy, lemony note; sprinkle into the potato mixture to lend fresh herb complexity.
- 1 tablespoon minced parsley leaves Garnish and add fresh green flavor when minced; stirs into the filling or sprinkles on top for a mild, slightly peppery finish.
- 1/2 cup garlic lemon herb cream cheese (or plain, or your favorite flavor) Cream and enrich the filling with tangy, savory creaminess; spread into the baked potato nests to create a smooth, luscious center.
- 6 hard-boiled eggs see cooking tips Provide a firm, protein-rich centerpiece once peeled and sliced; place halved or whole in the nests for a classic Easter presentation.
- cherry tomatoes Add a sweet, acidic burst of color and freshness when halved or quartered; top the nests for visual contrast and a juicy pop.
- fresh dill Finish and brighten with feathery, bright herb sprigs for fragrance; place small sprigs as garnish to enhance aroma and appearance.
- Dill brush (optional but recommended) Create realistic, decorative accents when formed into brush shapes for presentation; optional element used for styling and texture contrast.
- 2 teaspoons fresh dill leaves minced Season the topping with delicate dill flavor; mince and mix into cream cheese or sprinkle over eggs for herby brightness.
- 1 teaspoon fresh parsley leaves minced Season the garnish with mild, fresh parsley flavor when minced; fold into spreads or scatter over finished nests for color and freshness.
- pinch of salt Season sparingly to balance flavors and control overall saltiness; use a pinch to adjust seasoning after tasting the assembled nests.
- pinch of pepper Season sparingly to fine-tune peppery heat and depth; add a pinch to taste to complement the herbs and cream cheese filling.
- 2 tablespoons melted butter (or olive oil) Moisten and crisp the potato nests during baking with a rich, buttery finish; brush or toss the shredded potatoes to promote golden color and flavor.
Instructions
- Preheat the oven to 400 degrees F.: You will notice a warm, dry heat that helps form a crisp exterior on the nests, which is critical for texture contrast. Preheating ensures the nests begin crisping immediately, not steaming in a cool oven. A common error is placing them in before the oven reaches temperature, which leads to under browned edges and a denser interior. I listen for the oven signal and use an oven thermometer if my oven runs cool.
- In a bowl, mix the shredded potatoes with the salt, pepper, olive oil and fresh thyme and parsley.: As you toss, smell the herb oils waking up and the slight minerality of the potatoes. This mixing step allows seasoning to distribute and the oil to coat strands for even browning. If you skip this step or mix unevenly, some nests may taste bland while others are over seasoned. A tip is to press a small handful between your fingers to check for even seasoning and moisture before proceeding.
- Take your standard size muffin pan and brush the inside of each cavity with olive oil (alternatively you can line it with baking paper).: Brushing the pan creates separation so nests release easily, and the oil promotes browning where potatoes touch the metal. You'll hear a faint sizzle as nests hit the hot pan. Forgetting to oil the cavities can cause the nests to stick and tear when removed, so be thorough but not excessive with oil.
- Use a 1/4 cup measuring scoop and take a scant 1/4 cup of the potato mixture and place it in each muffin cavity. Then press the potatoes down with your fingers making sure they stick firmly to the bottom and sides of the muffin pan cavity. Use your thumb, press down in the centre of each potato mixture forming a dent so that after it bakes, you can place the cream cheese mixture inside.: While forming nests, you will feel the strands compress and a faint tackiness as they hold together, which is what you want for structural integrity. The dent ensures room for filling while preserving the nest walls. A common pitfall is under pressing which leads to nests falling apart when removed, so press firmly but gently to avoid compacting them too densely. Visually, you should see uniform thickness along the sides and a clear indentation in the center.
- Bake the potato nests for about 15 mins until they are golden on the outside and soft in the inside. Remove the muffin pan from the oven and let the potato nests cool for a few minutes before removing them from the pan.: During baking you'll notice a toasty aroma and the edges turning a deep gold, indicating caramelization of the potato starches. The contrast between a crisp rim and a tender core is the goal. Rushing the cooling phase can lead to warping when unmolding, and removing them while too hot often causes breakage, so allow a few minutes of rest. If the nests still feel too soft, return them to the oven for a few more minutes rather than forcing them out.
- In the meantime, prepare the eggs.: This step focuses on texture, as the eggs will be sliced and arranged. A tactile check is helpful, the eggs should feel firm but not rubbery. Overcooking can produce a chalky yolk and a sulphuric aroma, so timing matters. If you overcook, cool them rapidly in ice water to halt cooking and preserve a paler yolk.
- to boil the eggs: Place your eggs in cold water and bring the water to a boil. Once it starts boiling and rolling, turn off the heat, cover your pot and let the eggs sit in the pot for 15 mins.: Place your eggs in cold water and bring the water to a boil. Once it starts boiling and rolling, turn off the heat, cover your pot and let the eggs sit in the pot for 15 mins. : This gentle residual heat method yields evenly cooked whites and set yolks that are not chalky. You'll hear the water shift as it reaches a rolling boil and then settle; using residual heat avoids vigorous agitation which can crack shells. A common mistake is boiling aggressively the entire time, causing cracked shells and uneven doneness. After the resting time, plunge eggs into cool or iced water to stop cooking and make peeling easier.
- Slice the eggs into about 1/4 th of an inch thick (if you slice them too thin, the yolk and white might separate during assembling).: As you slice, notice the clean, slightly glossy cut on the whites and the steadiness of the yolk. Thicker slices stay intact and arrange nicely, giving the nest a flowerlike appearance. A flimsy slice will fall apart during assembly, so use a sharp knife and steady hand. If your knife drags, chill the eggs briefly to firm them up for cleaner cuts.
- Remove the potato nests and assemble the appetizer by placing a teaspoon of the cream cheese in the centre of the potato nest and arrange the sliced hard boiled eggs around it in the form of a flower. Place a cherry tomato in the centre, a sprig of fresh dill on the side.: In this stage you will feel the satisfying contrast of soft cream cheese against crisp potato and the cool firmness of egg. The arrangement is visual and textural, aiming for balance between nine or so slices around the center, depending on egg size. A frequent issue is over filling the center, which can push the egg slices outward and upset the presentation, so use modest amounts of cream cheese and adjust as needed.
- To finish off, place all the dill brush ingredients in a small bowl, and use a brush to brush the eggs and tomato with this mixture.: Brushing adds a glossy sheen and a burst of herbal aroma that elevates the finished bite. You will see the herbs cling and sparkle on the egg surface, and the tomato will gleam when lightly coated. Over brushing can pool the mixture and weigh down the eggs, so dab off excess on the rim of the bowl.
- Serve and enjoy! 🙂: Serving should feel celebratory and relaxed, guests will likely notice the visual charm first, then the layered textures. Encourage picking them up by the nest to maintain the filling, and enjoy the combined flavors. A misstep is letting them sit too long at room temperature before serving, which can soften the nest, so aim to serve soon after finishing the brush.
Notes
- Make it extra herby Add more fresh dill and parsley to the cream cheese for an aromatic lift, mixing finely minced herbs right into the spread so each bite has consistent flavor.
- Butter finish Brush the nests with melted butter before baking for a richer, golden exterior that pairs especially well in spring when buttered flavors feel seasonal and comforting.
- Advance prep Bake the nests and hard boil the eggs up to two days ahead, store separately and re crisp nests for 10 mins at 350 degrees F before assembling to keep texture intact.
- Brighten the cream If you use plain cream cheese, stir in lemon zest and a pinch of salt to approximate a garlic lemon herb profile, which sharpens the overall taste.
- Mini or standard size Scale by using a mini muffin pan for bite size or standard for a heartier appetizer, adjusting baking time slightly until nests are golden but still tender in the center.
- Presentation upgrade Garnish each assembled nest with a small dill sprig and a light dusting of minced parsley for a polished look that photographs beautifully.