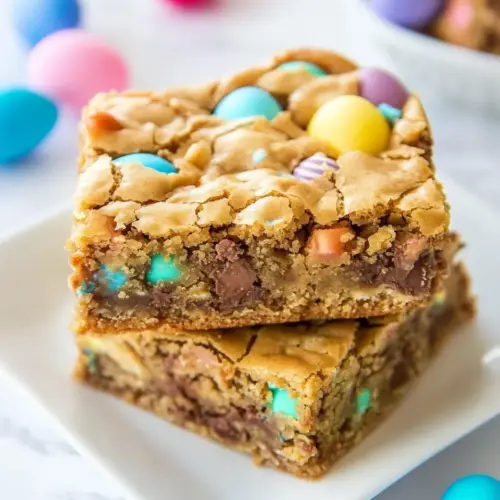
Easter Egg Blondies
Easter Egg Blondies are chewy, buttery bars studded with colorful candy for a playful spring dessert. The tender crumb and sweet pockets of chocolate make them an easy, crowd pleasing treat that travels well for potlucks and holiday gatherings. Make a pan for a festive addition to brunch or to pack into lunchboxes for a special surprise.
Equipment
- Mixing Bowl
- Whisk
- 8-by-8-inch baking pan
- Aluminum Foil
- Spatula
Ingredients
- 1/2 cup unsalted butter, 1 stick, melted Melted and creamy, provides rich fat that contributes to a tender, moist crumb and helps brown the edges for blondies.
- 1 large egg Beaten and binding, adds structure and helps set the batter while contributing slight richness and lift for a soft texture.
- 1 cup light brown sugar, packed Softly sweet and caramel-like, supplies bulk sweetness and moisture while enhancing flavor depth and chewiness in the bars.
- 1 tablespoon vanilla extract Aromatic and sweet, imparts warm vanilla flavor that rounds out sweetness and elevates the overall taste profile of the blondies.
- 1 cup all-purpose flour Dry and structural, supplies gluten-forming proteins that give the blondies body and framework while absorbing wet ingredients.
- 1/2 teaspoons salt, or to taste Savory and balancing, brings out other flavors and controls sweetness while preventing the blondies from tasting flat or overly sweet.
- 1 cup M&M's Milk Chocolate Eggs, divided (substitute with your favorite M&M's if you cannot find those) Colorful and crunchy, contributes pockets of chocolate and candy texture throughout the blondies while adding visual appeal.
Instructions
- Preheat oven to 350 F. Line an 8-by-8-inch baking pan with aluminum foil, spray with cooking spray; set aside.: As you preheat the oven, you should notice the air beginning to warm, which helps create a consistent bake. Prepare the pan so you are not rushed later, and make sure the foil is pressed tightly into corners for even edges. The foil makes lifting the blondies out effortless once cooled. Common mistake to avoid here is skipping the spray, which can make removing squares messy; a light spray keeps the edges clean.
- To a large, microwave-safe bowl add the butter and heat to melt, about 1 minute on high power.: When melting the unsalted butter , watch for it to become glossy and just melted, with little to no bubbling. You will smell a warm, rich butter aroma. If using the microwave, stop and stir halfway to prevent hotspots. The reason we melt it is to create a dense, chewy texture, but overheating can brown it unintentionally. Avoid letting it get smoke hot, which can alter flavor.
- Wait momentarily before adding the egg so you don’t scramble it. Add the egg, brown sugar, vanilla, and whisk until smooth.: After the butter cools slightly, you will feel a warmer than room temperature bowl but not hot. The batter will begin to come together into a glossy mixture when you whisk in the egg , brown sugar , and vanilla. Use your whisk to beat until smooth, noticing the sheen. This step ensures even incorporation and prevents cooked egg bits. A common pitfall is adding the egg too soon to very hot butter, which causes bits of cooked egg in the batter.
- Add the flour, salt, and stir until just combined, don’t overmix.: When you fold in the all-purpose flour and salt , aim for a few streaks of flour disappearing rather than a completely uniform paste immediately. The batter should remain slightly thick and glossy. Overmixing develops gluten, leading to tougher blondies, so stop as soon as you see no dry flour. You want a tender, dense crumb, and restrained mixing preserves that texture.
- Add 3/4 cup M&M's Eggs and stir to combine as best you can. They are a bit resistant to stir in, but do your best to incorporate.: As you fold in most of the M&M's Milk Chocolate Eggs , notice how they push back against the spoon, resisting incorporation yet embedding into the batter. The sound is a soft clink, and the visual is cheerful speckles throughout. Work gently so you do not crush all the candies. A common mistake is stirring too vigorously and bleeding color, which can tint the batter; gentle folding preserves the distinct pieces.
- Turn batter out into prepared pan, smoothing the top lightly with a spatula.: When transferring the batter, it should have a thick, glossy consistency that spreads under the weight of your spatula. Smooth the surface so the top bakes evenly and you avoid thin edges. Use an even hand to avoid overworking the batter. If you press too hard you might compact the batter making edges denser than the center.
- Evenly add the remaining 1/4 cup M&M's Eggs over the top, pressing them down lightly so they adhere to the batter.: Press the remaining M&M's Milk Chocolate Eggs into the surface so they remain visible after baking. The candies on top will soften slightly and add a decorative burst of color. Light pressure helps them stick without sinking. The trap here is pressing too deeply which buries them; keep them mostly on the surface for the best look and texture.
- Bake for about 20 minutes, or until top is set in center and done. A toothpick inserted in the center should come out clean, or with a few moist crumbs, but no batter. Blondies firm up as they cool.: As the blondies bake you will notice the aroma of caramelizing sugar. The top will change from glossy to a matte, lightly golden surface and edges will pull slightly from the foil. Use visual cues and the toothpick test rather than relying only on time. If underbaked, the center may be too gooey; if overbaked, they become dry. Aim for moist crumbs on the toothpick to get that fudgy interior.
- Cool for about 30 minutes before slicing and serving.: Cooling allows the structure to set and prevents crumbling when you slice. You will smell the final, sweet finish as they cool, and the candies will become firm. Use the foil sling to lift the slab out and cut with a sharp knife. A common mistake is slicing warm, which yields ragged pieces; patience pays off with clean squares.
Notes
- Swap or mix candy Replace the M&M's Milk Chocolate Eggs with seasonal candies you prefer, being mindful that some candies may bleed color when warm.
- Make mini bars Bake the batter in a 9-by-13 pan and cut into smaller squares for bite sized portions ideal for parties or dessert trays.
- Adjust sweetness Slightly reduce the light brown sugar by a couple of tablespoons if you prefer less sweet bars, but note texture will be marginally denser.
- Sturdier edges For firmer edges, bake an extra 2 to 4 minutes, watching closely so the center does not overcook.
- Decorative topping Add a few candies right after baking while the surface is still warm so they adhere visibly and create a festive look.