Easter Dirt Cake
Easter Dirt Cake is a creamy, crunchy, and playful layered dessert that combines cookie crumbs, tangy cream cheese, light whipped cream, and silky puddings for an easy spring centerpiece. This easy make ahead dessert is perfect for potlucks and family gatherings, delivering crowd pleasing texture and festive decorations. Try it for an effortless holiday treat that delights both kids and adults, and makes entertaining stress free.
Equipment
- Food Processor
- 9×13 glass baking dish
- Stand mixer or hand mixer
- Mixing Bowls
- Spatula
Ingredients
- 33 Oreo Cookies I used a 13.29 oz package (reserve a handful for sprinkling on top) Crushed into fine crumbs to form the base and add chocolate cookie flavor and texture throughout the dessert. Provides a crunchy, slightly salty contrast to the creamy layers and some reserved pieces can be sprinkled on top for visual appeal. Can be pulsed in a food processor or placed in a bag and crushed with a rolling pin.
- 1/4 cup butter unsalted, melted Melted and combined with crushed cookies to bind them into a cohesive crust or layer, adding richness and helping the crumbs hold their shape. Contributes a silky mouthfeel and helps set the bottom layer when chilled. Use unsalted butter to better control overall sweetness and salt balance.
- 16 oz heavy whipping cream cold Chilled and whipped into stiff peaks to create a light, airy component that stabilizes layers and lends a creamy texture. Adds richness and volume while helping maintain structure when folded into other components like sweetened cream cheese mixtures. Cold heavy cream whips faster and yields a smoother whipped cream.
- 2 tsp vanilla Added to whipped cream or filling to enhance aroma and deepen overall flavor with a warm, sweet note. Helps balance the sweetness of other components and complements the dairy elements. Use pure vanilla extract for the most natural flavor.
- 1/2 cup powdered sugar Sifted into whipped cream or cream cheese mixtures to add sweetness and a silky texture without grittiness. Stabilizes whipped components slightly and helps achieve a smooth, uniformly sweet filling. Powdered sugar dissolves easily, preventing graininess.
- 16 oz cream cheese at room temperature Softened and beaten until smooth to create a tangy, rich base for the creamy filling, providing structure and flavor contrast. Balances sweetness from pudding and sugars while contributing to a dense, luscious mouthfeel. Room temperature ensures it incorporates without lumps.
- 1/4 cup powdered sugar Incorporated into cream cheese or whipped mixtures to add additional sweetness and help achieve the desired flavor balance. Fine texture ensures even distribution and smooth consistency in fillings. Measure carefully to avoid over-sweetening.
- 1 cup homemade whipped cream half of the above recipe Light and airy component prepared from heavy cream, folded into denser mixtures to lighten texture and add volume. Half of the prepared whipped cream provides fluffy lift and smoothness to the layered dessert. Use gentle folding to preserve airiness.
- 3.4 oz instant vanilla pudding mix Instant mix whisked into milk to form a quick, flavorful pudding layer that adds custardy texture and vanilla flavor. Helps thicken the dessert and create a stable middle layer when chilled. Follow package instructions and allow time to set for best results.
- 3.9 oz instant chocolate pudding mix Instant mix combined with milk to create a chocolate pudding layer that contributes rich cocoa flavor and silky consistency. Acts as a contrasting layer to the vanilla pudding and ties flavors together with chocolate notes. Ensure mixture chills to firm up before layering.
- 4 cups milk cold, I used whole milk Poured cold into pudding mixes to hydrate and set them, creating smooth, properly textured puddings that assemble cleanly. Whole milk adds creaminess and fuller mouthfeel compared to lower-fat milks. Keep cold to help puddings chill faster and maintain structure.
- 1 cup homemade whipped cream remainder of the above recipe Folded in as the remaining portion of whipped cream to further lighten fillings and provide consistent texture across layers. Adds aeration and softness to denser pudding or cream cheese mixtures, ensuring a fluffy final dessert. Maintain gentle technique to preserve whipped volume.
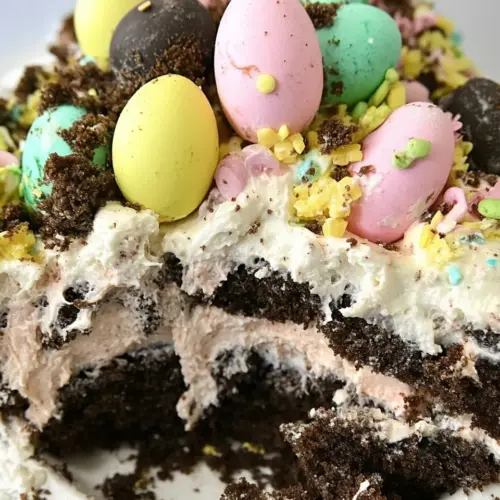
- Oreo crumbles handful, to sprinkle on top Sprinkled over the finished dessert to mimic soil and add crunchy texture and visual contrast against lighter fillings. Uses reserved Oreo crumbs to create an authentic 'dirt' appearance and deliver bursts of chocolate cookie flavor on top. Scatter evenly for best presentation.
- 8 Peeps Placed as colorful marshmallow decorations to evoke an Easter theme, adding sweetness, playful shapes, and bright colors to the dessert surface. Peeps provide a nostalgic, decorative touch and a chewy texture contrast to creamy layers. Arrange gently to keep impressions intact.
- 1/2 cup coconut shredded, sweetened Sprinkled lightly to impart a tropical flavor note and chewy texture, and to contribute to the look of grassy or sandy elements in the dessert. Sweetened shredded coconut adds sweetness and visual interest when toasted or left raw. Use sparingly to avoid overpowering other flavors.
- green food coloring Dropped into whipped or tinted cream to impart a subtle hue for decorative grassy elements or added to decorative components for visual effect. A few drops go a long way to tint cream to a spring green without affecting flavor. Add gradually until desired shade is reached.
- mini Cadbury Eggs Scattered as colorful candy accents to simulate eggs in a nest, adding crunchy, sweet bites and festive visual appeal. Mini Cadbury Eggs provide varied textures and chocolate centers that complement the dessert’s creamy layers. Place strategically to enhance presentation without overcrowding.
- jelly beans Added as assorted candy pieces to create bright, varied pops of color and sugary flavor across the top of the dessert. Jelly beans provide small, chewy bursts of fruitiness that enhance the Easter theme and invite guests to sample different flavors. Distribute evenly for balanced appearance.
Instructions
- Pulverize Oreos in a food processor until crumbly.: When you pulse the Oreo Cookies , you should hear a steady, rhythmic hum and see fine, even crumbs with occasional slightly larger bits for crunch; this texture helps the crust bind while maintaining interest. Avoid over processing into a powder, or the crust will become too dense and lose texture. If you do get powder, add a few more whole crumbs back in or pulse just a couple of times to reintroduce bite. Make sure the pieces are small enough to press into the pan evenly, and stop while there are still tiny flakes to keep a pleasant mouthfeel.
- Slowly pour melted butter into Oreos and pulse food processor until well combined.: As you drizzle warm butter over the crumbs, watch how the mixture darkens and becomes slightly glossy, indicating the fat is coating the crumbs and helping them stick. The warmth will release the cookie aroma, which is an excellent sign that the crust will taste rich. A common mistake is adding the butter too fast, leaving some dry pockets, so add gradually and pulse between additions. If the mixture seems too wet, freeze it for five minutes to firm up before pressing into the pan.
- Reserve a handful of Oreo crumbs to sprinkle on top. Press remainder of buttered cookie crumbs into a 9×13 glass baking dish with clean hands or an offset spatula.: Pressing the crumb mixture should produce a compact, even layer that holds together when tapped, and you will likely feel a slight resistance under your fingers as the crumbs set. Use an even pressure and a flat bottomed measuring cup to press for a uniform thickness, which ensures even bites across the pan. Avoid pressing so hard that the crust becomes rock hard; it should be compact but still slightly tender. If the crust is crumbly when you touch it, add a touch more melted butter and press again.
- Place in refrigerator to chill while making the next layer.: Chilling sets the butter and stabilizes the crust, giving it structure to support the creamy layers. You may notice the chilled crumbs smell more intensely of chocolate once firmed up. A mistake to avoid is skipping this chill time, which can make the crust soggy when you add wetter layers. Ten to fifteen minutes in a refrigerator is usually sufficient for the butter to solidify.
- Make homemade whipped cream by combining heavy whipping cream, powdered sugar and vanilla in a bowl and beat with a stand mixer or hand mixer until soft peaks form. Set aside.: As the heavy whipping cream transforms, you will see it thicken and hold soft peaks that curl over when you lift the whisk; the texture should be billowy and glossy. Stop at soft peaks for folding, because over whipping leads to grainy butter. If you accidentally over whip, add a splash of cold milk and gently whisk to bring it back. Keep the bowl chilled if your kitchen is warm to slow down the process and preserve stability.
- Place softened cream cheese and powdered sugar in a bowl and mix to combine.: When you beat the cream cheese with powdered sugar , aim for a smooth, lump free consistency that smells tangy and sweet. Use room temperature cream cheese to avoid lumps, scraping the bowl sides to ensure even mixing. A common mistake is using cold cream cheese , which leads to clumps that are hard to incorporate; soften it by letting it sit at room temperature for a bit longer or beat on low speed until smooth.
- Fold in HALF of the homemade whipped cream mixture until combined.: Folding should be gentle so the mixture keeps its airy structure, resulting in a velvety, mousse like texture that lightens the tang of the cream cheese . Use a spatula to scoop under and fold over, rotating the bowl as you go to preserve volume. Over mixing will deflate the air and create a denser layer, which can weigh down the dessert. If deflation occurs, you can whip a very small additional amount of heavy whipping cream and fold it in cautiously.
- Spread cream cheese/whipped cream mixture overtop the Oreo layer.: As you spread this layer, it should contrast with the dark crust, appearing pale and pillowy; smooth it with a spatula to an even thickness so each bite has balance. If you notice streaks or lumps, use gentle strokes to even them out rather than aggressive back and forth motions that will compress the layer. A common error is applying the layer when the crust is still warm, which can cause sliding; ensure the crust is chilled to prevent slipping and to keep clean edges.
- Place in refrigerator to chill while making the next layer.: Chilling here firms the cream cheese layer and makes it easier to top with pudding without mixing the layers. You will sense a subtle tightening of texture as the fats solidify. Skipping this step can lead to mixing between layers and a less defined cross section when sliced. Fifteen to twenty minutes usually suffices to set this layer properly.
- Combine chocolate and vanilla pudding mixes with milk, whisking for 2 minutes.: Whisking the chocolate pudding mix and vanilla pudding mix into cold milk should produce a glossy, smooth custard that thickens as you whisk; you will notice it coat the whisk and fall in ribbons when ready. Whisk vigorously to dissolve any dry pockets; under whisking leaves lumps, while over whisking won’t harm but may thin the set if the mix warms. Use a cold bowl and cold milk for the best texture, and stop after the mixture looks homogeneous and slightly thickened.
- Spread pudding mixture overtop the cream cheese/whipped cream layer.: The pudding should flow and level naturally, forming a shiny, even surface that promises a silky bite. Spread gently to avoid disturbing the layer beneath, using a gentle tilt and shimmy motion with your spatula to nudge the pudding into place. A common problem is pressing too hard, which can create air pockets or mix layers; instead, let gravity help and only nudge where needed.
- Cover and place in refrigerator to chill at least 10 minutes.: Chilling the pudding helps it set and prevents the next layer from absorbing moisture, keeping clean layers when you cut into the cake. You may notice the surface become slightly matte as it firms; that is normal. If you skip this brief chill, the whipped cream topping may sink into the pudding. Ten to twenty minutes is a good window here to achieve stability.
- Spread remaining whipped cream overtop pudding layer.: This top layer should be cloud like and smooth, adding a light visual contrast over the pudding. Use broad, gentle strokes to create peaks or leave it flat for a cleaner look. If your whipped cream feels soft, chill it briefly before spreading to avoid it melting into the pudding. Avoid overworking the surface, which can create drag marks and an uneven finish.
- Sprinkle with remaining Oreo cookie crumbs for garnish and chill for another 20 minutes.: The reserved Oreo Cookies crumbs add crunch and a pleasing visual detail while the final chill helps all layers knit together. You should hear a faint crunch as you sprinkle, and see a textured finish that invites a spoon. One mistake is adding wet toppings before this chill, which can cause sogginess in the top layer; finish chilling first, then garnish if you want maximal crunch retention.
- Pour coconut shreds into a small bowl. Add a few drops of food coloring and stir until your desired color is achieved.: When tinting shredded coconut , mix in small increments of green food coloring until you reach the shade you like; the coconut will absorb color quickly and retain a fluffy texture. Wear gloves if you do not want green stained fingers, and blot excess liquid if the coconut seems damp. Too much liquid color can make the coconut clump, so add color sparingly and fluff with a fork.
- Decorate top of cake with coconut shreds for the "grass" and then add your Peeps, mini Cadbury eggs and jelly beans. Get creative!: Decorating is where the dessert becomes festive; arrange the tinted coconut like a nest and tuck in Peeps , mini Cadbury Eggs , and jelly beans for a playful finish. Press decorations lightly so they stay put but do not sink, and vary heights for visual interest. Avoid decorating too far in advance if you want candies to remain crisp, as some may soften over prolonged refrigeration.
- Serve chilled.: A chilled slice will hold its layers and present clean edges, and the first bite should yield a mix of creamy pudding, airy whipped cream, tangy cream cheese , and crunchy Oreo Cookies . Serve straight from the refrigerator for the best texture, and keep leftovers covered and cold to maintain structure. A common error is leaving it out too long, which makes slices fall apart, so return any leftovers to the fridge promptly.
Notes
- Chill between layers — Putting the pan in the refrigerator after the crust and again after the cream cheese layer firms the structure and prevents mixing, which yields clean slices when serving.
- Use room temperature cream cheese — Softened cream cheese blends smoothly with powdered sugar, eliminating lumps and giving you a silky filling.
- Keep dairy cold until use — Cold heavy whipping cream and milk produce better whipped cream and pudding textures, especially in warm kitchens.
- Reserve crumbs for garnish — Hold back a handful of crushed Oreo Cookies to maintain a fresh, crunchy topping and reinforce the chocolate flavor.
- Tint coconut sparingly — Add food coloring a couple drops at a time to shredded coconut and fluff it up to get realistic looking grass without moisture clumping.
- Decorate last minute — Add delicate candies just before serving if you want them to remain crisp and colorful, especially if refrigerated for extended periods.