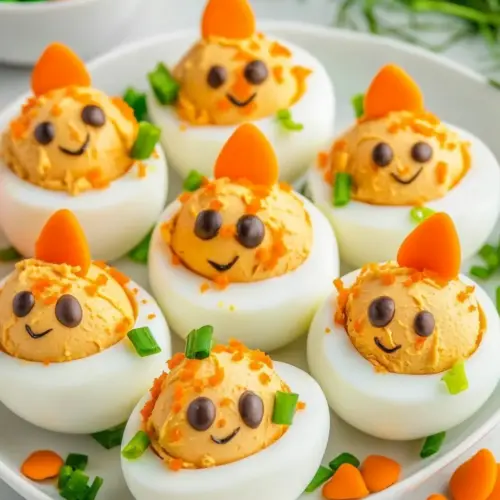
Easter Deviled Eggs
Easter Deviled Eggs are creamy, playful, and easy to assemble, combining smooth yolk filling with bright chive and smoky paprika notes. These festive deviled eggs make an excellent easy party appetizer or spring brunch addition, offering charming carrot beaks and peppercorn eyes that delight guests. Make them for gatherings to add both visual whimsy and reliable flavor to your spread.
Equipment
- Mixing Bowl
- Fork
- Piping Bag
- Paring knife
- Cutting Board
Ingredients
- 12 hard-boiled eggs Peel and halve to provide firm white cups that cradle the yolk filling; offer a neutral, sturdy base and familiar texture for classic deviled eggs. Provide structure and a mild flavor that balances richer components. Serve chilled for best texture and food safety.
- 1/2 teaspoon Dijon mustard Add tangy sharpness to brighten the yolk mixture and cut through richness; emulsifies slightly with mayonnaise to create a smoother filling. Use sparingly to avoid overpowering other flavors. Adjust to taste depending on how bold a mustard note is desired.
- 1/3 cup light mayonnaise Bind and create a creamy, smooth texture in the yolk filling while adding subtle richness without overpowering other flavors. Whisk with the yolks to achieve a spreadable consistency that holds piping shapes. Choose a lighter mayo for a less heavy mouthfeel.
- 1/4 teaspoon garlic powder Introduce a warm aromatic note that enhances savory depth without adding moisture; blends into the yolk mixture easily. Use in small amounts to prevent clumping and maintain a balanced flavor profile. Ideal for subtle garlicky background flavor.
- 1 teaspoon smoked paprika Provide a warm, smoky accent that contrasts with the creamy filling and adds visual color when dusted on top or mixed in. Use as a finishing spice to impart a distinctive, slightly sweet smokiness. Sprinkle lightly to avoid dominating the delicate egg flavors.
- 2 tablespoons chives finely sliced Contribute a fresh, mild onion-like brightness and a pop of green color when finely sliced and mixed into or sprinkled atop the filling. Offer delicate texture contrast and subtle herbaceousness that complements creamy components. Add near the end to preserve color and freshness.
- Salt and pepper Season to enhance and balance all flavors; adjust salt and pepper to bring out the filling's richness and ensure the dish is well-rounded. Use salt sparingly when mayonnaise or other ingredients are already seasoned. Freshly ground pepper adds a subtle bite and aroma.
- 1 carrot Grate or shave to create decorative carrot 'hairs' or accents that add color and playful texture to an Easter-themed presentation. Offer a mild sweetness and crisp bite if used raw; can be blanched briefly for softer garnish. Choose a firm carrot for easy shaping.
- 24 peppercorns Place as small decorative eyes or punctuations on egg halves to create a whimsical appearance and mild peppery bursts when bitten. Offer intense, sharp pepper flavor in concentrated spots; crush slightly for a stronger punch. Use whole for visual effect or cracked for seasoning.
Instructions
- Peel your hard-boiled eggs carefully so that the egg whites are nice and smooth.: As you peel, you should hear a slight papery tear and feel the shell giving way without gouging the white; a clean peel results in glossy, smooth egg surfaces that look inviting on the platter. Work under running cool water if the shells are sticking, letting the water help slip the membrane away, and roll the egg gently between your hands to loosen the shell before removing larger pieces. I dislike jagged edges on the whites because they distract from the finished look, so take a moment to smooth any rough spots with a clean fingertip. A common mistake is using eggs that were boiled and cooled too quickly or too recently; eggs that are very fresh are harder to peel, so try slightly older eggs if you can. If a patch tears, trim it carefully with a small knife to tidy the edge.
- Cut a small sliver off the bottom of the egg to make a flat edge for the egg to stand on its own. Cut 1/3 of the egg off the top to make a 'hat' for the chick's head.: When you slice the bottom, you should get a stable base so the egg sits upright without wobbling, which helps with assembly and display. The top cut should remove a neat cap that echoes the curve of the egg, and I aim for a consistent one third to keep the proportions flattering. Use a sharp paring knife and a steady hand, making a single confident slice to avoid jagged edges; the hat should look like a tiny bowl that will sit on the filling. If you cut too deep you will lose filling space, and if you cut unevenly the hat will tip, so take your time and reset the knife angle if needed.
- Scoop out the yolks and place them in a bowl with the Dijon mustard, mayonnaise, garlic powder, smoked paprika, chives, salt, and pepper. Use a fork to mash everything together, and stir until the mix is smooth.: As you scoop the yolks, they should be firm yet creamy; when combined with the other ingredients, you will notice the mixture begin to take on a glossy sheen and a silky texture. Use a fork to break the yolks down, then add the measured Dijon mustard and mayonnaise , sprinkling the garlic powder and smoked paprika evenly so they distribute nicely. Stirring releases their aroma, and you should smell the warm paprika and the faint tang of mustard. The 'why' here is that even distribution ensures every bite is balanced, and the mayonnaise emulsifies the mixture to create that classic creamy mouthfeel. A frequent error is under-mashing, leaving lumps of yolk, so press firmly and scrape the bowl edges to integrate everything smoothly.
- Fill a piping bag with the egg yolk mixture (or use a plastic storage bag with one corner snipped off).: As you work the fork through the yolk mixture, aim for a homogenous paste that spreads without breaking; you should feel the resistance ease as the emulsion forms and hear the gentle scraping sound of the fork against the bowl. The texture should be loaf-soft, dense enough to hold shape but light enough to pipe; if it seems too thick, a small additional dollop of mayonnaise can help, added sparingly. The sensory cue I look for is a creamy, satiny surface and a neutral aroma with hints of the spices. Overworking with too much liquid can make the filling runny, so stop once smooth and taste to adjust seasoning.
- Arrange the egg bottoms on a serving plate. Pipe the yolk mixture into the egg hollows. Add three or so layers on top to make a 'face' for the chick.: When you squeeze the bag, the filling should extrude in a smooth, ribbon-like flow, not in lumps or thick dollops; that flow creates pretty peaks and a sculpted face for each chick. If you notice uneven piping, check that the bag corner or tip is the right size and that the filling is not too stiff; warm it briefly by holding the bowl to encourage a softer consistency. The tactile feedback of the bag will tell you if you need to adjust pressure or angle; a steady, gentle squeeze produces the most controlled result. A common misstep is overfilling the bag, which makes it difficult to control, so only fill it about two thirds full.
- Use a sharp knife to cut tiny triangle beaks and L-shaped legs out of the carrot.: As you pipe, notice the way the filling settles against the white, forming soft mounds that catch light and show texture; layering creates a dimensional look like a little feathered chest. Place the eggs close enough to each other that they form a cohesive display, but give them space so the faces read clearly. The piping motion should be deliberate and steady, allowing each swirl to sit atop the previous one, building soft ridges that look sculpted. Avoid filling them flat, which loses the charming profile; instead aim for height and gentle peaks.
- Place the 'hats' on top of the piped yolk on each egg. Press two peppercorns into the yolk to create the 'eyes' for each chick, and then place the 'beaks' below the eyes. Create two small slits at the bottom of each egg and attach the 'legs' into the slits.: The carrot should yield crisp, clean shapes with a bright orange color and a fresh, slightly sweet smell. A sharp blade will create precise edges, and I cut on a stable board so small pieces do not slip. The beak triangles should be small enough to fit the face scale, and the legs should slot neatly without cracking when inserted. If the carrot is too old or soft it becomes fibrous and difficult to shape, so select a firm specimen.
- Place the 'hats' on top of the piped yolk on each egg. Press two peppercorns into the yolk to create the 'eyes' for each chick, and then place the 'beaks' below the eyes: The hat should perch gently atop the filling, and when it touches the yolk you will hear a soft settling sound rather than a splash; that tells you it sits correctly. Pushing in the peppercorns should be done with care so they anchor without cracking the yolk. The placement of the beak beneath the eyes forms an adorable expression; positioning is everything here, small shifts change the personality of each chick. Be mindful that peppercorns are intense, so place them central to avoid biting into a concentrated burst of heat.
- Create two small slits at the bottom of each egg and attach the 'legs' into the slits: The slits should be shallow and neat, enough to receive the L-shaped carrot legs and hold them upright, creating the illusion that the chicks are standing. The legs add a whimsical finishing touch and a fresh crunch against the creamy filling. If a slit is too deep the leg may fall through, and if it is too shallow the leg will not stay put, so test one first to find the right depth. A steady hand and a sharp paring knife are your best tools here; work slowly and enjoy the tiny details.
Notes
- Pick the right eggs: Slightly older eggs peel more cleanly, reducing frustration and preserving smooth whites which are essential for the decorative steps.
- Cool completely before peeling: Let the eggs rest in an ice bath after boiling to stop cooking and to shrink the interior slightly, which helps the shells separate.
- Adjust filling texture: If the yolk mixture is too thick, add tiny amounts of mayonnaise until you reach a pipeable consistency, but add sparingly to avoid runniness.
- Work on a stable surface: Use a non slip board when carving hats and legs so your small cuts remain precise and safe.
- Store assembled eggs properly: Refrigerate covered and consume within two days for the best texture and freshness.
- Make assembly kid friendly: Precut the decorative pieces and let children press in peppercorns or place hats for a fun, supervised activity.
- Season to taste: Always taste the filling before piping and adjust the salt and pepper gradually to avoid oversalting concentrated yolks.