Easter Deviled Eggs
Easter Deviled Eggs are creamy, tangy, and easy to make, featuring smooth yolk filling with bright pickle juice and thick Greek yogurt. This playful appetizer is perfect for spring brunches and holiday gatherings, offering both visual charm and approachable flavors. Make ahead friendly and crowd pleasing, these deviled eggs are a simple way to add festive flair to any table.
Equipment
- Saucepan
- Slotted Spoon
- Mixing Bowl
- Piping bag or plastic bag
- Ice Bath Bowl
Ingredients
- 8 large eggs Boil and cool to create firm whites and yolks that hold filling; peeling carefully prevents ragged edges and ensures neat presentation for halved eggs.
- cup plain Greek yogurt (see notes) Add creaminess and tang while reducing fat compared to mayo; whisk smooth into the yolk mixture to achieve a silky, spreadable consistency.
- 1 tablespoon pickle juice (see notes) Provide acidity and a subtle briny note to brighten the filling; stir into the yolk mix to balance richness and enhance overall flavor.
- 1 teaspoon Dijon mustard Introduce a sharp, savory mustard flavor and slight emulsifying power; blend into the yolk mixture to add depth and help stabilize the filling.
- 1/4 teaspoon fine sea salt, plus more to taste Season precisely to enhance all flavors without overpowering; sprinkle into the mixture and taste as you go to reach the desired saltiness.
- 1 carrot, sliced into small triangles for beaks Cut into small triangles to form cute beaks for the decorative chicks; press gently into the egg halves to secure and add a fresh, sweet crunch.
- black sesame seeds (for eyes) Create tiny, dark eyes and add visual contrast for the chick design; place individually for consistent, expressive features and a subtle nutty note.
Instructions
- To hard boil the eggs, bring a large saucepan of water to a boil over high heat. Once the water has reached a rolling boil, use a slotted spoon to gently lower each egg into the pot. Let the eggs boil for 10 minutes.: The aroma as water approaches a rolling boil is clean and metallic, and you want the surface to be actively bubbling for even cooking. Use a saucepan large enough so the egg s sit in a single layer, which prevents jostling and cracking. A slotted spoon helps you lower them carefully, and the slight hiss as cold shells hit hot water tells you the seal has formed. If eggs bang together they might crack, which lets white seep into the water, so place them gently. A common issue is overcrowding, which leads to unevenly cooked yolks, so give them space.
- When the timer goes off, use a slotted spoon to transfer the boiled eggs to a large bowl filled with ice water. Let the eggs cool in the ice water for 15 minutes, then gently tap the shells on the counter and peel away the shells. Hold the eggs under a stream of running water to help remove the shells, if needed.: You will feel the cool shell meet hot water, and small ripples will form around each egg . Lowering them slowly prevents hairline cracks and keeps the whites intact. Maintain a steady boil rather than a furious churn, which can cause collision damage. If shells start to fracture, remove affected eggs quickly; cracked eggs will draw water into the white and create a messy texture.
- Slice the hard-boiled eggs in half lengthwise and use a small spoon to remove the cooked yolks, adding them to a small mixing bowl. Set the egg whites aside on a serving plate.: At the ten minute mark the yolks will set fully and become firm yet not chalky if timed correctly. You may hear a gentle simmer and see consistent bubbling. Overcooking beyond this time risks a green ring around the yolk and a sulfurous note in aroma, so set a kitchen timer. If you prefer slightly creamier yolks, testing the timing once with your stove and pot will help dial it in.
- To prepare the filling, add the yogurt, pickle juice, mustard, and salt to the bowl of yolks. Use a fork to mash the mixture together, then taste it and make any adjustments you like. Add more mustard for a tangy flavor or extra salt to boost the overall taste. (I usually use a 1/2 teaspoon of salt total, but this will vary on the brand you use.) You can also add a tablespoon of water if the mixture is looking dry.: The immediate cold plunge stops the cooking process and firms the white, while the shell often separates from the membrane which makes peeling easier. You should hear the clink of eggs meeting ice and feel the temperature drop when you move your hand near the bowl. Avoid skipping this step, or the yolks will continue to cook from residual heat, changing texture. A mistake I see is not cooling long enough, which leads to tearing when peeling.
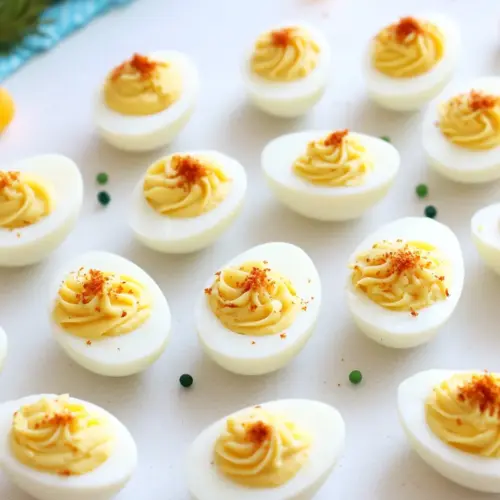
- Transfer the egg yolk mixture to a piping bag or plastic bag, then cut off one end. Squeeze the filling into the egg white halves so they are slightly heaped. To finish off the Easter look, top each filling with a carrot triangle and two black sesame seed eyes.: After sufficient chilling, the shells become easier to remove; you will notice a slightly papery crack pattern. I peel under a gentle stream of water to help lift stubborn bits of shell. Aim to keep the white surface smooth and intact, which makes the final presentation neater. If you peel too soon, the white may tear and create uneven cups for the filling.
- Place the deviled eggs in the fridge until ready to serve. You can keep these tightly covered in the fridge for up to 48 hours (for a fresh flavor) and deviled eggs can sit out for serving for up to 2 hours.: Running water helps separate small shell fragments and rinses away any residues. The sound of the water and the feel of smooth egg white under your fingers indicates readiness. Use gentle pressure to avoid denting the soft white. A frequent error is scrubbing too hard, which creates pits on the surface and less tidy halves.
- Slice the hard-boiled eggs in half lengthwise and use a small spoon to remove the cooked yolks, adding them to a small mixing bowl: The visual cue for success is a clean cross section with a bright yellow center. Use a thin bladed knife for cleaner cuts, wiping between slices to avoid smearing. When you scoop the yolks into the bowl you will see the crumbly texture that forms the base of the filling. Avoid pressing or squeezing the white too hard while scooping, or the halves will lose shape.
- Set the egg whites aside on a serving plate: Arrange them with the hollow side up to keep them stable for filling later. The visual of neat empty cups helps plan portioning and piping. Keep the plate chilled if you are not filling immediately to preserve texture. If left at room temperature too long, whites can become warm and not hold their shape as well when filled.
- To prepare the filling, add the yogurt, pickle juice, mustard, and salt to the bowl of yolks: The first aroma is tang from the pickle juice and the slight pungency of Dijon mustard . When combined, the mixture should smell bright and inviting, not flat. Add ingredients gradually and watch the texture change from crumbly to creamy as you mash. Overadding liquid can make the filling runny, so pause and reassess before adding more.
- Use a fork to mash the mixture together, then taste it and make any adjustments you like: Mashing with a fork gives control, and you will notice a smoother sheen as the fats from the yolk emulsify with the Greek yogurt . Taste for tang, salt, and mustard balance, and tweak incrementally. If the mixture seems dry, I add a tablespoon of water to loosen it slightly. A common mistake is over seasoning early; always taste after thorough mixing to judge the final profile.
- Transfer the egg yolk mixture to a piping bag or plastic bag, then cut off one end: The piping step creates those pretty, slightly heaped mounds that make deviled eggs feel special. As you squeeze, you can hear the smooth mixture glide through the nozzle and see it take shape in the white cups. If the filling resists, the bag may be overfilled or not trimmed enough, so adjust accordingly. Avoid using a bag with an overly large opening on a runny filling, which will make the presentation messy.
- Squeeze the filling into the egg white halves so they are slightly heaped: The ideal visual is a small rounded peak on each half, creamy and glossy. Press gently as you fill so the filling sits firmly without spilling. If some mounds look uneven, a quick swipe with a small spoon evens them. A frequent issue is under filling, leaving a visible gap between filling and white edge; fill generously but cleanly.
- To finish off the Easter look, top each filling with a carrot triangle and two black sesame seed eyes: The final touches transform them into playful characters. The crisp snap of the carrot provides contrast and the tiny black sesame seeds create precise, contrasting eyes. Place garnishes carefully so they do not slide off when refrigerated. One mistake people make is using wet garnishes, which can cause seeds to shift or fall.
- Place the deviled eggs in the fridge until ready to serve: Chilling firms the filling and helps flavors meld, and you will notice a subtle tightening of texture after refrigeration. Store them covered to prevent absorption of other fridge aromas. They keep well for up to 48 hours for best quality. Leaving them out longer than two hours at room temperature risks food safety concerns.
- You can keep these tightly covered in the fridge for up to 48 hours for a fresh flavor: Proper storage preserves texture and flavor, and the filling will remain creamy rather than dry out. When transporting, use a container with a fitted lid and a single layer to avoid crushing. A common pitfall is stacking halves which can smoosh the garnish, so pack carefully.
- Deviled eggs can sit out for serving for up to 2 hours: This guideline helps keep them safe and palatable at gatherings. I usually bring them out shortly before guests arrive so they are cool but not icy. If temperatures are high, shorten this window and return leftovers to the fridge promptly. Leaving them out longer risks spoilage and off flavors.
Notes
- Swap yogurt texture Use full fat Greek yogurt for creamier filling, or reduce the amount if your yogurt is thin so the mixture remains pipeable and not runny.
- Adjust tang with pickle juice Start with less pickle juice and add a teaspoon at a time, tasting as you go to avoid overpowering the yolks with acidity.
- Make kid friendly Omit any extra strong flavors and focus on visual appeal, using the carrot beaks and sesame seeds to make playful faces children will love to help assemble.
- Prep ahead smartly Boil and peel the eggs a day ahead, store them unfilled in a sealed container, and fill on the day of serving for peak texture.
- Alternative eyes If you do not have black sesame seeds, substitute small capers or tiny diced black olives for similar contrast and flavor.