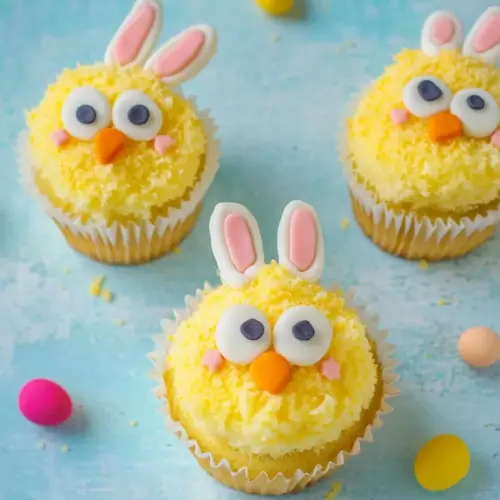
Easter Chick Bunny Cupcakes
Easter Chick Bunny Cupcakes offer light, tender sponge and creamy buttercream with playful sugar paste decorations. These colorful cupcakes are moist, easy to pipe, and ideal for spring gatherings and easy weeknight baking. They are fun to decorate with kids and make a charming centerpiece for holiday parties, so give them a try to brighten your celebration.
Equipment
- Mixer
- Oven
- Cupcake Tin
- Pastry bags
- Wire Rack
Ingredients
- 140 g all-purpose flour Sifted to ensure lightness and even texture, provides the structure and bulk for the cupcake batter while helping trap air for a tender crumb.
- 1/2 tsp baking powder Leavening to create lift and softness, reacting with batter moisture and whisking to produce a fluffy, risen cake interior.
- 2 egg whites medium Whipped until frothy, contributes protein and stability to the foam structure while reducing fat for a lighter crumb and improved aeration.
- 120 g sugar Granulated sweetener to balance flavors and tenderize the crumb, helping with moisture retention and contributing to browning during baking.
- 120 ml sunflower oil Neutral-flavored oil added for moistness and tenderness, keeping cupcakes soft and extending freshness with an even distribution of fat.
- 4 tbsp strained yogurt Creamy cultured yogurt spooned in for acidity and moisture, tenderizing gluten for a soft texture and enhancing overall flavor depth.
- 1/2 tsp vanilla extract Aromatic extract used sparingly to enhance overall flavor, adding warm vanilla notes that complement the sweetness and other ingredients.
- 240 g powdered sugar Finely ground sweetener used for smooth, stable frosting, dissolves easily to create a silky texture and consistent sweetness in icings.
- 120 g butter at room temperature Softened fat at room temperature to emulsify with powdered sugar, providing richness, structure, and spreadability for buttercream or frosting.
- 2 tbsp heavy cream full fat Thickening liquid to adjust frosting consistency, adding creaminess and a smooth mouthfeel while making buttercream more spreadable.
- 1/2 tsp vanilla extract Flavoring agent added to the frosting mixture to enrich aroma and provide classic vanilla tones that balance the sweetness of the icing.
- yellow food coloring Concentrated pigment used sparingly to tint frosting a cheerful yellow, allowing decorative elements to match the Easter theme without altering taste.
- white sugar paste Malleable fondant used for crafting smooth decorative shapes, allowing precise modeling of chicks and bunnies with a polished finish.
- black sugar paste Hand-colored or shaped fondant used for detailing facial features or costumes, offering flexibility for small decorative accents and contrast.
- pink sugar paste Soft modeling paste used for delicate pink details like cheeks or ears, providing gentle color and pliable texture for miniature elements.
- small chocolates Small assorted chocolates used as edible embellishments or candy eyes, adding texture, visual interest, and bursts of chocolate flavor.
Instructions
- Place the flour in a bowl along with the baking powder and set aside.: The dry mix emits a neutral, floury scent and feels light when sifted, and taking this step first helps ensure even distribution of the leavening. I like to give the bowl a gentle whisk so the baking powder is fully blended through the flour, which prevents pockets of lift or flatness in individual cupcakes. If you skip this, some cupcakes can dome unevenly, so do not rush it. A common mistake is adding wet ingredients to unsifted flour, which can create lumps and uneven crumb. Use a fine mesh sieve if you have one to aerate the flour and remove any small clumps.
- In another large bowl, add the egg whites and sugar, and whisk until fluffy. Then add the sunflower oil, vanilla extract and yogurt, and stir until the mixture is homogenized.: As you whisk the egg whites with the sugar you will notice a pale, glossy texture forming, and that trapped air is what gives the sponge lift. The oil will thin the mixture slightly and the yogurt brings a subtle tang and added moisture. Stir gently after folding in the oil so you do not deflate the trapped air, because those tiny bubbles matter for a tender crumb. One mistake is overwhisking after adding oil, which knocks the volume out and yields denser cupcakes. Aim for a smooth, velvety batter rather than a frothy one at this stage.
- Pour the flour mix in in batches while stirring.: Adding the dry mix gradually keeps the batter cohesive and prevents overmixing, and you will hear a soft, thickening sound as the spoon moves through the batter. The final texture should be smooth and slightly thick, with no visible streaks of flour. If you dump all the flour in at once you risk both lumps and vigorous stirring that develops gluten, producing a chewier result. Stop stirring as soon as the flour is incorporated to preserve tenderness. If the batter looks curdled or seizes, pause and fold gently until it evens out rather than whipping at high speed.
- Pour the above mix into 6 cupcake molds lined with butter and flour, and bake in a preheated oven at 175°C/345° F for 18-20 minutes.: As the cupcakes bake you will smell a warm, baking aroma and see the tops gently rise and set with a light golden edge. I rotate the tray halfway through if my oven has a hot spot, to ensure even color. Use the toothpick test in the center for doneness, it should come out clean or with a few moist crumbs. Opening the oven too soon can cause them to sink, so resist that temptation in the first 12 minutes. If the tops brown too quickly, lower the temperature by 10 degrees and extend baking by a few minutes for even cooking.
- Once ready, unmold the cupcakes and let them cool completely.: Cooling is where the crumb relaxes and firms, and if you frost while still warm the buttercream will melt into the cake and lose structure. I like to place them on a wire rack so air circulates underneath and the bottoms do not sweat. A common error is impatience, frosting warm cupcakes that then slump or bleed color, so set a realistic cooling window. If you are in a hurry, chill them briefly on a tray in the refrigerator until completely cool, but avoid overly rapid cooling which can cause condensation.
- Place the butter into the mixer bowl and whisk at high speed until fluffy.: Whipping the butter produces a pale, whipped texture that feels light and almost cloud like, which creates a stable base for the powdered sugar. Beat until the butter is smooth and slightly aerated, which typically takes a few minutes on medium to high speed. If you start with butter that is too cold you will end up with lumps, while too warm butter yields a greasy frosting. Scrape the bowl periodically to ensure even aeration and avoid overbeating, which can incorporate too much air and make the frosting unstable.
- Add the powdered sugar, vanilla extract and heavy cream, and continue stirring until the mixture is homogenized.: As you incorporate the powdered sugar you will notice the texture shift to creamy and glossy, and the cream adjusts the consistency to make piping effortless. The vanilla deepens the flavor, balancing the sugar and butter. If the frosting appears grainy, continue beating until smooth or sift the powdered sugar first. A frequent pitfall is adding too much cream, creating a runny frosting; add a splash at a time until you reach a pipeable consistency.
- Divide the mixture into 2 parts and add the yellow food coloring to one of them.: Splitting the frosting and tinting one portion creates a cheerful color contrast for the chick decorations, and gel color will deepen quickly without thinning the frosting. Mix just until the color is even, and avoid vigorous whisking which can incorporate excess air and change texture. Using too much coloring, especially liquid dyes, can soften the frosting, so prefer concentrated gels. If the color is too pale, add a tiny bit more until you reach the shade you want.
- Pour the 2 colors of frosting into 2 pastry bags.: Filling pastry bags gives you control for piping feathers and smooth swirls, and the friction of the bag against the frosting creates a slightly glossy surface when piped. Fit tips as desired for different effects, and twist the bag top to keep the pressure even while piping. A common mistake is overfilling the bag, which makes it hard to handle, so fill the bag about two thirds full. Keep a damp towel nearby to wipe the tip occasionally to maintain clean edges.
- Decorate the cupcakes with frosting. Add eyes to the yellow frosted ones, using the white and black sugar paste. Use the pink sugar paste for the hair and small chocolates for the nose.: Decorating is tactile and satisfying, and as you pipe you will notice small ridges in the frosting catching the light, which adds visual interest. Press the white and black sugar paste carefully to form eyes, and place the small chocolates for the nose so they sit securely. Work in small batches to prevent the frosting from drying, and if a piece does not adhere, a tiny dot of frosting works as edible glue. A common misstep is pressing decorations too forcefully, which can dent the frosting, so handle with a gentle touch.
- On the white frosted cupcakes, add ears using white sugar paste, black sugar paste for the whiskers and pink sugar paste for the nose. Add 2 small chocolates for the eyes.: Building the bunny features is like sculpting, and pressing the ears upright gives height and charm. The contrast of black paste for whiskers makes facial expressions readable from across the table. If the ears slump, chill the cupcakes briefly to firm the frosting before attaching, and for extra support you can insert a tiny toothpick into the ear base and remove before serving. Avoid overly large ear pieces, they can topple and look disproportionate.
- Serve and keep leftover cupcakes refrigerated.: Freshly decorated cupcakes look their best at room temperature for the first hour, with frosting that is slightly soft to the touch and a moist crumb inside. When storing, arrange them in a single layer in an airtight container and refrigerate to maintain frosting stability and freshness. Let refrigerated cupcakes come back to room temperature before serving so the flavor and texture are at their peak. A mistake is stacking cupcakes, which can smudge decorations, so always store them in a single layer if possible.
Notes
- Chocolate sponge option Swap a small portion of the flour for unsweetened cocoa powder to create a chocolate base that pairs beautifully with the yellow frosting, adding a richer depth while keeping the original technique the same.
- Vanilla bean buttercream Use scraped vanilla bean in place of vanilla extract in the frosting for a speckled, aromatic finish that feels a touch more elegant without changing consistency.
- Mini cupcake version Bake the batter in a mini tin to make bite sized versions, reducing baking time by about half and creating perfect party finger food that is easier for little hands to manage.
- Different piping tips Try a star tip for textured feathers or a round tip for smooth domes, each will give a distinct look with the same buttercream and little extra effort.
- Allergy aware swaps Use a neutral oil and dairy free cream alternative in the frosting if you need to accommodate dietary needs, but test texture first as some substitutes can affect firmness.