Easter Candy Bark
Easter Candy Bark is an easy, colorful no bake treat with creamy melted chocolate and crunchy mini eggs. This festive bark is perfect for spring gatherings and makes a fun homemade gift. Quick to assemble and endlessly customizable, it is a cheerful addition to any holiday table. Make a batch for an easy party dessert everyone will love.
Equipment
- Microwave-safe Bowl
- 9×13 baking pan
- Parchment Paper
- Spatula
Ingredients
- 16 ounce s448 g semi-sweet or milk chocolate melting wafers Melted provides the smooth chocolate base that binds the bark together and gives a rich, sweet flavor; choose semi-sweet for balanced sweetness or milk for creamier taste. Melted should be tempered or gently warmed to maintain a glossy finish and snap once set, preventing graininess. Melted also acts as an adhesive to hold candy and sprinkles in place during chilling.
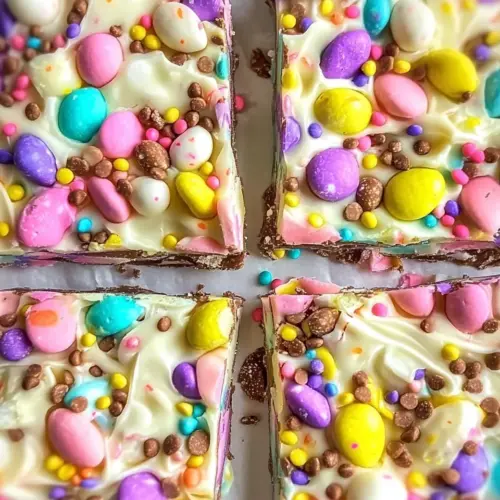
- 1 cup mini eggs some whole, some coarsely crushed Crushed and whole pieces add texture, color, and bursts of candy-coated crunch that contrast with the creamy chocolate; varying sizes create visual interest and pleasant bite. Crushed bits distribute flavor throughout the bark while whole mini eggs serve as decorative focal points on the surface. Crushed pieces can be pressed lightly into warm chocolate to ensure they stick and remain visible after setting.
- Easter themed colored sprinkles Colorful enhances the festive appearance and adds a subtle sugary crunch to each bite, reinforcing the holiday theme with bright accents. Colorful sprinkles provide small pops of texture without overwhelming the chocolate and candies, making each piece look celebratory. Colorful sprinkles are best sprinkled immediately after arranging candies so they adhere before the chocolate firms.
Instructions
- Line a 9×13 baking pan with parchment paper.: The tactile feel of the parchment as you smooth it into the pan is reassuring, and this step prevents sticking while making removal effortless. Use a sheet large enough to come up the sides for easy lifting, and press firmly into the corners so the melted chocolate will form a neat rectangle. If the paper slips, the chocolate can pool unevenly, so keep it taut. A common misstep is using wax paper instead of parchment, which can stick and tear, so always choose parchment for a clean release.
- Put chocolate pieces into a microwave safe bowl. Microwave on half power for 60 seconds, then mix well.: When you open the microwave the aroma of warm chocolate should be faintly sweet and comforting, and stirring is key to distributing heat. Use a heavy glass or ceramic bowl so it retains heat evenly. After the first cycle, the chocolate will be partially melted with soft spots and glossy streaks, and your stirring will smooth those out. Avoid rushing to full power or skipping stirring, because uneven heat can cause hotspots that scorch the chocolate .
- Microwave again in bursts of 30 seconds, stirring well after each. Repeat the process, until the chocolate is completely melted.: The visual cue here is gradual glossiness increasing with each stir, and you will hear a faint, almost imperceptible change as the thicker chunks give way to a silkier consistency. Keep the power modest, and stop when you have only a few soft pieces left, letting residual heat finish the melt while stirring. The why is simple, controlled heat prevents seizing and keeps the texture silky. A common error is overheating, which produces a dull, granular chocolate , so give it time between bursts.
- Pour the chocolate into the prepared pan and spread into an even layer. You want about rectangle about 10×15-inches max (so your chocolate doesn’t get too thin).: As you pour the warm chocolate , it should flow like molten glass and level out with a few gentle nudges of your spatula. Aim for an even rectangle roughly 10×15 inches to ensure the bark has enough thickness to snap, rather than being paper thin. The sound while smoothing is quiet and gentle, with the spatula gliding across the surface. If you spread too thinly the bark will be brittle and break into dust, so keep an eye on thickness for a satisfying snap.
- Sprinkle the whole and crushed mini eggs over the chocolate.: When you sprinkle the mini eggs , they should sit on the surface and not sink, which tells you the chocolate is cooling to the right tacky stage. The contrast of glossy brown and pastel shells is visually joyful, and the crushed pieces create little craters of texture. Pressing gently into the surface with the back of a spoon can help adhere them, but avoid embedding them fully or the shells may lose their crunch. A common oversight is waiting too long, which can cause toppings to slide off if the surface is already too cool.
- Sprinkle the easter sprinkles over the chocolate.: The tiny sprinkles add fine detail and a festive finish, and when scattered they create a confetti effect across the glossy surface. These delicate bits stick best when applied right after the eggs, while the surface is still a touch tacky. Use a light hand to avoid clumps, and rotate the pan as you work to get even coverage. A pitfall is adding heavy sprinkles all in one spot, which can weigh the chocolate down and create uneven setting.
- Chill until completely set, about 1 hour.: Cooling transforms the glossy, soft surface into a firm, snappy texture, and you will notice the sheen dull slightly as it sets. I place the pan flat in the refrigerator to keep the layer even, and the kitchen fills with a cool, faint chocolate scent as it firms. Setting time depends on fridge temperature and thickness, so allow the hour as a guideline and check for a firm snap at the edges. Avoid leaving it out at room temperature if your home is warm, because that can prolong setting and invite soft spots.
- Break into pieces and enjoy.: The final moment is satisfying, with a crisp snap and a mixture of textures as you break the sheet into irregular shards. The sound is a short, clean crack, and the cross section will show embedded candies and sprinkles suspended in the firm chocolate . Serve immediately or store chilled to maintain crispness. A common mistake is using a dull knife to cut; breaking by hand yields charming, rustic pieces and prevents smudged edges.
Notes
- Choose quality melting wafers: Good melting wafers melt smoothly and set with a nice sheen, reducing the chance of a grainy texture. If you prefer a richer taste, select semi sweet chocolate or a reputable brand that lists cocoa butter near the top of the ingredients. Avoid overcooking, which is the most common reason for texture issues.
- Stir between microwave bursts: Stirring distributes heat and smooths hot spots, which prevents scorching. Use a spatula to scrape the bottom and sides, ensuring all bits melt evenly. If you stop stirring, small unmelted pieces can overheat and seize the entire bowl.
- Prepare toppings in advance: Measure out whole and crushed mini eggs and sprinkles so you can work quickly once the chocolate is ready. This keeps the process smooth and prevents the chocolate from cooling too much before toppings are applied, which could cause poor adhesion.
- Work on a cool surface: If your kitchen is warm, place the prepared pan on a cooler counter or in the fridge for a few minutes before topping. Excess heat can soften candy shells or sprinkles, causing colors to bleed or textures to dull.
- Store properly: Keep the bark in an airtight container in the refrigerator for up to two weeks to maintain crispness and color. Layer pieces with parchment between them to prevent sticking and preserve presentation when gifting.