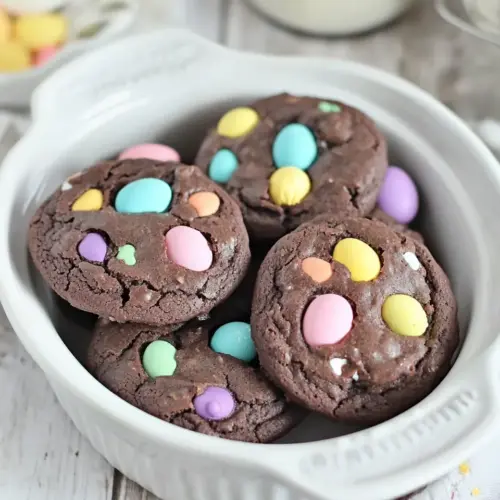
Easter Brownie Cookies
Easter Brownie Cookies are fudgy, chocolate forward treats with colorful candy crunch, combining dense brownie texture and cookie portability. This easy, crowd pleasing recipe gives glossy melted chocolate, rich butter, and pockets of semi sweet chocolate chips for chewy centers and joyful bites, perfect for spring gatherings and busy weeknight baking. Make them for a festive reason to celebrate.
Equipment
- Microwave-safe Bowl
- Mixing Spoon
- Parchment-lined cookie sheet
- Cooling rack
Ingredients
- 6 ounces unsweetened chocolate, chopped Melt and provide deep chocolate flavor and structure; chopped unsweetened chocolate brings intense cocoa richness and helps set the fudgy base when combined with butter and eggs. Add slowly over low heat or in a double boiler to avoid scorching and ensure a smooth consistency that disperses evenly through the batter.
- 1/2 cup butter Cream to incorporate fat and create a tender crumb; butter contributes moisture, richness, and helps dissolve sugar for a glossy batter. Use softened or melted butter as directed to properly emulsify with the chocolate and eggs, improving mouthfeel and texture in the final cookies.
- 1 3/4 cup sugar Sweeten and balance bitterness while aiding in structure; sugar caramelizes during baking to add color and a crisp edge while dissolving to help create a chewy center. Measure accurately and mix thoroughly to ensure even sweetness and proper interaction with eggs for lift and chewiness.
- 4 large eggs Bind and leaven while adding moisture and richness; large eggs create emulsion with fats, trap air when beaten, and contribute to the dense, brownie-like texture of these cookies. Add eggs one at a time and beat until well combined to achieve a uniform batter and optimal rise.
- 1 teaspoon vanilla Flavor and enhance sweetness without adding moisture; vanilla provides aromatic depth and rounds out the chocolate notes for a more complex taste profile. Use pure vanilla extract for best results and incorporate during mixing to distribute flavor evenly.
- 1 1/4 cup flour Provide body and structure while controlling density; flour supplies the necessary starches and proteins that form the cookie matrix when hydrated and mixed with eggs and fat. Sift or lightly spoon to measure accurately, then fold gently to avoid overdeveloping gluten and keep the texture tender.
- 3/4 cup semi-sweet chocolate chips Introduce pockets of melted chocolate and intensified chocolate bursts; semi-sweet chocolate chips add textural contrast and concentrated chocolate flavor throughout the cookies. Fold in near the end of mixing to preserve chip shape and ensure even distribution without overworking the batter.
- 1/2 cup Easter M&Ms Add colorful crunch and festive sweetness as a topping and mix-in; Easter M&Ms contribute a crisp candy shell and bursts of milk-chocolate that enhance both appearance and bite. Sprinkle on top or gently fold in to maintain candy integrity and create visual appeal on each cookie.
Instructions
- Preheat oven to 350º.: The moment you turn on the oven you begin the transformation. You will notice a gentle hum as the oven warms, and setting it early ensures consistent heat when the cookies go in. This temperature encourages a set exterior while leaving the centers tender. A common mistake is not preheating long enough, which can cause uneven baking and underdeveloped texture.
- Melt the chocolate and butter in a microwave-safe bowl, starting with 60 seconds, stirring, then heating and stirring in 30-second increments until smooth.: As you heat, the butter and unsweetened chocolate will soften and then come together into a glossy, velvety mass. Stirring is key it promotes even melting and prevents scorching. You should smell deep chocolate notes and see the mixture become shiny and homogeneous. If you overheat, the chocolate can grain or seize, so short bursts and stirring prevent that. Avoid using high power or neglecting to stir, which are common pitfalls.
- Add sugar; mix well. Add the eggs and mix until combined. Add the vanilla.: Once the chocolate is warm, the sugar will begin to melt slightly and integrate, creating a satiny sheen. When you whisk in the eggs , the batter will loosen and take on a glossy texture, almost pudding like. The vanilla brightens the flavor, releasing a warm aroma. If the chocolate is too hot when eggs are added, they may scramble, so let the mixture cool a bit before combining. People sometimes rush and end up with curdled batter, which you can usually rescue by cooling the bowl slightly before continuing.
- Add the flour and mix until incorporated. Add chocolate chips and mix until well distributed.: As you fold in the flour , the batter will thicken and transform from silky to more cohesive, signaling it is ready to hold shape. The semi sweet chocolate chips will sink into and become partly enrobed in batter, promising molten pockets after baking. Mix gently to avoid developing gluten which can toughen the cookies. Overmixing is the typical error here, leading to denser, chewier results than intended.
- If the dough is too soft, let it sit at room temperature for a few minutes until it firms up.: Allowing the dough to rest gives the flour time to hydrate and the batter to become easier to scoop. You will feel a change as it firms slightly, making neat rounded drops feasible. This short pause often improves shape retention during baking. Be careful not to let it sit too long, which can cool it excessively and change baking time.
- Drop by rounded tablespoons onto parchment-lined cookie sheet. Bake for 10 minutes. The centers should still look underbaked.: As you scoop, the dough will hold a rounded form and the surface will develop small cracks in the oven. While baking, you will smell rich chocolate baking and see edges set while centers remain glossy and slightly soft, which is exactly what you want for that fudgy bite. Removing them while the centers look underbaked ensures they finish perfectly as they cool. Leaving them in too long leads to a firmer, less brownie like interior, which is the most common misstep.
- Carefully press 4 or so M&Ms onto the top of the cookies to garnish, if desired, before the cookies are cool.: When the cookies come out, they will still be warm and a touch glossy, the ideal moment to press in the Easter M&Ms . The candies will adhere and keep their bright color, offering a satisfying snap. Doing this too late means the candies may not stick, while doing it too early can cause them to sink and melt slightly, so timing matters.
- Cool on the pan for 10 minutes before removing to a cooling rack.: The cookies continue to set as they cool on the pan, and you will notice the centers firming to a tender, sliceable texture. Ten minutes allows them to stabilize, making transfer safe without breaking. If moved too soon, they can fall apart, and if left too long on a hot pan, they can overcook from residual heat.
Notes
- Swap the candy for other seasonal pieces Try different colorful candy coatings for other holidays to change the look while preserving the fudgy interior.
- Add a sprinkle of flaky salt A tiny pinch of salt on top brightens the chocolate and balances sweetness, enhancing the overall flavor profile.
- Try a double chocolate approach Fold in extra semi sweet chocolate chips for more gooey pockets if you like intense chocolate bursts in every bite.
- Chill slightly before scooping if your kitchen is warm A firmer dough helps keep the cookies from spreading too thin during baking.
- Use high quality chocolate Better chocolate delivers deeper, cleaner cocoa notes, which really elevates these simple cookies.