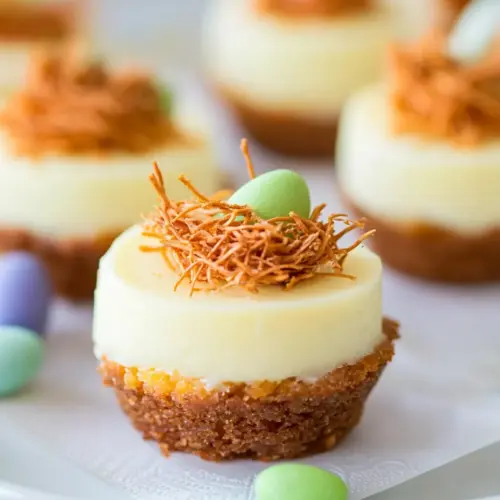
Easter Bird's Nest Mini Cheesecakes
Easter Bird's Nest Mini Cheesecakes are creamy, festive, and irresistibly bite sized. These easy to assemble mini cheesecakes combine a buttery graham cracker crust, smooth cream cheese filling, and toasted coconut nests finished with colorful mini egg candies, perfect for spring gatherings and brunches. Make a batch ahead for an effortless, crowd pleasing dessert that looks like a celebration on a platter.
Equipment
- Muffin Tin
- cupcake liners
- Food Processor
- Mixing Bowl
- Electric Mixer
- Baking Sheet
Ingredients
- 16 ounces Cream Cheese softened (2 packages) Softened to room temperature and creamed smoothly to provide a rich, tangy, and creamy base for the cheesecake filling, ensuring a velvety texture without lumps when mixed with sugar and eggs. Adds structure and body so the mini cheesecakes hold their shape while remaining tender and luscious. Balances sweetness and contributes classic cheesecake flavor that pairs well with citrus and vanilla.
- 1/4 cups sour cream Added to introduce a subtle tang and to lighten the filling’s texture, creating a creamier mouthfeel and preventing the cheesecake from becoming too dense. Helps stabilize the batter and contributes moisture for a smooth bake. Complements the cream cheese’s richness by adding a mild lactic note.
- 1 teaspoon vanilla extract Stirred in to enhance and round out the flavor profile with warm, sweet aromatic notes that accent the dairy and citrus elements. Acts as a flavor amplifier so the cheesecake tastes more rounded and bakery-like without adding extra sweetness. Used sparingly to avoid overpowering the delicate filling.
- 2 eggs Beaten into the batter to help bind the ingredients, provide structure, and create a silkier, custard-like consistency when baked. Contributes moisture and a slight richness that improves mouthfeel while helping the cheesecakes set properly. Ensures slices hold together yet remain tender.
- 1/2 cups sugar Mixed into the filling to provide sweetness and to balance the tang of the cream cheese and sour cream, helping create a pleasantly sweetened custard. Affects the texture by tenderizing the final product and promoting a smooth, glossy finish. Amount controls overall sweetness level.
- zest of one lemon optional Zested to add bright, citrusy aroma and a fresh, slightly floral note that cuts through the richness of the filling; labeled optional for those who prefer a subtler profile. Contributes tiny bursts of lemon oil that enhance overall flavor without adding acidity. Used sparingly to avoid bitterness from pith.
- 8 sheets graham crackers Crushed to form fine crumbs for the cheesecake base, providing a toasty, slightly sweet foundation that contrasts the creamy filling. Works as the primary dry component in the crust when combined with sugar, salt, and melted butter. Supplies familiar graham flavor and sturdy texture for nest formation.
- 2 tablespoons granulated sugar Sprinkled into the graham cracker crumbs to add targeted sweetness to the crust and help balance salt and butter. Enhances browning and caramelization of the crust when baked or pressed. Small amount refines the overall taste without making the base overly sweet.
- 1/8 teaspoons salt Added to the crust mixture to enhance flavor complexity by slightly amplifying the graham crumbs’ taste and balancing sweetness. Helps bring out flavors through a small savory contrast, improving the perception of overall sweetness and depth. Also assists in controlling the crust’s flavor profile.
- 3 tablespoons melted butter Melted and combined with the crumbs to bind the crust together, providing richness and a tender, cohesive texture that crisps slightly when baked or chilled. Adds buttery flavor and helps the crust hold its shape as mini nests. Quantity influences how compact and sliceable the base becomes.
- 1 cups sweetened coconut toasted Toasted to golden brown to create a crunchy, sweet, coconut-based nest topping that mimics bird’s nests and adds texture contrast to the creamy cheesecake. Offers chewy, nutty flavor notes and enhances visual appeal by resembling straw when shaped. Toasting develops deeper flavor and removes raw coconut taste.
- 36 mini egg candies Placed atop each mini cheesecake to finish the nests with festive color and a sweet, candy-coated crunch reminiscent of eggs in a nest. Provides visual charm and a burst of sugary texture with every bite, complementing the creamy and coconut elements. Numbered to ensure there are enough candies for each mini cheesecake.
Instructions
- Preheat oven to 325°F. Line a 12 cup muffin tin with cupcake liners, set aside.: You will notice a warm, anticipatory aroma as the oven reaches 325°F , which makes the kitchen feel cozy and ready for baking. Preparing the muffin tin with liners ensures the little cheesecakes release easily after baking, and the liners help keep the nest shape during handling. I often tap the muffin tin to settle the liners so they sit evenly. A common misstep is to skip liners and then struggle to remove the cheesecakes, which can tear the crust. Make sure the oven is fully preheated so baking times are accurate.
- Crush the graham crackers into crumbs in a food processor. Add the 2 tablespoons of sugar and the 1/8 teaspoon of salt, pulse a few times to combine. Pour in the melted butter and pulse until mixed. (If you don't have a food processor, crackers can be crushed by sealing in a large ziptop bag and crushing with a rolling pin or other heavy object until they are fine crumbs. Pour them into a bowl, whisk in sugar and salt, then stir in the butter and mix until combined): As you pulse the graham crackers , the sound will shift from loud crunching to a gentle whir as crumbs become fine, and you will see the color turn uniformly tan. Adding sugar and salt at this point distributes sweet and savory notes evenly through the crumbs. When you pour in the melted butter , it should coat the crumbs so they clump slightly when pressed between your fingers, which indicates they will bind into a solid base once baked. If you do not reach this clumping texture, the crust may fall apart; add a touch more butter sparingly. Avoid over processing into a paste, or the crust will be greasy.
- Evenly divide the crumb mixture between the 12 muffin cups. Use a small flat bottomed measuring cup to press the crumbs into the bottom of each cup (I used a 1/4 cup).: You will feel the crumbs compact under the flat bottom of the measure, which is the sign of a sturdy crust developing. Press firmly but not aggressively, aiming for an even thickness across all 12 cups so baking and texture are consistent. When pressed correctly, the crust should hold its shape when you lift the measure. A common error is leaving crusts uneven, which leads to thin spots that crumble when served. If crumbs stick to your hands, lightly wet them to smooth each base.
- Beat the cream cheese, sour cream, vanilla and sugar until smooth.: You will notice the mixture transform from stiff blocks into a glossy, velvety batter as the electric mixer works, and a sweet dairy scent will rise. Scrape the bowl periodically to ensure no lumps remain, especially around the beater and bowl edges. The texture should be smooth and free of lumps before adding the eggs . If the cream cheese was not softened enough, you may see small curds; stop and warm the bowl slightly to smooth them out. Over mixing at this stage can incorporate too much air and cause cracking later.
- Add the eggs, one at a time and mix until well combined. Mix in lemon zest if using.: Adding each egg separately allows the batter to emulsify without separating, giving you a consistent, silky filling. After each addition, the batter will become a touch looser and glossier, a good visual cue that the eggs are incorporated. If you are using the optional lemon zest, fold it in now so its aromatic oils distribute evenly. Watch for curdling or streaks, which means you need to lower speed and scrape. A common mistake is dumping all the eggs in at once, which can cause uneven texture.
- Evenly divide the cheesecake mixture between the 12 muffin cups. Bake for 25-30 minutes, or until centers are set.: Spoon the creamy filling into each crust so each cup looks about uniform; you will hear the slight thud as the batter hits the crust. While baking, the edges will set first and take on a faint creamy color, while the centers should still have a gentle wobble when you tap the pan. That wobble means they will finish setting as they cool. If the centers are liquid or overly jiggly after the full bake time, give them a few more minutes, but be careful not to overbake, which leads to dry texture and cracked tops. Using an oven thermometer helps maintain an accurate 325°F environment.
- Allow to cool completely, then refrigerate for 2 hours or up to overnight.: Cooling brings a faint, comforting aroma and allows internal temperature to drop, which firms the filling. The cheesecakes will tighten and the texture will become creamy and sliceable after refrigeration. Chilling also helps the crust set so it does not crumble when you remove the liners. A typical issue is serving too soon, which results in runny centers; patience yields the best bite. If you refrigerate overnight, cover them loosely to avoid absorbing fridge odors.
- To toast the coconut, spread in an even layer on a baking sheet. Toast in the oven at 325°F, stirring every 5 minutes, until golden. This should take 10-15 minutes. Watch closely because the coconut can go from golden to burnt in an instant!: During toasting you will smell warm, nutty aromas from the coconut , and the flakes will deepen from pale to golden brown. Stirring ensures even color and prevents hot spots that burn. Because toasted coconut can transition from perfect to bitter quickly, keep a close eye and remove the pan as soon as the golden tone appears. If you notice dark edges, the coconut is overdone and the flavor will be acrid rather than sweet. Use the same 325°F oven for efficiency, and reduce time slightly if your oven runs hot.
- Before serving, sprinkle the toasted coconut in a circle around the edges of each mini cheesecake to form the "nest" Place 3 mini egg candies in the center. Enjoy!: The final assembly is where the visual payoff happens, as the toasted coconut frames the creamy center and the colorful mini egg candies pop against the pale filling. Gently press the coconut so it adheres to the edges without burying the center, then nestle three candies in the middle for balance. You will hear a satisfying crunch from the candy shell when bitten, contrasting with the smooth filling and crisp crust. A common mistake is piling coconut too high, which can overwhelm the cheesecake; aim for a thin, even ring so each element shines.
Notes
- Make ahead: These cheesecakes can be baked a day ahead and chilled; reserve the toasted coconut and mini egg candies until serving to maintain crispness.
- Crust firmness: If your crust is too crumbly, add an extra half tablespoon of melted butter and press more firmly so it holds when sliced.
- Even baking: Rotate the muffin tin halfway through baking if your oven has hot spots to keep centers setting uniformly.
- Eggs and texture: For a silkier filling, make sure each egg is fully incorporated before adding the next, and avoid high speed mixing after the eggs are added.
- Toasting tip: Use a rimmed baking sheet for the coconut so flakes do not slide off when you stir, and remove at the first sign of golden color.