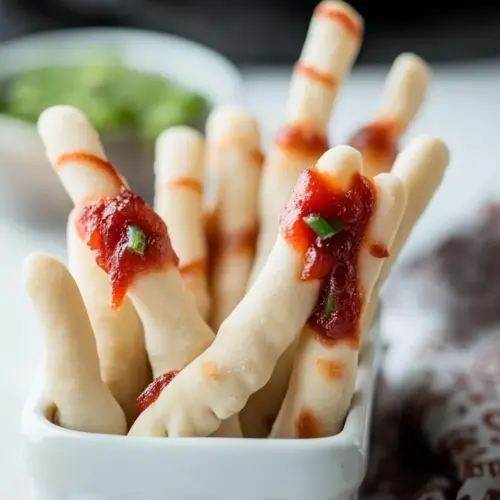
Easiest Halloween Witch Finger Breadsticks
Easiest Halloween Witch Finger Breadsticks are an easy, playful snack that bake to a tender, pillowy texture with crisp almond or colorful pepper nails. The recipe is quick and family friendly, perfect for a last minute party centerpiece or spooky appetizer, delivering crunchy, soft, and savory contrasts that guests will love. Make them for a fun, easy Halloween treat.
Equipment
- Oven
- Baking Sheet
- Parchment Paper
- Wire Rack
- Pizza Cutter
Ingredients
- One roll of refrigerated soft breadsticks dough (I usually buy Pillsbury soft breadsticks) Provides a soft, convenient dough base that bakes into golden, pull-apart breadsticks; offers consistent texture and mild flavor that holds shapes and toppings well. Ideal for shaping into spooky finger forms and simplifies prep time with refrigerated convenience. Can be brushed with egg wash for added shine and browning during baking.
- 1 large egg (beaten (optional)) Adds a glossy, golden finish when brushed on dough before baking and helps toppings adhere to the surface. Beaten egg contributes slight richness and color without altering dough flavor significantly. Use optionally for a more finished, bakery-style appearance.
- Marinara sauce or pizza sauce for serving/dipping (optional) Serves as a tangy, savory dip that complements the warm, buttery breadsticks and enhances overall flavor. Can be used as a traditional marinara or a smoother pizza-style sauce depending on preference. Optional serving component that makes the finished dish more interactive and kid-friendly.
- Sliced almonds Provides crisp, almond-shaped accents ideal for creating fingernail details or crunchy texture contrasts on the baked breadsticks. Imparts a mild nutty flavor and visual authenticity for the witch finger theme. Can be pressed into dough tips before baking to secure in place.
- OR Offers an alternative crunchy topping or decorative element to use with or instead of sliced almonds, delivering fresh vegetable flavor and vibrant color. Red and green bell pepper pieces can be shaped into nail or accent pieces that withstand brief baking. Adds visual interest and a slight sweetness when roasted.
- Red and green bell peppers (cut into narrow 1-inch triangles -and-) Contributes two distinct roles when used: thin triangular pepper pieces provide colorful, crisp nail accents, and the cream cheese creates a creamy filling or adhesive for toppings. When spread lightly inside or atop dough, cream cheese adds tangy richness and helps secure decorative peppers or almonds. Choose vegan cream cheese as a dairy-free substitute without changing texture markedly.
- About 1/4 cup cream cheese or vegan cream cheese Acts as a creamy binder and mild-flavored spread that can be used to adhere decorative elements or to add moist richness inside the breadstick. Cream cheese smooths out edges and balances the savory dough with a subtle tang. Vegan cream cheese offers similar consistency for dairy-free diets.
Instructions
- Preheat oven to 350 degrees Fahrenheit, or, if the temperature on your package of refrigerated breadstick dough indicates a different temperature, follow the temperature on the package. Line a large baking sheet with parchment paper or a Silpat.: The warm oven creates the proper rise and golden color for the breadsticks . You ll know the oven is ready when the heat becomes steady and the rack is in the center position, which promotes even browning. Lining a baking sheet with parchment or a Silpat prevents sticking and makes removing the fingers clean and easy. A common mistake is slipping the rack too low which can cause the bottoms to brown too fast, so center the rack. The smell of dough warming will be subtly yeasty as the oven approaches temperature, and the surface should feel completely dry to the touch before the sheet goes in.
- Unroll the breadsticks onto a large cutting board (or your counter or wherever you like to do doughy things).: The dough should unroll smoothly and feel cool to the touch, slightly tacky but not wet. Working on a large board gives you room to slice and shape without crowding pieces together. If the dough is sticking, a light dusting of flour on the board prevents tears, but avoid adding too much flour because it can dry the exterior and change the baked texture. The tactile feel of the dough will tell you if it s too warm, in which case pop it back into the fridge for a few minutes to firm up.
- Using a pizza cutter, slice each breadstick in half vertically and again horizontally. Each breadstick should be about 3-4 inches long and 1/2-inch to 1 inch wide, but perfection is highly discouraged! The more rustic the more realistic. 🙂: You ll create pieces roughly three to four inches long and about one half inch to one inch wide. The audible, clean slice of the pizza cutter gives you a neat edge that bakes evenly. Rustic pieces are better than perfectly precise ones, since irregularities make them look more like fingers. If you press or squish while cutting you may compress the dough and reduce rise, so slice with firm, quick motions. The pieces should feel soft and springy after cutting.
- Roll the dough a bit to round it a bit/give it more of a finger shape. Lay it on the baking sheet.: Rolling brings together seams and forms a tapered, cylindrical profile that reads like a finger. Roll gently so the seams stay smooth and the ends taper naturally. Place each shaped stick on the prepared sheet with space between to allow expansion. You want the dough to look slightly plump and not overly flat, because puffiness after baking is desirable. Over-rolling can lead to too tight a structure and a denser bite.
- Using your thumb, press down on the narrowest tip of each breadstick. If using almonds, press a sliced almond onto each tip. If using bell peppers, you’ll add them AFTER the breadsticks have baked.: Pressing with your thumb creates a nail bed indentation that makes the fingernail placement convincing. When you press, you should feel the dough give but not collapse, which indicates good elasticity. Press the sliced almonds gently so they sit partially embedded; they will brown slightly and adhere as they bake. If the almond doesn t stick well, it might fall off while transferring, so press firmly but carefully. For peppers, leave the indentation shallow so you can add the nail after baking with cream cheese .
- Now, you have a couple of options. You can grab the pizza cutter or a bread knife and press a three or four horizontal lines into the middle of the breadstick so it’ll look a bit like a knuckle. And/or, if desired, brush lightly with egg. This will give them a slightly shinier and more golden appearance. Or skip those steps and just stick ’em in the oven already!: The knuckle lines create texture and character, and when you press them in you ll feel a slight resistance as the dough compresses. Brushing with the beaten egg creates a shiny, deeper brown surface during baking, which adds realism. If you skip both, the final look will be plainer but still charming; the rustic simplicity can be intentional. Avoid overbrushing with egg because pooled egg can burn and leave dark spots.
- Bake for 10-12 minutes, until puffy and starting to brown on the top. But again, if the label on your breadsticks indicates a different time, I recommend going by that time and just checking them often.: As they bake you ll notice the tops become glossy if egg washed, and a light golden hue will spread across the surface. The aroma shifts from raw dough to a warm, toasty scent that signals they re close. Use visual cues more than the clock, since oven temperatures vary. A common misstep is opening the oven too often early on which can prevent proper rise, so only peek toward the end of the bake window. When tapped gently the interior should feel set, not doughy.
- Let cool for about 5 minutes on the baking sheet, then transfer to a wire rack to cool completely.: Cooling briefly on the sheet allows the structure to settle so the fingers don t collapse, then moving them to a wire rack prevents sogginess from trapped steam. You ll feel the texture firm slightly as they cool, and the aroma becomes more mellow and bready. If you try to decorate while they re too hot the toppings can slide or melt, so resist the urge to rush. A common error is stacking while warm which can create condensation and soften the crust.
- If adding bell pepper for the fingernails, after they’ve cooled, dab the tip with a bit of cream cheese and stick the bell pepper on. You may want to dry the pepper off with a paper towel so it will adhere better.: The cool, slightly tangy cream cheese acts as glue and adds a pleasant contrast in texture. Drying the red and green bell peppers helps the adhesive bond, and pressing gently will secure them. You should feel a slight tack as the cream cheese grabs the pepper piece. If the cream cheese is too soft, chill it briefly to firm up; if it s too cold it won t spread smoothly. Avoid using watery pepper pieces or they may slide off.
- Arrange on a plate or in mini mason jars filled with marinara or pizza sauce. Bloooody!: Presentation is part of the fun, so arranging the fingers upright in jars filled with marinara sauce creates theater. The scent of warm sauce is inviting and pairs well with the baked dough. If using jars, ensure the sauce is secure so the fingers stand without toppling. A common pitfall is overfilling jars which causes the fingers to lean; keep the sauce level low enough to support them upright.
- Almond-tipped fingers keep in an airtight container at room temperature for several days. Because of the cream cheese and cut pepper, I recommend storing that version in the refrigerator.: The almond tipped version stays fresh and soft at room temperature because there are no perishable toppings. The version with cream cheese and cut red and green bell peppers should be refrigerated to prevent spoilage. You ll notice slight changes in texture when chilled, so let refrigerated fingers sit at room temperature briefly before serving for best flavor. Avoid leaving cream cheese topped fingers out for long periods.
Notes
- Choose soft refrigerated dough: Using a labeled soft breadsticks dough ensures tender, pillowy fingers that are easy to shape and bake evenly. Firmer doughs can be stiffer to roll and may result in denser final texture.
- Keep dough cool while shaping: If the dough warms, it becomes sticky and hard to handle; chilling it briefly makes shaping simpler and preserves the intended puff after baking.
- Use a light touch with the egg wash: Apply a thin brushed layer if you want shine, too much egg can pool and leave dark spots when baked, so a subtle coat yields the most natural look.
- Press almond nails before baking: For almond tipped fingers press the sliced almonds into the dough so they adhere; if you wait until after baking they tend to fall off or break.
- Attach pepper nails after cooling: When using red and green bell peppers, dry them and secure with a dab of cold cream cheese so they stay put and retain vibrant color.
- Arrange for drama: Fill small jars with a bit of marinara sauce or pizza sauce and stand fingers upright for a memorable centerpiece that is both decorative and edible.