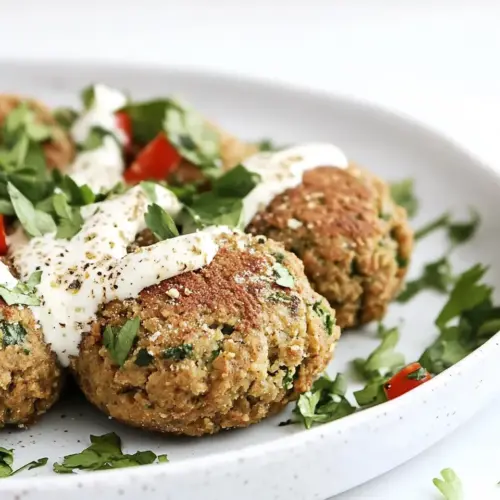
Easiest Baked Falafel
Easiest Baked Falafel is a crispy yet tender baked patty with herby brightness and warm spice, perfect for an easy weeknight dinner or make ahead lunches. These falafel are nut enhanced and oven baked for a lighter take that still delivers texture and flavor. Quick to mix and forgiving to shape, they are a reliable, crowd pleasing option worth trying tonight.
Equipment
- Food Processor
- Baking Sheet
- Parchment Paper
- Mixing Spoon
Ingredients
- 1/2 cup walnuts (53 grams) Adds crunch and a subtle, toasty richness when finely ground; helps bind the mixture while contributing a deeper, nutty flavor to the falafel without overwhelming the herbs.
- 1/3 cup fresh cilantro (15 grams) Provides a bright, herbaceous lift and fresh citrusy notes; finely chopped cilantro balances the earthiness of chickpeas and complements the parsley for a vibrant overall flavor.
- 1/3 cup fresh parsley (15 grams) Offers a clean, slightly peppery green flavor that rounds out the herb profile; chopped parsley lightens the texture and adds freshness to the falafel patties.
- 1/2 teaspoon ground cumin (1 gram) Infuses warm, earthy depth with a hint of smoke when measured precisely; ground cumin enhances the savory profile and harmonizes with coriander and garlic.
- 1 teaspoon ground coriander (3 grams) Brightens the spice blend with a lemony, floral warmth; ground coriander adds complexity and helps elevate the overall seasoning without overpowering other flavors.
- 1 (14.5 oz) can chickpeas, rinsed and drained Provides the main body and protein base for the falafel; drained chickpeas supply texture and structure when processed and mixed with herbs and seasonings.
- 1 shallot, diced (~1/2 cup diced; 41 grams) Contributes a mild sweet onion flavor and slight moisture when finely diced; shallot aids in binding and adds subtle savory complexity to the mix.
- 2 to 3 garlic cloves, minced (7 grams) Delivers pungent, aromatic heat and savory depth when minced; garlic enhances overall flavor, rounding out the herbs and spices in each bite.
- 3/4 teaspoon fine sea salt (6 grams) Balances and enhances all flavors while controlling overall seasoning; fine sea salt sharpens taste and helps draw out moisture for proper texture.
- 1 tablespoon olive oil (13 grams), plus more for brushing Adds richness and helps prevent drying when brushing before baking; olive oil also enhances mouthfeel and encourages browning for a pleasing exterior.
Instructions
- Preheat the oven to 400ºF and line a baking sheet with parchment paper. In a large food processor fitted with an 'S' blade (mine is 12 cups) add the walnuts, cumin, coriander, cilantro, and parsley. Process briefly, just until they are broken down into smaller pieces.: You will notice the oven warming the kitchen, and a steady, even heat is crucial so the falafel bake through without burning. Preheating ensures the moment you place the trays inside the oven they begin browning immediately, producing a crisp bottom. A common mistake is skipping the parchment, which can cause sticking and tearing when you try to remove the falafel after baking. If your oven runs hot, move the rack one position higher to prevent excessive bottom browning.
- Drain and rinse the chickpeas well, then pat them dry so they aren't too wet. Add the chickpeas to the food processor, along with the chopped shallot, garlic, salt, and olive oil. Process again, stopping to scrape down the sides, just until the mixture will stick together when pressed between your fingers. Don't over-process it into a puree.: When you pulse these dry and leafy components you will hear a change from coarse to a finer crumb and smell the spices blooming as their oils release. This step builds texture and infuses the mixture with herby and nutty aromatics. Avoid over-processing here, because turning the herbs into a paste will make the mixture too wet. If your processor seems to be clumping, scrape the sides so everything breaks down evenly.
- Use a tablespoon to scoop 2 tablespoons worth of the filling into your hands. Roll into a ball, then flatten it slightly to create a small patty. Repeat with the remaining filling, making roughly 12 pieces. Arrange them on the lined baking sheet, and brush both sides with olive oil, to help prevent them from drying out in the oven. (Note: Only the top really needs to be brushed with olive oil, if you'd like to keep this as low-oil as possible.): The sound of the motor will shift and the mixture will look more uniform, with tiny flecks of green and tan throughout. This creates the structural bits in the falafel, so you still want visible fragments rather than a smooth paste. A mistake to watch for is overblending which removes the pleasant textural contrast. If unsure, pulse in short bursts and inspect between pulses.
- Bake for 20 to 25 minutes at 400ºF, or until the tops look dryer and feel firm to the touch. (No need to flip!) Remove the falafel from the oven and let them cool for 5 minutes before serving. The bottom side will look the most golden and crisp, so I like to serve that side facing up. These are best served right away, but you can store them in an airtight container for up to 5 days. Reheat in a greased skillet for 3 minutes on each side to warm them up again.: Properly drying the chickpeas reduces steam in the oven and prevents the mixture from becoming watery. You should feel the beans firm and slightly dry, and they should not look glossy with water. If they feel damp, lay them on paper towels and press gently. Leaving excess moisture is the main reason falafel can become crumbly or fail to brown.
- Add the chickpeas to the food processor, along with the chopped shallot, garlic, salt, and olive oil: As you add these elements the aroma will shift, with a savory lift from the shallot and garlic , and a richer mouthfeel from the olive oil . Including salt at this stage ensures the flavors distribute evenly. A frequent error is adding too much liquid; use only the specified tablespoon to maintain the right consistency.
- Process again, stopping to scrape down the sides, just until the mixture will stick together when pressed between your fingers: After processing, press a small amount between your fingers to test cohesion. The right texture is slightly coarse but holds when compressed, like a rough paste with visible flecks. If the mixture is too dry it will not form into patties, while too wet will lead to a greasy, flat result. Err on the side of under-processing and adjust by scraping and pulsing more if needed.
- Don't over-process it into a puree: The mixture should retain some grain for bite and structure, so resist pulsing until smooth. When you over-process you lose the air and texture, resulting in dense falafel that do not crisp properly. If you accidentally puree it, you can stir in a small amount of breadcrumbs or extra chopped walnuts to restore texture, but that alters the original ingredient list, so instead stop earlier and work in short pulses next time.
- Use a tablespoon to scoop 2 tablespoons worth of the filling into your hands: Measuring by spoon helps create uniform pieces that bake evenly. When you scoop, you will feel the mixture compact and slightly tacky, which is ideal for shaping. An uneven scoop leads to irregular baking, with some pieces cooking faster than others. To avoid that, hold the scoop level and tap it gently to release consistent portions.
- Roll into a ball, then flatten it slightly to create a small patty: The tactile act of rolling and flattening develops a smooth outer surface that browns nicely. You should hear a faint rustle as you shape them, and the patties should feel firm but not rock hard. If the patties crumble while forming, the mixture may be too dry; press more firmly or pulse a couple more times to redistribute moisture. Conversely, if they are sticky and flattening into a puddle, refrigerate the mixture for 15 minutes to firm up.
- Repeat with the remaining filling, making roughly 12 pieces: Lining them up on the sheet with consistent spacing ensures air can circulate and each patty browns. As the tray fills you will see a pattern of pale green flecks and tan bits, and the visual consistency helps predict even baking. Do not crowd the pan because the falafel will steam rather than crisp, resulting in limp edges instead of golden texture.
- Arrange them on the lined baking sheet, and brush both sides with olive oil, to help prevent them from drying out in the oven: The added olive oil encourages browning and adds a glossy sheen when finished. Brushing both sides helps the bottoms color evenly; if you prefer less oil, only brush the top. A common misstep is skimping too much on oil which can yield a pale, dry result. For best color, rotate the sheet halfway through baking.
- Note: Only the top really needs to be brushed with olive oil, if you'd like to keep this as low-oil as possible : Lightly brushing the top will still produce a pleasing golden finish while minimizing added fat. You will still get aromatic warmth from the spices even with less oil. Just be aware that the bottom may not brown as deeply without oil contact, which is fine if you prioritize lighter fare.
- Bake for 20 to 25 minutes at 400ºF, or until the tops look dryer and feel firm to the touch: As they bake you will smell nutty, herby aromatics and see the edges take on a warm tan color. The patties will firm up and resist pressing, which signals they are done. Avoid opening the oven too often because that drops the temperature and increases baking time. If the tops are still soft after 25 minutes, add two to five more minutes and check again.
- No need to flip: The oven's heat will brown the bottoms sufficiently, and flipping risks breaking delicate patties before they set. The underside will typically appear more golden, and the tops will look drier and set. If you flip and they crumble, it usually indicates the internal structure needed more time, so next time bake a couple minutes longer before attempting to turn them.
- Remove the falafel from the oven and let them cool for 5 minutes before serving: Cooling allows steam to redistribute and the exterior to set, improving texture and making them easier to handle. You will notice the aroma deepen slightly as they rest. Serving immediately is fine but allow five minutes so they are not too hot to enjoy. A common oversight is plating straightaway which can lead to collapse or soggy bottoms.
- The bottom side will look the most golden and crisp, so I like to serve that side facing up: Presenting the crisp bottom on top shows off the appealing color and provides a satisfying initial bite. The contrast between the toasted underside and the tender interior is one of the most enjoyable elements. If the bottoms did not brown as desired, try placing the tray lower in the oven next time.
- These are best served right away, but you can store them in an airtight container for up to 5 days: Proper storage preserves texture and flavor, and the falafel will keep well in the fridge. Reheating in a greased skillet for a few minutes per side restores crispness better than microwaving, which tends to make them soft. Avoid leaving them at room temperature for extended periods to prevent loss of quality.
- Reheat in a greased skillet for 3 minutes on each side to warm them up again: You will hear a gentle sizzle and see the exterior regain its golden brown hue, which brings back the pleasant crunch. The skillet method adds a small amount of fat that helps revive the texture and aroma, making leftovers taste freshly made. Microwaving is faster but can make them limp, so use the skillet when possible for best results.
Notes
- Measure for consistency, use a tablespoon to scoop roughly 2 tablespoons of filling for each falafel so they bake evenly and finish at the same time.
- Pulse don’t puree, stop processing as soon as the mixture sticks together when pressed, this keeps pleasant texture and prevents a gummy interior.
- Dry the chickpeas well, pat them with paper towels after rinsing to reduce steam and avoid a soggy outcome during baking.
- Toast walnuts lightly if desired, a quick toast in a dry skillet deepens the nutty flavor but is optional if you want a raw, fresh note.
- Use parchment for easy removal, lining the sheet prevents sticking and protects the falafel when you lift them off after baking.
- Reheat in a skillet, briefly pan crisping leftovers restores the exterior crunch more effectively than microwaving.