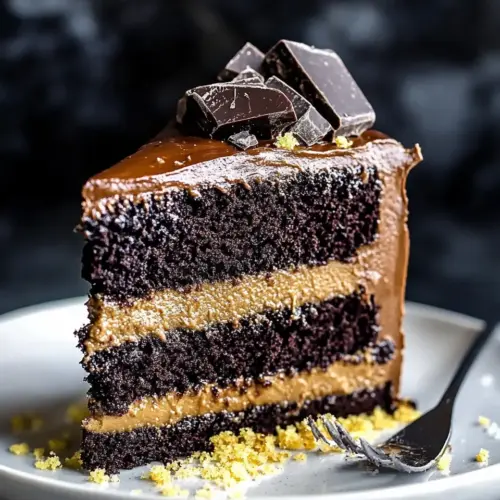
Double Chocolate Salted Caramel Cake
Double Chocolate Salted Caramel Cake is a rich, glossy chocolate layer cake with silky buttercream, a shiny ganache, and ribbons of salted caramel. Creamy frosting meets a tender, coffee enriched crumb for an indulgent yet balanced dessert, perfect for special occasions and cozy gatherings. Make it to impress and enjoy slices that deliver deep chocolate flavor with a bright salted finish.
Equipment
- Stand mixer
- 9 inch round baking pans
- Wire Rack
- Small Saucepan
- Heat safe bowl
Ingredients
- 2 cups sugar Provide sweetness and moisture to the cake batter while aiding in browning during baking, creating a tender crumb; creaming with fats helps incorporate air for lift and texture.
- 1 3/4 cups all-purpose flour Contribute structure and bulk to the cake, supplying gluten for framework while balancing dry-to-wet ratios; sifting or aerating flour ensures even mixing and lighter results.
- 3/4 cup unsweetened cocoa powder Impart deep chocolate flavor and color while absorbing some liquid to affect batter density; unsweetened cocoa intensifies richness without adding sweetness.
- 2 tablespoons King Arthur Flour Black Cocoa optional Enhance color and intensify chocolate notes when used, producing a darker, more robust appearance and flavor; optional use adjusts visual drama without altering quantities significantly.
- 2 teaspoons baking soda Act as a leavening agent by producing carbon dioxide when reacting with acids, helping the cake rise and become airy; proper measurement ensures even texture without metallic aftertaste.
- 1 teaspoon baking powder Provide additional leavening power and fine crumb structure by releasing gas when heated, balancing rise with baking soda for controlled lift and tenderness.
- 1 teaspoon kosher salt Enhance overall flavor by balancing sweetness and strengthening gluten structure slightly; also helps control yeast or chemical leavening performance and improves taste complexity.
- 2 eggs Bind ingredients together, add richness and contribute to emulsification for a smooth batter; eggs also help with structure, moisture retention, and browning during baking.
- 1 cup buttermilk Add tang, acidity, and moisture that react with baking soda to promote leavening while tenderizing the crumb and contributing a subtle richness to the cake.
- 1 cup strong brewed black coffee Introduce liquid, depth of flavor, and bitterness that complements chocolate while hydrating dry ingredients; caffeine and acidity can intensify chocolate perception and enhance overall balance.
- 1/2 cup vegetable oil Provide fat for moistness, tenderness, and mouthfeel while aiding in creaming to incorporate air and create a smoother batter; neutral flavor allows chocolate to dominate.
- 2 teaspoons vanilla extract Contribute aromatic sweetness and enhance other flavors through its fragrant profile; vanilla rounds and deepens the cake's overall taste.
- 1 cup unsalted butter softened Offer richness and structure to frostings or fillings, contributing buttery flavor and stability; softened texture allows for easy creaming with sugar for a smooth finish.
- 4 ounces semisweet chocolate melted and cooled Add concentrated chocolate flavor and glossy richness to batters or fillings when melted and cooled, enhancing depth and silky texture without added sweetness from sugar.
- 4 cups powdered sugar sifted Sweeten and stabilize frostings or fillings, providing bulk and a smooth, pipeable consistency when sifted to remove lumps; powdered sugar also helps set the final texture.
- 2 tablespoons unsweetened cocoa powder sifted Introduce additional chocolate intensity and a hint of bitterness to balance sweetness in frostings or ganache, contributing to color and flavor depth when sifted with sugar.
- 2 teaspoons vanilla extract Contribute aromatic sweetness and flavor depth to frostings, fillings, or glazes while rounding out chocolate and caramel notes for a cohesive taste.
- 2 -3 tablespoons milk Adjust frosting or filling consistency to a spreadable or pipeable texture while adding a touch of creaminess; small additions help achieve the desired viscosity.
- 4 oz semisweet chocolate chopped into very small pieces Supply small chocolate pieces for texture and bursts of chocolate flavor in fillings or as garnish; very small pieces distribute evenly and melt slightly for richness.
- 1/2 cup heavy whipping cream Provide fat and creaminess to ganaches or caramel sauces, producing a smooth, glossy texture and helping create a rich mouthfeel when heated and combined with chocolate.
- 1 teaspoon vanilla extract Add concentrated aromatic flavor to fillings, frostings, or ganache, enhancing sweetness perception and rounding bitter chocolate notes for a balanced profile.
- 1 tablespoon honey Impart subtle sweetness and help thin sauces or glazes while contributing flavor complexity and shine; honey can also aid in preventing crystallization in caramel.
- 1/3 cup homemade salted caramel sauce Deliver sweet, salty, and buttery notes concentrated from caramel, adding depth and flavor contrast when swirled into batters or used between layers; homemade versions provide freshness and control over salt level.
- salted caramel sugar pieces optional Provide crunchy salted-sweet texture to garnish or finish the cake, enhancing contrast and visual appeal; optional use adds bite and intensifies caramel theme.
Instructions
- For the Cake: The air in the oven should smell warmly of cocoa as the batter bakes, a sure sign the sugars and cocoa are caramelizing delicately. You will notice the thin batter spread and settle before it starts to rise, and the top will lose its wet sheen and look set. This phase is when the leaveners react with the acidic buttermilk and the hot coffee amplifies the cocoa. If you open the oven too often you risk uneven rising, so avoid checking until the last third of the bake time; a common mistake is rotating pans mid bake which can cause imbalanced domes.
- Heat oven to 350°F. Grease and flour two 9-inch round baking pans or one 13 x 9 x 2-inch baking pan. Set aside.: As you prepare the pans, the tactile ritual of greasing and flouring establishes an even release and light edge crust that makes layers easy to unmold. Pay attention to coating the sides and bottom uniformly so the cake does not cling and tear. If pans are not properly prepared, the cake can stick and break when you invert it; a quick tip is to line the bottom with parchment for extra insurance.
- In the bowl of a stand mixer fitted with the whisk attachment or in a large bowl with an electric mixer, combine the sugar, flour, cocoa(s), baking soda, baking powder and salt. Mix on low speed until dry ingredients are thoroughly combined.: You should hear a soft whisking as the powders blend into a uniformly colored mixture, free of pale streaks. This step ensures even distribution of leaveners so the cake rises consistently. If you skip thorough mixing, pockets of baking soda or cocoa can cause uneven texture or flavor; avoid mixing at high speed which can incorporate too much air prematurely.
- Add eggs, buttermilk, coffee, oil and vanilla. Beat on medium speed for about two minutes; the batter will be thin.: The batter will look glossy and fluid, almost syrupy, which is correct for a chocolate layer that stays moist. The mixing time hydrates the flours and develops a fine crumb without creating toughness. A common error is under beating, leaving streaks of unincorporated flour, or over beating, which tightens the gluten and yields a denser cake.
- Pour batter evenly into prepared pans.: As you pour, watch the batter settle into the pans and smooth it with a spatula if needed; even distribution leads to evenly baked layers. Tap pans gently on the counter to release trapped air bubbles and ensure the surface is level. Uneven filling will bake into uneven layers, making stacking and frosting more difficult, so take an extra moment here.
- Bake in preheated oven for 30 to 35 minutes for round pans, 35 to 40 minutes for rectangular pan or until wooden toothpick inserted in center comes out clean.: During baking you will observe the edges pulling slightly away from the pan and the center beginning to spring back when touched gently. These visual cues signal doneness along with the toothpick test. A frequent mistake is removing the cake too early when the center is still glossy, which leads to collapsing as it cools, so err on the side of a slightly longer bake if unsure.
- Cool 10 minutes; remove from pans to wire racks. Cool completely.: The cake continues to set as it cools, and moving it to a wire rack prevents trapped steam from making the bottom soggy. The crumb should feel springy but stable, and cooling fully prevents the frosting from melting into the layers. Frosting a warm cake is a classic error, resulting in sliding layers and runny frosting, so be patient and let it reach room temperature.
- For the Frosting: When you start the frosting stage you will notice the butter turning paler and airy as it is whipped, that lightness is what helps the frosting feel fluffy rather than cloying. Incorporating the cooled melted chocolate brings an intense chocolate depth without thinning the fat structure. If the frosting seems grainy, it may be from adding very cold chocolate, so always cool melted chocolate slightly before adding.
- In the bowl of a stand mixer fitted with the paddle attachment, beat butter on medium-high speed for about 5 minutes.: As you whip the butter , you will see it lighten in color and texture, gaining volume which contributes to a spreadable, airy frosting. This aeration traps air, producing a smoother mouthfeel. A common pitfall is starting with butter that is too soft or melted, which prevents proper aeration and yields a greasy frosting, so aim for softened but still cool butter.
- Spoon in cooled, melted chocolate (chocolate should feel cool to the touch, but still be melted. I usually cool mine for about 5 minutes) and mix on low speed to incorporate the melted chocolate. Scrape down the sides of the bowl as needed.: You will smell a richer chocolate scent as the melted chocolate melds into the whipped butter, and the mixture will become denser and more luxurious. Mixing slowly helps the fats marry without breaking. If the chocolate is too hot it can melt the butter and cause separation, so always check temperature by touch.
- Add in powdered sugar, cocoa, and vanilla and mix on low speed until combined.: The powdered sugar will thicken the frosting into a pipeable texture while the cocoa deepens the chocolate profile; during this stage the mixer hums steadily as dry ingredients incorporate. Sifting the sugar and cocoa prevents lumps for a satin finish. Adding the sugar too quickly can create a dusty cloud and make it hard to incorporate evenly.
- Turn the mixer back up to medium-high speed and beat for an additional 5 minutes. Add in milk, 1 tablespoon at a time until you reached the desired consistency.: The extended beating lightens the frosting and creates a silky texture, while small additions of milk let you control spreadability. Aim for a frosting that holds peaks but still spreads easily. A common mistake is adding too much liquid at once which makes the frosting slack and runny.
- Place one cake layer on a cake stand or plate and frost the top of the cake with a little less than half of the frosting. Add the next layer and frost the top of the cake with the remaining frosting.: As you assemble, the sound of spreading frosting is smooth and the layers settle into each other; applying slightly less under the top layer prevents overstuffing which can cause sliding. Keep the edges tidy for a professional look. Overfilling the layers will force frosting out when the cake is sliced, creating a messy presentation.
- If desired, top with salted caramel chocolate pieces.: Scatter the optional salted caramel pieces for crunch and visual contrast, the little glints catching the light. They give a textural surprise against the silky frosting. If you prefer a cleaner look skip them, but be mindful that heavy decorative pieces can shift and fall.
- For the Ganache: The ganache brings a glossy, reflective finish that visually elevates the cake and adds a silky mouthfeel that contrasts the buttercream. Heating the cream just to the point before boiling preserves its smoothness, and letting the ganache sit briefly ensures it thickens to a pourable yet settable glaze. Allowing it to sit too long will harden it, so time your pour carefully.
- In a small saucepan over medium heat, warm the heavy cream until very hot, but not boiling.: You will see small bubbles form at the edge of the pan and steam rising, and that moment is just right to remove it from the heat. Very hot cream melts the chocolate fast and produces a smooth emulsion. Letting the cream actually boil can change the texture and cause separation, so watch it closely.
- Place chocolate pieces in a heat safe bowl. Pour the hot cream over the chocolate and allow it to sit for about 5 minutes. Whisk the cream and chocolate until smooth and thoroughly combined. Whisk in the vanilla and honey. Allow to cool at room temperature for about 10 minutes. Do not let the glaze sit for too long or it will harden up before you spoon it over the frosting.: After the initial rest the chocolate will look glossy and begin to melt into a rich pool; whisking transforms it to a mirror smooth ganache. The addition of vanilla and honey rounds flavors and adds shine. If the ganache becomes too thick, warm it gently over a bain marie, but avoid overheating which can separate the fats.
- Drizzle ganache and salted caramel sauce over the cake before serving. Refrigerate any leftover cake for up 3 days.: As you spoon the ganache, watch it cascade over the edges to create natural drips that look effortlessly elegant; then decorate with reserved caramel sauce and optional pieces. The cold of refrigeration helps the ganache set and stabilizes the frosting for neat slices. A common error is leaving decorated cake at warm room temperature for long periods, which can soften the frosting and cause sliding, so refrigerate if your kitchen is warm.
Notes
- Measure precisely: I always spoon and level flour into the cup to avoid packing it, which prevents a dry dense crumb.
- Use fresh leaveners: Ensure your baking soda and baking powder are fresh so the cake rises as expected; old leaveners yield flat cakes.
- Cool chocolate before adding: Let melted chocolate cool to warm rather than hot before mixing into buttercream to avoid separation and grainy texture.
- Prep pans with parchment: Lining the pan bottoms with parchment makes unmolding simple and reduces the risk of breaking layers.
- Whip butter thoroughly: Beat butter until pale and fluffy for a lighter frosting that is easier to spread and pipe.
- Control ganache temperature: Heat heavy whipping cream until very hot but not boiling to melt chocolate evenly and produce a shiny ganache.
- Chill briefly for cleaner slices: After frosting and glazing, chill the cake for a short time to set the layers and make slicing neat and tidy.