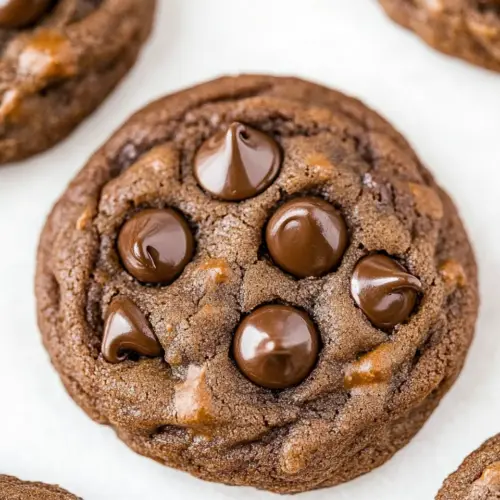
Double Chocolate Chip Cookies
Double Chocolate Chip Cookies are intensely chocolaty, chewy, and easy to make with pantry staples. This recipe yields soft centers and slightly crisp edges thanks to a bit of cornstarch and a chill period, perfect for an easy weeknight baking session or a crowd pleasing dessert. Make a batch to enjoy warm, melty chocolate pockets and a reliable cookie texture every time.
Equipment
- Mixing Bowl
- Whisk
- Electric Mixer
- Rubber spatula
- Plastic Wrap
- Baking Sheets
- Parchment Paper
- Cookie Scoop
- Cooling rack
Ingredients
- 1 1/4 cups all-purpose flour Provide structure and bulk to the cookie dough, developing gluten that gives chewiness while supporting other ingredients; sift or lightly spoon into the measuring cup for accuracy and avoid overpacking.
- 3/4 cup cocoa powder Contribute deep chocolate flavor and color while absorbing some fat and moisture; whisk with the flour to ensure even distribution and prevent clumping for a uniform chocolate crumb.
- 1 tsp baking soda Leaven the cookies by releasing carbon dioxide when activated, helping them spread and rise slightly; measure carefully to avoid an overly metallic or soapy taste.
- 1/2 tsp baking powder Add gentle lift and a tender crumb by producing additional carbon dioxide and balancing acidity; use the small amount to keep cookies soft without excessive puffing.
- 2 tbsp cornstarch Tenderize the texture by absorbing moisture and interfering with gluten formation, yielding softer, cakier cookies; whisk into dry ingredients to evenly distribute its moisture-controlling properties.
- 1/2 cups salted butter Provide fat for richness, flavor, and structure while contributing to spread and mouthfeel; work to room temperature for easier creaming with sugars and uniform incorporation into the batter.
- 3/4 cup granulated sugar Add sweetness and contribute to cookie spread and crisp edges by dissolving into butter when creamed; measure precisely to balance flavor without making the cookies overly thin.
- 3/4 cup packed light brown sugar Contribute moistness, depth of flavor, and a subtle caramel note while aiding in chewiness and color; press into the butter during creaming to help aerate the dough for tender texture.
- 2 large eggs (room temperature) Bind ingredients, add moisture, and help leaven and enrich the dough, contributing to structure and a tender interior; use at room temperature to incorporate evenly and avoid dense cookies.
- 2 tsp vanilla extract Enhance overall flavor with warm, aromatic notes and help balance sweetness; stir into the wet ingredients to distribute flavor uniformly throughout the dough.
- 2 tsp heavy cream Add richness and a touch of fat to improve mouthfeel and encourage softer, more tender cookies; stir into wet ingredients to increase moisture and help dissolve sugars.
- 3/4 cups semi-sweet chocolate chips (plus more to top the cookies if desired) Provide pockets of melted chocolate and intense bursts of flavor throughout the cookie, creating texture contrast; fold in most of the chips and reserve a few to press on top before baking for an attractive finish.
Instructions
- In a medium bowl, add the flour, cocoa powder, baking soda, baking powder, and cornstarch. Whisk together then set aside.: The aroma of the cocoa powder becomes more pronounced as you whisk, and you will see a uniform dark blend with tiny pale specks from the cornstarch . Whisking aerates the dry mix slightly, which helps distribute leavening evenly so cookies rise consistently. A useful sensory tip is to watch for an even color with no streaks of flour or clumps of cocoa. If you skip thorough whisking you might get uneven pockets of rising that create misshapen cookies, so take the extra minute to sift or whisk well.
- In a large mixing bowl, beat together the butter, granulated sugar, and brown sugar until light and fluffy (about 2 minutes on medium speed). Add vanilla extract and eggs and beat together until combined. Use a rubber spatula to scrape the sides of the mixing bowl.: When creaming, you will notice the texture shift from grainy to smooth as the butter and sugars incorporate. The mixture should look paler and slightly voluminous, with a gentle sheen. Adding the eggs and vanilla extract brings the batter together into a glossy emulsion. If you hear the mixer clanging against the bowl, lower the speed to keep aeration controlled. A common mistake here is undercreaming, which can lead to dense cookies, or overbeating, which can incorporate too much air and cause excess spread; aim for that pale, light texture.
- Turn the mixer on low and gradually add half of the dry ingredients to the butter mixture. Beat until combined. Add half of the heavy cream and mix to combine. Add in the remaining dry mixture and the remaining cream.: Adding dry ingredients in portions prevents flour clouds and helps maintain a tender crumb. You will feel the batter thicken as you fold in the dry mix, and the sound of the mixer will change to a softer whir. The small amount of heavy cream loosens the dough slightly, making it pliable without making it wet. If you add all the dry ingredients at once you risk overmixing while trying to incorporate them, which can develop gluten and create tougher cookies. Watch for a cohesive dough that pulls away from the bowl, not a sticky batter.
- Beat in the chocolate chips just until combined.: When you fold in the semi-sweet chocolate chips the dough will litter with shiny chips, promising molten bites. Avoid overmixing at this stage to keep chunks intact and pockets of chocolate dispersed. The chips provide visual contrast and bursts of texture; be sure they are evenly distributed so each cookie gets a good share. Overworking this step can break chips and warm the dough, causing excessive spread later in the oven.
- Cover the dough with plastic wrap and chill for 1 hour in the refrigerator.: Chilling firms the fats and allows flavors to meld, producing a cookie that spreads less and has a chewier center. You will feel the dough become firmer to the touch after chilling, which makes scooping cleaner and rolling smoother. This hour also helps hydrate the flour for better structure. Skipping chilling is a frequent shortcut that leads to flat, thin cookies, so plan ahead and give the dough this rest.
- Preheat the oven to 350 degrees and line baking sheets with parchment paper.: As the oven warms you will notice a gentle toasty scent that will complement the baked cookies. Lining trays with parchment ensures even browning and makes cleanup simple. Use an oven thermometer if you suspect your oven runs hot or cold. Placing cookies directly on an unlined sheet can cause uneven browning and sticking, so always prepare the pan properly.
- Use a cookie scoop to make balls from the chilled dough. Roll each ball between the palms of your hands for a smooth cookie. Space 2" apart on prepared cookie sheets.: Rolling creates a taut surface that encourages an even dome while baking, and spacing allows air to circulate so cookies bake uniformly until edges set and centers remain soft. You will feel the chilled dough warm slightly as you roll, which is normal; work quickly to keep the dough cold. Crowding the pan is a common mistake, and it leads to merged cookies and unpredictable bake times, so respect the spacing guideline.
- Bake for 9 minutes and remove from the oven. Sprinkle several additional chocolate chips over the tops of the warm, baked cookies if desired.: During baking you can watch edges set and centers remaining glossy; nine minutes typically yields a set edge with a soft center. Once out of the oven the surface will look slightly underbaked, which is perfect because carryover heat finishes the center without drying it out. Pressing extra chocolate chips onto warm cookies adds glossy, melty appeal. Leaving cookies in the oven too long is the usual mistake here, resulting in dry, crumbly textures, so err on the shorter side.
- Transfer cookies to a cooling rack and allow them to cool.: Moving cookies off the hot sheet is crucial because residual heat will continue to cook their bottoms if left on the pan. On the rack they cool evenly and the bottoms firm just enough while centers retain chew. You will hear a soft settling sound as steam releases, and the scent of chocolate intensifies as they cool. Rushing to stack them while still hot can lead to smashed shapes or melted chips sticking together, so patience pays off.
Notes
- Soften Butter Properly: Aim for butter that yields slightly to a gentle press but is not greasy or melted. This helps the butter cream with sugars into a light, aerated base for the dough. If your butter is too cold it will not cream evenly, creating lumps; if too warm the dough will spread excessively in the oven.
- Check Your Cocoa: Different cocoa powders produce different bitterness and color. If your cocoa powder is especially strong, you may notice a deeper chocolate note, so taste the dough if safe to do so. Inconsistent cocoa can change the perceived sweetness, so be mindful when swapping brands.
- Use Fresh Leaveners: Baking soda and baking powder lose potency over time. Test baking soda by dropping a pinch into vinegar to see if it fizzes, and replace if it does not react vigorously. Fresh leaveners ensure proper rise and texture.
- Chill Without Drying: Cover the dough tightly so it does not form a crust while chilling. A dry surface can cause uneven spread and textural differences between cookies. If you notice a crust, scrape and remix gently to reincorporate moisture.
- Portion Evenly: Use a cookie scoop for uniform size and consistent bake times. Similar sized cookies bake at the same rate, preventing some from drying out while others remain underbaked. If you lack a scoop, weigh portions to match sizes.