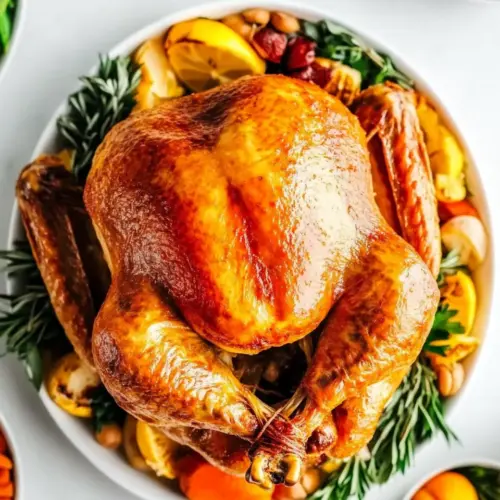
Deep Fried Turkey
Deep Fried Turkey delivers a crispy golden skin and juicy, herb infused meat in a fraction of oven time. This easy to follow method highlights a savory brine of salt, brown sugar, and fresh herbs for an easy weeknight or holiday dinner that tastes indulgent. Try it for a showstopping centerpiece you will want to make again and again.
Equipment
- 30 Quart Pot with deep frying basket
- Baking Sheet
- Deep-Frying Thermometer
Ingredients
- 3 gallons water Dissolve into water to create a brine that seasons and helps retain moisture; use three gallons to fully submerge the turkey. Ensure the brine is cooled before immersing the bird and refrigerate for 12–24 hours for optimal flavor infusion.
- 11/4 cups kosher salt Measure precisely to balance the brine’s salinity and penetrate the meat for deep seasoning; use 1 1/4 cups of kosher salt. Rinse the turkey lightly after brining and pat dry to promote even browning and proper oil contact during frying.
- 1 cup brown sugar Dissolve into the brine to add a subtle molasses sweetness that balances the salt and enriches skin color. Use one cup of brown sugar and stir until fully integrated; it helps develop caramelization during cooking without overpowering savory herbs.
- 1 head garlic cut in half Smash or leave halved to release aromatic oils into the brine and cavity; one head adds pungent garlic flavor that permeates the meat. Include the garlic in the brine and optionally tuck halves into the cavity before frying for concentrated aroma.
- 1/2 cup fresh thyme divided Strip and divide the fresh leaves to infuse herbal brightness into the brine and cavity; use half a cup total, saving some for the cavity and some for a finishing rub. Chop lightly to release oils and distribute evenly so thyme’s savory, slightly minty notes complement the poultry.
- 1/2 cup fresh sage leaves divided Tear or chop and divide to impart an earthy, peppery herbaceousness both in the brine and inside the turkey cavity; reserve half the cup for brining and half for seasoning. Use sage for its warm, slightly bitter edge that pairs well with rich fried turkey.
- 1/2 cup fresh rosemary leaves divided Crush or chop and divide to contribute piney, citrusy aromatics that uplift the overall flavor; half a cup should be split between the brine and surface seasoning. Add rosemary for its robust aroma, which helps cut through the oiliness of frying and improves the finished flavor.
- 13 -15 pounds whole turkey Thaw fully if frozen and ensure cavity is empty and dry before brining, seasoning, and frying; select a 13–15 pound bird to fit fryer capacity and cook safely. Truss as needed and follow fryer safety guidelines to avoid overfilling the oil and to achieve an evenly cooked, juicy result.
- 3 gallons vegetable oil for frying Fill the fryer to a safe level and heat to the proper temperature to produce a crisp, golden exterior while cooking the turkey through; use three gallons as specified for immersion frying. Use a high-smoke-point vegetable oil and monitor temperature closely to prevent flare-ups and ensure consistent doneness.
Instructions
- Add the water, salt, and brown sugar to the pot and stir. Add in the garlic, and half of the thyme, sage, and rosemary.: Warmth on the stovetop helps dissolve the salt and brown sugar , releasing a faintly sweet and salty steam that signals the brine is coming together; you should smell the herbs begin to bloom. Stirring until the solids are fully dissolved ensures consistent penetration into the meat, which is why I always taste a bit of the liquid once cooled to confirm balance. If the brine tastes too salty to you, dilute it with a bit more water rather than adding more sugar, because over salting cannot be undone. A common error here is not dissolving the salt fully, which leads to gritty pockets that unevenly season the turkey .
- Take the turkey out of the packaging and remove the neck and giblets. Remove any plastic pieces attached to the turkey. Place the turkey into the pot. Ensure there is enough water in the pot to completely cover the turkey and that you have at least 8 inches from the water line to top of the pot. See notes.: Handling the bird can feel intimidating because of its size, but you will want to inspect the cavity and remove any packaging or giblets; those items can impart off flavors if left in the brine and will also prevent a proper fit in the pot. As you lower the turkey into the brine the surface should cup the liquid without risking overflow, which is why measuring the water level first is crucial for safety when frying later. If your pot is too small, transfer to a larger container rather than cramming the bird and risking uneven brining. A typical mistake is skipping the check for plastic fasteners, which can melt or cause chemical contamination.
- Cover the pot and let the turkey brine in the refrigerator or a cool environment for 12-24 hours.: During this restful period the brine diffuses into the muscle fibers and the aromas of garlic and herbs embed themselves in the meat, quietly transforming texture and flavor. I like to place the pot on the lowest refrigerator shelf to maintain an even cool temperature, which helps prevent bacterial growth. Brining too briefly won't allow full penetration, while brining too long can make the meat overly salted; aim for that sweet spot between 12 and 24 hours. A common oversight is leaving the bird at room temperature for extended periods, which invites food safety risks.
- Remove the turkey from the brine and place it on a large baking sheet lined with paper towel. Pat it dry on the inside and outside with extra paper towels, ensuring any liquid is removed. It may help to set the turkey right side up so the liquid drains out on the paper towel.: The tactile step of patting the bird dry is essential because surface moisture will cause violent oil splatter and reduce browning. You should feel the skin come to a satin finish as you dry it, and if you press gently you will notice less moisture giving up under your fingers. Allowing the turkey to rest upright helps any lingering brine drip away; never skip this step or the frying oil will react unpredictably. A pitfall here is rushing the drying, leaving pockets of water near the cavity which can produce dangerous sputtering when submerged.
- Pour out the brine from the pot and rinse and wipe the pot dry.: Cleaning the pot removes excess salt and sticky sugar residue that could burn or smoke once you add the frying oil . After rinsing, wipe the interior thoroughly and feel for any residual dampness; the pot should be completely dry to avoid oil foaming or spattering later. I like to give the pot a quick wipe with paper towels and then a last check by running a dry hand along the rim to confirm dryness. Leaving any wetness behind invites oil to pop and create hazards, so take this step seriously.
- Pour oil into the pot and heat to 275°F. If it will reach to the oil, affix the thermometer to the rim of the pot. If not, check the temperature of the oil every few minutes.: As you heat the oil you will notice a subtle shimmer and a faint nutty aroma when it approaches temperature, but do not let it smoke. Using a reliable deep frying thermometer clipped to the side gives you constant feedback; I watch the needle climb and prepare mentally for the next moves. Heating too quickly can degrade the oil and cause unstable temperatures, so bring it up gradually and monitor closely. A frequent mistake is not securing the thermometer so it slips, giving false readings that ruin timing.
- Once the oil has reached 275°F, place the turkey in the strainer basket. If not attached to the main pot, affix the thermometer to the rim of the strainer basket. Carefully lower the basket into the hot oil.: At first the oil will make a low rumbling hiss and small bubbles will form at contact points; this is normal. Lowering the turkey slowly prevents violent splatter and helps the oil settle around the bird for even heating. Keep a steady hand and consider using heavy gloves or long tools to protect from any surprise spurts. A mistake to avoid is dropping the bird quickly, which can cause oil to overflow and ignite if you are working near open flames.
- Once the temperature has reached 350°F, lower the heat to maintain that temperature throughout frying. Fry the turkey for 3 minutes per pound.: When the oil stabilizes at 350°F you will hear a sustained, confident sizzle which indicates the skin is sealing and the inside is cooking. Timing at 3 minutes per pound is a practical rule that balances doneness with texture, but always confirm by internal thermometer near the thickest part. Keep the heat responsive rather than set and forget, because fluctuations change cooking time and final texture. One common slip is assuming the oil will hold temperature without adjustment; watch and tweak the burner accordingly.
- Remove the basket from the pot and allow the turkey to rest for at least 20 minutes. It’s fine to keep the turkey in the strainer basket and place the basket on a large sheet pan to rest.: Resting is where the juices redistribute, so when you slice the turkey you will get moist, tender meat instead of runoff. The skin will continue to crisp slightly and the residual heat will carry the internal temperature up a few degrees. I usually set a timer and resist the urge to carve too soon, because cutting early drains the juices onto the cutting board. A frequent error is impatience, which yields a drier final product.
- Carefully transfer the turkey to a cutting board to carve. Serve with remaining herbs.: The final transfer is tactile, the skin giving a faint crackle as you move the bird, and the herb aroma should be fresh and bright against the warm meat. Carve confidently, slicing against the grain for the best texture, and sprinkle any reserved thyme , sage , and rosemary for color and lift. Avoid hacking at the carcass; steady, even slices present better and preserve moisture. Watch out for hot juices when transferring, and let the bird settle if it still feels very hot to the touch.
Notes
- Thawing frozen turkey: If you are using a frozen turkey, follow a controlled thawing process in the refrigerator based on weight so you avoid bacterial growth; plan for about 24 hours per 4 to 5 pounds in the fridge, and always confirm the cavity is fully thawed before brining and frying to prevent ice pockets that cause violent oil reactions.
- Sugar substitute: Instead of brown sugar, you may use granulated sugar if that is what you have on hand, but be mindful it will create a slightly different caramelization profile on the skin; brown sugar adds molasses notes, while granulated sugar keeps the finish a touch cleaner.
- Herb variations: Feel free to change up the herb mix to match your menu, but keep the total herb volume similar; using basil parsley or chives will shift the aroma and pair well with lighter accompaniments, while keeping the structure of the brine intact ensures consistent seasoning.
- Spice it up: For a spicy brine, add a measured amount of cayenne pepper to the brine; start small and taste a diluted sample before committing, because heat compounds under the skin and during frying so you do not want to overpower the savory balance.
- Oil choices: You can use peanut corn or avocado oil instead of vegetable oil, choosing based on smoke point and flavor neutrality; higher smoke point oils provide more margin for temperature control and a cleaner frying experience.
- Turkey selection: Avoid pre seasoned kosher salt injected or self basting birds for this brine method, because extra processing can make the final product too salty or unevenly seasoned; choose a plain whole bird for best control.