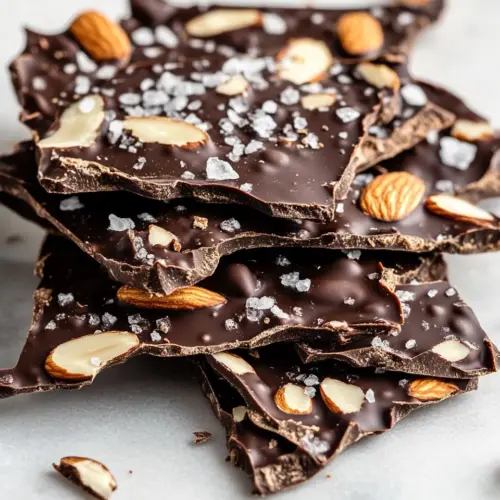
Dark Chocolate Almond Bark Thins
Dark Chocolate Almond Bark Thins are an easy, crispy chocolate nut treat with a salty finish and rich cocoa flavor. This no bake recipe is quick to make and perfect for gifting, parties, or an indulgent snack. With just a few pantry staples you get glossy chocolate, crunchy almonds, and a pop of sea salt, a simple dessert worth making again and again.
Equipment
- Plastic Bag
- Wood spoon or ice mallet
- Mixing Bowl
- Microwave
- Spatula
- 9 x 13 inch baking sheet
- Parchment Paper
Ingredients
- 1 package dark chocolate chips (12 oz.) Melted and tempered to create the glossy, rich base that binds the bark together; provides deep cocoa flavor and smooth mouthfeel when cooled into thin shards. Use gentle heat to avoid seizing and ensure a satiny finish that snaps cleanly when broken.
- 1/2 tsp vanilla extract Added sparingly to enhance and round the chocolate's aroma and flavor profile; contributes warm, sweet floral notes that elevate the overall taste without overpowering. Stir in at low temperature to preserve volatile aromatics and maintain balance.
- 1 cup almonds Toasted or raw whole nuts offering crunchy texture contrast and nutty richness throughout the bark; contributes healthy fats and a satisfying bite that complements dark chocolate. Scatter evenly before chocolate sets to ensure distribution and pleasant mouthfeel.
- 1/2 tsp sea salt Sprinkled lightly to accentuate flavor with a subtle briny counterpoint and to enhance the chocolate's complexity; balances sweetness and deep cocoa notes. Use fine grains for even coverage and a delicate crunch on top of the cooled bark.
Instructions
- Place almonds in a plastic bag and seal. Using a sturdy wood spoon or an ice mallet, pound the almonds until they are chopped into small pieces mixed with crumbs.: The scent of the nuts will become more pronounced as you work, and the bag keeps fragments contained for an easy cleanup. Use a heavy sealed bag so it does not tear, and lay it flat on the counter to stabilize the nuts before you start. A frequent slip up here is pressing too hard too fast, which can pulverize the almonds into uniform dust, losing the pleasing mix of chunk and crumb that gives the bark its character. If you want more variety in texture, rotate the bag and change the angle of your strikes to break some pieces while leaving others larger.
- Set almonds aside.: You will notice the sound change from single loud hits to a softer, crunching rhythm, and the aroma of toasted nut oils will become evident even without heat. Aim for a mix of sizes so the mouthfeel is layered, some big chunks for chew and fine bits to melt into the chocolate. Avoid overworking them into dust by checking often; stop when you see a variety of pieces. One mistake is to try and breeze through with huge swings, which can damage the bag or create inconsistent pieces.
- In a medium mixing bowl, add chocolate chips. Microwave in 25 second increments, stirring each time. Continue until melted–the key is not to overdo it. When almost all of the chips are melted, stirring a bit extra will get the rest and not overheat the chocolate.: You will get a moment to savor the nutty scent as you transition to melting chocolate, and separating the almonds prevents them from absorbing moisture or getting lost on the counter. Place them in a shallow bowl so they are easy to sprinkle later. An oversight here is leaving them near a sink or damp area where they can pick up moisture, which makes them less crisp in the finished bark.
- Pour crushed almonds, vanilla and all of the sea salt except for a pinch into the bowl and stir to combine.: As you prepare to melt, the chocolate will already begin to warm slightly from contact with your hands, and the bowl will hold heat nicely. Choose a bowl that is dry and free from steam or droplets because even a bit of water can seize chocolate into a grainy mess. A common error is to start melting in a bowl that held warm water, which causes uneven melting and can make tempering impossible.
- Line a 9 x 13 inch baking sheet with parchment paper and pour the mixture over top and spread evenly with a spoon or spatula. Sprinkle with remaining sea salt.: The chocolate will go from glossy to slightly saggy as it approaches fully melted; that is the cue to stop heating. Stirring redistributes heat and finishes the melt gently, producing a smooth, shiny mixture. When almost all chips are melted, stirring will finish the job without overcooking. If you continue heating past this point, the chocolate may become thick and grainy, so patience is essential. If your chocolate does begin to stiffen, remove it from heat at once and try a few extra vigorous stirs off the heat to bring it back.
- Allow to set in the freezer for about 30 min.: You will see the mixture take on flecks of nut and your hands may get a tiny dusting of cocoa while stirring, which always feels indulgent. Mixing at this stage allows the almonds to warm slightly and for the vanilla extract to blend into the chocolate, rounding the flavor. Be mindful to fold gently so you do not break larger almond pieces and that everything disperses evenly. A typical slip is adding the nuts too early while the chocolate is too hot, which can cause them to sweat oils and alter the texture; letting the chocolate cool by stirring helps avoid that.
- Remove from the freezer and break into pieces.: The visual cue you want is a glossy, even surface with nuts distributed across the top. Work swiftly but gently, dragging the spatula to thin the chocolate into an even layer so it sets uniformly. If the layer is too thick it takes longer to set and may not break into pleasing thins; if too thin it can become fragile. One mistake is to use a cold metal spatula that chills the chocolate and causes streaks; a room temperature spatula preserves the shine.
- Store in the freezer of refrigerator.: The salt crystals will glisten against the dark chocolate and provide immediate aromatic lift. Distribute the pinch sparsely so only some pieces get that bright pop. Over-salting can flatten the sweetness, so err on the light side and add more next time if desired. A misstep is shaking too vigorously, which clusters salt in one area, making bites imbalanced.
- Allow to set in the freezer for about 30 min: The cold air firms the chocolate quickly and gives a crisp snap when you break it. You will hear a subtle shift when you touch the parchment, from tacky to firm, and the smell will settle into pure chocolate notes. Do not rush this step as setting at room temperature can make the bark softer and stickier. A common hiccup is opening the freezer repeatedly which slightly thaws the surface and creates a dull finish.
- Remove from the freezer and break into pieces: The bark should fracture into rustic shards with glossy edges and textured nut-studded centers. Use your hands to break it along natural weak points, and expect a satisfying snap when the chocolate is properly set. If the bark bends rather than snaps, it likely needs a few more minutes to firm up. Avoid using a knife to cut it while frozen, which can shatter it into uneven chunks.
- Store in the freezer of refrigerator: The chilled environment preserves snap and sheen, and storing layered between parchment prevents sticking. I prefer the freezer for long term storage because it keeps the chocolate crisp and preserved, while the fridge works for shorter windows. If you leave it at room temperature in warm weather it may soften, so choose storage based on your climate. A usual error is stacking pieces without protection, which leads to clumping and breakage when you separate them later.
Notes
- Swap nut size for texture Change the chop size of the almonds to create thicker bites or delicate, thin thins; larger chunks yield more chew while finer crumbs melt better into the chocolate.
- Adjust chocolate intensity Choose a higher or lower cocoa percentage in the dark chocolate chips to dial bitterness or sweetness; a higher percentage gives a more grown up flavor while a lower one feels smoother and sweeter.
- Double the batch for gifting Make two sheets and store separated by parchment; this is ideal when you want to make gift boxes or share widely without crowding freezer space.
- Finish with creative salts Swap the finishing sea salt for smoked or citrus flake versions to add a subtle aroma twist that elevates the presentation.
- Use different nut distribution Reserve a small handful of chopped almonds to press on top after spreading the chocolate to highlight texture and create visual contrast.
- Control set time If you prefer a softer snap, set in the refrigerator instead of the freezer for a few more minutes; the change in temperature alters the bite subtly.