Danish Braided Strawberry Bread
Danish Braided Strawberry Bread is a tender, honey enriched loaf filled with creamy cheese and bright jam, offering a bakery quality treat at home. Soft bread, golden crust, and a silky glaze create a visually stunning centerpiece for brunch or special mornings. Easy to make ahead and versatile with fillings, it s a persuasive reason to bake this bread for guests or cozy weekend breakfasts.
Equipment
- Mixing Bowl
- Stand up mixer or strong spoon
- Rolling Pin
- Baking Sheet
- Parchment Paper
- Kitchen scissors or paring knife
Ingredients
- 2 large eggs, lightly beaten Lightly beaten to incorporate air and help bind the dough, contributing tenderness and structure while enriching flavor and color.
- 3/4 cup + 2 tablespoons lukewarm water, 100F or below Lukewarm and measured precisely to activate yeast without killing it; provides hydration for gluten development and dough consistency.
- 1 1/2 teaspoons granulated yeast Granulated yeast added to leaven the dough, producing carbon dioxide for rise and contributing characteristic yeasty aroma and lightness.
- 1 1/2 teaspoons kosher salt Kosher salt used to strengthen gluten, regulate yeast activity, and enhance overall flavor balance throughout the bread.
- 1/4 cup honey Honey used to tenderize the crumb, add subtle sweetness and richness, and feed the yeast for a milder fermentation.
- 4 tablespoons unsalted butter, melted Melted unsalted butter incorporated for richness, moisture, and a tender crumb while allowing precise control of salt level.
- 3 1/2 bread flour Bread flour selected for higher protein to develop strong gluten networks, giving the braided loaf structure and chew.
- 8 ounces cream cheese Cream cheese softened to create a tangy, creamy filling that adds moisture, richness, and contrasts with the jam.
- 1 teaspoon grated lemon zest Grated lemon zest added to brighten flavors, lift the sweetness, and provide fresh citrus aromatics to the filling.
- 2 tablespoons sugar Sugar used to sweeten the cream cheese mixture, balance tartness, and slightly caramelize during baking for color.
- 1/2 cup your favorite store-bought jam (I used half apricot and half strawberry jam) Store-bought jam spooned into the braid for concentrated fruit flavor, sweetness, and glossy, spreadable filling consistency.
- Egg yolk wash, 1 egg yolk beaten with 1 tablespoon water, for brushing the braids Egg yolk wash brushed over braids to promote even browning, glossy finish, and a slightly richer crust after baking.
- 1 cup powdered sugar Powdered sugar used in the glaze to provide smooth sweetness and help create a pourable icing when combined with cream.
- 4 to 6 tablespoons heavy cream, or more as needed to reach the proper consistency Heavy cream added to thin the powdered sugar into a silky glaze, contributing richness and allowing adjustable consistency.
Instructions
- You can use a big bowl with a strong spoon or a stand-up mixer with the paddle attachment.: The kitchen will smell faintly of flour and butter as you choose your mixing method, and using a stand up mixer saves time when you have a lot of dough to move. You'll feel the dough come together more smoothly with mechanical mixing, which reduces hand fatigue. One common mistake here is overworking the dough if you use the wrong attachment, so stop once ingredients are evenly combined and allow resting time for gluten to relax.
- To the bowl, add the beaten eggs, lukewarm water, yeast, kosher salt, honey and melted butter. Mix.: As the liquids mingle, you will notice a glossy sheen and a sweet, yeasty aroma developing. Mixing at this stage hydrates the yeast and dissolves the honey and salt, which helps with consistent fermentation. If the liquid feels too warm, cool it down slightly before adding yeast because heat can kill the yeast and prevent rising.
- Add the flour – without kneading — and mix until combined. Cover the dough with a clean kitchen towel and place in a warm-ish area in your kitchen. Allow the dough to rise for 2 hours.: The dough will appear shaggy at first and then begin to hold together in a loose mass. The texture should be slightly tacky, not dry. This initial gentle mixing builds enough structure for the first rise while keeping the dough tender. A typical error is adding too much extra flour, which yields a dense loaf, so resist the urge to overflour the mixture.
- The dough can be used immediately after the initial rise, though it is easier to handle when it’s cold. Refrigerate the container and use over the next 5 days.: Over the next couple of hours you will see the dough puff and almost double in volume, releasing a pleasant fermented scent. This is the yeast working, creating air pockets that lighten the crumb. If your kitchen is cold, place the bowl in an oven with just the light on to provide gentle warmth; a common misstep is expecting a dramatic rise in a cold space which will lengthen proofing time.
- Mix the cream cheese, lemon zest, and sugar in a bowl until smooth. Set aside.: Chilling firms the dough so it is less sticky and much easier to shape into neat braids. Flavor deepens slightly in the fridge as fermentation continues slowly. A pitfall is leaving it out too long at room temperature after the first rise which can lead to overproofing and collapse.
- Line a baking sheet with parchment paper or a silicon mat.: As you whip these ingredients, the bowl will smell bright and tangy from the zest while the cream cheese becomes silky. Achieving a lump free filling ensures even pockets of creaminess in every slice. If the cream cheese is too cold, it will stay lumpy, so allow it to soften to room temperature for easiest smoothing.
- Dust the surface of the refrigerated dough with flour and divide in half. Dust the first piece with flour and shape into a rough ball by stretching the surface of the dough around to the bottom, rotating the ball a quarter-turn as you go.: Lined sheets help the braid slide off easily and prevent sticking, while the parchment also collects any small drips from the filling. The surface texture supports even browning and makes cleanup effortless. Avoid skipping a liner, as the glaze and jam can stick and burn on bare metal.
- Using a rolling pin, roll the first piece of dough out to a 1/4-inch-thick rectangle, about 9 x 12 inches. As you roll out the dough, add flour as needed to prevent sticking.: When you perform this motion, the dough surface tightens, building a smooth skin that resists tearing when rolled. This creates an ideal canvas for rolling into a rectangle. A common oversight is working with overly warm dough, which will stick and tear, so keep flour handy and chill the dough again briefly if needed.
- Transfer the dough onto the lined baking sheet. Place the cream cheese filled down the length of the dough in a 3-inch strip in the center, and add the jam on top in an even layer.: You will feel the dough gradually thin and spread under the pin, and the small cloud of flour prevents it from adhering to the board. Try to maintain even thickness so the braid bakes uniformly. Rolling unevenly leads to thin spots that brown too quickly, so rotate and check thickness as you go.
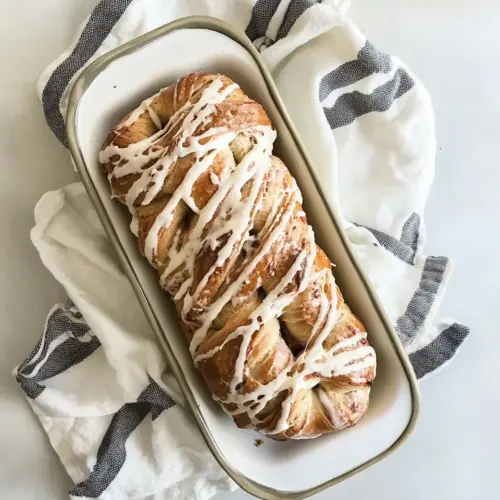
- Using a sharp paring knife or a pair of kitchen scissors (I found the scissors to actually work best), cut about 1/2-inch-wide strips down each side. Twist and then fold the strips, left over right, crisscrossing over the filling. Lightly press the strips together you move down the pastry, creating a braid.: The contrast of pale dough around the bright filling is satisfying visually, and the thickness of the filling determines how moist the center will be. Spread the cream cheese evenly to avoid pockets of dryness. Overfilling can cause leaks during baking, so keep the filling confined to the center strip.
- Repeat with the second braided loaf.: The snip and fold motion creates a woven pattern that traps the filling and makes attractive layers when sliced. Listen for the quiet snip of scissors and feel the dough give as you fold, which indicates a good tension. If strips are cut too wide, the braid looks sloppy, so aim for consistent 1/2 inch slices for the best presentation.
- Cover loosely with plastic wrap and allow them to rest at room temperature for 60 minutes.: As you repeat the process the motion becomes rhythmic and satisfying, and both loaves will take shape with similar appearance. This repetition helps you refine strip width and folding technique. Don't rush the second loaf, because uneven shaping can cause one loaf to bake differently than the other.
- Preheat the oven to 350 degrees F, with a rack placed in the center of the oven.: During this rest the braids relax and gain a final puff, producing a lighter crumb after baking. The surface will look slightly pillowy and soft to the touch. A frequent mistake is allowing them to overproof here which will cause flattening in the oven, so check for gentle spring back when pressed lightly.
- Brush the braids lightly with egg wash. Bake the braided loaves for 30 to 35 minutes, or until golden brown. Allow to cool.: A properly preheated oven ensures even color and correct oven spring, contributing to the golden crust. You will notice a warm, enveloping smell as the oven reaches temperature. Putting cold loaves into an oven that has not reached temperature can lead to uneven baking, so wait for full preheat before inserting pans.
- While the braid is cooling, mix together the powdered sugar and cream. I wanted the drizzle to be prettier, so I transferred to a piping bag, snipped off the end and drizzled the glaze on the both of the braids. A spoon would also work!: The egg wash produces a glossy, deep golden finish while baking. As the loaves cook you will hear faint crackles and smell the honey sweeten, and the filling will set into a creamy ribbon. If the tops brown too quickly, tent with foil to prevent overbrowning while allowing the centers to finish baking.
- While the braid is cooling mix together the powdered sugar and cream I wanted the drizzle to be prettier so I transferred to a piping bag snipped off the end and drizzled the glaze on the both of the braids A spoon would also work: The glaze will pour in a smooth ribbon and set to a glossy finish that brightens each slice. The contrast of the cool glaze and still warm loaf creates an irresistible sheen. If the glaze is too thin, add more powdered sugar a tablespoon at a time to thicken it slightly, and if too thick, thin with a bit more cream.
Notes
- Make ahead: Prepare the dough the day before and refrigerate it to mellow the flavors and firm the dough for easier handling. Chilling also allows you to bake fresh in the morning with minimal hands on effort.
- Bake then store: You can bake the loaves the night before and drizzle the glaze just before serving the next morning. Wrapped well, they will stay delicious for up to three days.
- Jam mix: Use a single jam or combine two for depth, such as mixing apricot with strawberry for a nuanced fruit profile that melts into the cream cheese beautifully.
- Chill for cleaner cuts: If you want tidy slices for serving, chill the cooled loaf briefly before slicing, which firms the filling and reduces smearing.
- Glaze consistency: Adjust the heavy cream one tablespoon at a time until the glaze reaches a drizzle like thickness; too thin and it will pool, too thick and it will not spread evenly.
- Keep it tidy: When cutting the strips, use scissors for consistent widths, which helps the braid look even and professional when baked.