Cucumber Soup
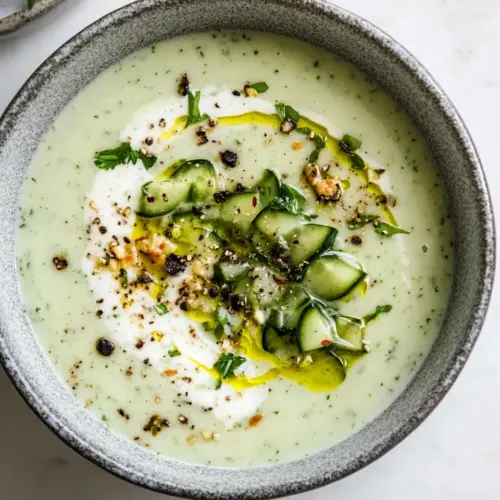
Cucumber Soup is a cool creamy chilled bowl that blends crisp cucumber with tangy Greek yogurt fresh herbs and a bright hit of lemon. Light and silky yet texturally interesting with a toasted walnut garnish, it makes an easy weeknight lunch or an elegant starter. Perfect for summer meals, this recipe is refreshing simple to make and worth trying for a cool seasonal treat.
Equipment
- Blender
Ingredients
- 3 English/hot house cucumbers, about 2 1/2 pounds total, trimmed Provide cool, crisp body and a watery texture that forms the base of the chilled soup; peel and seed if desired, then finely chop or puree to integrate with yogurt and herbs for a refreshing mouthfeel.
- 1 1/2 cups nonfat Greek yogurt Add creamy tang and protein to create a silky, smooth consistency; whisk into pureed cucumber to balance acidity and contribute thickness without heaviness.
- 1 medium shallot, roughly chopped Lend a mild oniony aroma and subtle bite when finely chopped; sauté briefly or blend raw to introduce gentle savory depth that complements herbs and lemon.
- 1/3 cup fresh dill sprigs, plus more for garnish Offer bright, anise-like herbal freshness and a fragrant lift; strip sprigs and finely chop or pulse into the soup to infuse cooling flavor throughout.
- 1/4 cup fresh mint leaves Contribute cool, slightly sweet menthol notes that brighten the soup; chiffonade or finely chop and blend with dill for layered herbal complexity.
- 3 tablespoons fresh lemon juice Provide bright acidity to lift and balance the richness; squeeze fresh juice in gradually and adjust to taste to sharpen the overall flavor profile.
- 4 teaspoons extra-virgin olive oil Impart fruity, peppery richness and help meld flavors; whisk in at the end to add smooth mouth-coating fat without overpowering the soup.
- 3/4 teaspoon kosher salt, plus more to taste Supply essential seasoning to enhance all flavors and control taste; start with the measured amount and adjust as needed after chilling for proper balance.
- Fresh white pepper, or black pepper Season with a clean, sharp heat and subtle floral notes that awaken flavors; grind fresh to taste and add sparingly to avoid dominating the delicate profile.
- 1/4 cup toasted walnuts, finely chopped (1 ounce) Add crunchy texture and warm, nutty undertones when toasted and chopped; sprinkle on top as a garnish to provide contrast and a pleasant finish.
Instructions
- Cut a 4 inch piece off one of the cucumbers, then halve it lengthwise, remove the seeds, and finely chop. Save this unpeeled cucumber for the garnish.: The reserved unpeeled cucumber will add a fresh crunch to your garnish, and keeping the skin gives a lively green color and slight bitterness that offsets the creamy soup. You should hear a crisp snap as you slice, and the interior flesh will be watery and pale. A common mistake is cutting the piece too large, which makes chopping awkward; aim for a neat 4 inch segment and steady your knife to avoid squashing the cucumber.
- Peel the remaining cucumber, seed it, and roughly chop.: Peeling the main batch prevents bitter skin from altering the soup, and removing the seeds avoids excess watery dilution. The peeled flesh should be firm and glistening; roughly chopping helps the blender work evenly. If you skip seeding, the soup can become watery and less silky, so take the extra minute to scrape or scoop out the seeds carefully.
- In a blender, combine the peeled cucumber, yogurt, shallot, dill, mint, lemon juice, 3 teaspoons of olive oil, the salt, and pepper to taste. Blend until completely smooth, slowly moving to the most powerful mode on your blender for the smoothest soup. The soup should be thick and smooth and not need water, but if your cucumbers were particularly small, add a very small of water to help the blender, 1 teaspoon at a time, until it reaches your desired consistency.: As the blade spins you will smell the bright citrus followed by the herbaceous notes of dill and mint . The texture will progress from chunky to velvety; push the blender through low to high speeds to avoid splatter and ensure uniform emulsion. The soup should be thick and cling to the side of the jar, indicating the correct body. A frequent error is under blending which leaves an uneven mouthfeel, so run the blender until no flecks remain and the surface looks glossy.
- Transfer the soup to the refrigerator, covered (in the blender cup is fine) and chill for 4 hours, or up to overnight (but no longer than 24 hours or it will become bitter).: Taste and observe the body after blending, it should pour slowly yet coat a spoon. If it feels too dense it will mute the bright flavors, so add water sparingly; the goal is a silky pourable soup without thinning the flavor. Add only one teaspoon at a time, blending briefly between additions. Over thinning is a common pitfall, which leads to flat tasting results, so resist the urge to add more than necessary.
- When ready to serve, stir the soup, check the seasoning, and add more salt and/or pepper if necessary.: Chilling allows the flavors to meld and the texture to relax into a cohesive bowl. You will notice the aromas soften and become more integrated after cooling. Covering prevents the soup from absorbing refrigerator odors. A usual mistake is chilling it too long; after 24 hours the cucumber can take on a bitter edge, so plan ahead and serve within the suggested window.
- In a small bowl, combine the reserved cucumber, the toasted walnuts, the remaining 1 teaspoon olive oil, and a pinch of salt and toss to combine.: Cold foods often need a final seasoning adjustment because cold temperatures mute salt and acid. Stirring wakes the mixture and releases aromatic notes. Taste carefully and add salt or pepper incrementally, letting each addition settle before adding more. A common trap is over salting at this stage; add modestly and re taste so you don’t overpower the delicate herbal balance.
- Pour the soup into bowls, divide the garnish between them, gently spooning it on so it doesn’t sink to the bottom, and serve topped with more fresh dill.: This garnish marries textures, the reserved chopped cucumber giving crunch and freshness while the chopped toasted walnuts contribute warmth and bite. The oil helps carry flavor and the pinch of salt ties it all together. Toss until the walnut pieces are evenly coated but not oily. Avoid cutting the garnish pieces too large, which can dominate the bowl instead of complementing it.
- Pour the soup into bowls divide the garnish between them gently spooning it on so it doesn’t sink to the bottom and serve topped with more fresh dill: When plating, pour slowly to create a smooth surface; then gently nestle the garnish on top to keep it visible. The final sprinkle of fresh dill adds aroma at the moment of serving and a bright visual contrast. Serve immediately so the garnish stays crisp; if left to sit it will soften and lose its textural impact which diminishes the experience.
Notes
- Choose English or hot house cucumbers: These varieties are less seedy and have thinner skins which means less peeling and a cleaner flavor for the soup.
- Peel and seed when necessary: Removing the skin from the main batch avoids bitterness while seeding prevents the soup from becoming watery and keeps the texture smooth.
- Blend in stages: Start on low then move to high to avoid splatter and to ensure the herbs are fully incorporated without leaving green flecks.
- Reserve a portion unpeeled for garnish: This gives you a fresh crunchy contrast and a pop of color that makes the bowls more inviting.
- Toast the walnuts lightly: Heat them in a dry skillet until fragrant, then cool before chopping to get the best crunchy texture and aroma.
- Chill adequately but not excessively: Four hours to overnight allows flavors to meld, but keep it under 24 hours to avoid bitterness from over maceration.
- Check seasoning after chilling: Cold temperatures dull salt and acid, so re taste and add small increments of salt or lemon if needed.