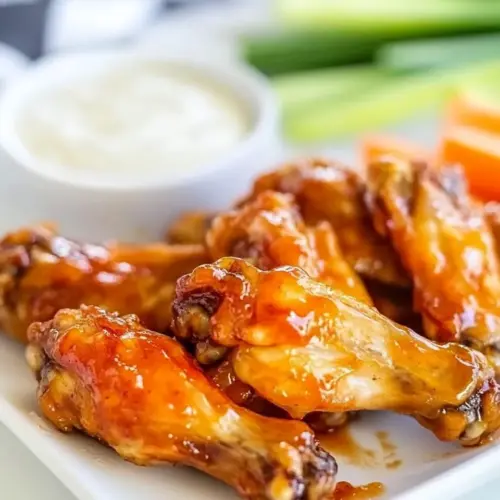
Crockpot Honey BBQ Wings
Crockpot Honey BBQ Wings are tender, sticky, and perfect for an easy weeknight dinner or game night. Slow cooking makes the chicken fall tender off the bone, while a honey and BBQ sauce glaze caramelizes in the oven for irresistible crispness. This recipe is crowd friendly, simple to scale, and delivers savory smoky flavor with a sweet finish, making it a must try.
Equipment
- Crockpot
- Oven
- Baking Sheet
- Large Bowl
Ingredients
- 1 teaspoon chili powder Season lightly to add a subtle smoky-heat layer that enhances savory flavors; sprinkle evenly over wings before cooking to build complexity. Works well combined with other spices to create a balanced dry rub that penetrates the skin for better overall flavor.
- 1 teaspoon salt Season to bring out natural flavors and provide necessary salinity that balances sweet and acidic components in the sauce. Use measured amounts to avoid overpowering the dish while ensuring the wings taste well-rounded.
- 1 teaspoon smoked paprika Add smoky depth and warmth to the rub, complementing sweet honey and tangy BBQ sauce; apply with other spices for an integrated flavor profile. Smoked paprika also contributes color to the wings, making them visually appealing when finished.
- 1 teaspoon garlic powder Flavor intensely with savory garlic notes that pair beautifully with smoked paprika and chili powder; distribute evenly to infuse the meat. Garlic powder dissolves into sauces and rubs easily, helping create a cohesive overall taste.
- 1/2 teaspoon ground black pepper Season sparingly to provide mild heat and sharpness that lifts other spices without overwhelming them; adjust to personal preference. Ground black pepper also aids in balancing richness from the chicken and honey.
- 4 pounds chicken wings, fresh or frozen Provide the main protein and hearty base of the recipe; choose fresh or frozen depending on convenience while adjusting cooking time if frozen. Wings deliver skin that crisps and meat that becomes tender after slow cooking, absorbing the rub and sauce flavors.
- 1 cup BBQ sauce Coat generously to supply tangy, smoky, and sweet-savory elements that define the sauce profile; stir with honey before pouring over wings. BBQ sauce acts as the primary glazing component during slow cooking and finishing for sticky, caramelized results.
- 1/2 cup honey Sweeten and help caramelize the sauce, creating glossy, sticky coatings that contrast with savory spices; mix thoroughly with BBQ sauce for even sweetness. Honey also aids in browning during any final high-heat step, producing a rich finish.
Instructions
- In a small bowl, combine the chili powder, salt, paprika, garlic powder, and black pepper. Mix.: The air will smell faintly smoky and savory as the spices mingle, signaling a flavor foundation that will season the entire batch. I like to rub the bowl between my fingers to release the aroma, which helps you sense whether a single spice is overpowering. Mixing evenly matters because uneven seasoning can create pockets of blandness or sharpness in finished wings. A common mistake is skimping on thorough mixing, which leaves clumps that concentrate flavor in one spot. If you notice a clump, break it up with the back of a spoon so the rub distributes uniformly across the chicken .
- Place the chicken wings (frozen) in the crockpot and sprinkle with the seasoning mix, stirring to get the wings coated evenly on all sides.: When you stir, listen for light clinking of the pan as wings shift, and notice the spice dusting every surface; the wings should look speckled and fragrant, not drenched. Coating while frozen can be awkward, but the spices still adhere thanks to surface moisture, and the flavors will infuse during the long cook. This step matters because evenly seasoned wings create consistent bites throughout the batch. A common slip is over stirring which can tear the skin; stir gently and with a large spoon to preserve texture. If some wings look paler, give them a gentle toss so every piece receives seasoning.
- Place the lid on, and cook frozen wings on high for 210-270 minutes, or low for 270-330 minutes. Or cook fresh wings 180-240 minutes on high, or 240-300 minutes on low.: As the crockpot works, the kitchen will fill with a savory, slowly developing smell that tells you collagen and fat are rendering into tender goodness. The wide time ranges let you adapt to how busy your day is, with longer times generally producing more fall apart texture. This range is important because it covers both frozen and fresh starting points, and because crockpots vary in actual temperature. Avoid the mistake of peeking too often, which lets heat escape and can lengthen cooking time; rely on the timer and check only near the end. If wings are still rubbery, extend the time incrementally until tender.
- Once done, preheat the oven to 425˚F, remove the wings from the crockpot and place in a large bowl. Tip: The drier the wings are the better the sauce will stick, so try to remove as much of the liquid as possible when transferring them into the bowl.: You will notice a pool of cooking liquid at the bottom, and the wings themselves will feel very tender to the touch. Preheating the oven before you remove the wings ensures the crisping step is immediate, which is key for good texture contrast. This transition from moist crockpot environment to hot dry oven creates the caramelization we want. A typical error is delaying the oven heat which leaves wings soggy; always have the oven ready so the surface can begin to crisp right away. Use a slotted tool to lift wings so excess liquid stays behind.
- Tip: The drier the wings are the better the sauce will stick, so try to remove as much of the liquid as possible when transferring them into the bowl.: The drier the wings are the better the sauce will stick, so try to remove as much of the liquid as possible when transferring them into the bowl. : Patience here pays off in stickiness and gloss, because excess cooking liquid will dilute the glaze and prevent caramelization. I gently lift and let excess drip, then blot with paper or leave them to rest briefly so steam dissipates. This drying concentrates surface proteins and sugars, which bond with the BBQ sauce and honey later. The common mistake is rushing straight to saucing, which leads to pooling and poor adhesion. If you find the wings still wet, let them sit uncovered for a few minutes to dry.
- To make the BBQ wing sauce, whisk together the BBQ sauce and honey, then pour them over the wings and toss them to coat.: As you whisk, the aroma of sweet and tangy notes will brighten, and the sauce will become glossy and smooth. Tossing should leave each wing evenly glazed; look for an even sheen and small ribbons of sauce clinging as you lift a wing. This combination is where the final flavor profile forms, so aim for balanced coating rather than drowning the meat. One mistake is adding too much sauce at once which leads to uneven coverage; add gradually if you prefer to reserve some for brushing later. If the mixture seems too thick, a tablespoon of reserved crockpot juice can loosen it slightly without diluting flavor too much.
- Lay the wings on a baking sheet and cook in the oven on the top rack for 15-18 minutes. Then, brush with additional sauce from the bowl you mixed the wings in and serve hot.: In the oven, you will hear light crackling as the sugars in the sauce begin to caramelize and the edges turn deep amber. The visual cue you want is an even glossy brown with some darker spots where the sauce has charred just a touch. That brushing after the initial roast layers fresh glaze and intensifies shine and flavor. A common pitfall is leaving them in too long which can harden the glaze or dry the meat; watch the last five minutes closely. Let the wings rest a minute or two off the heat so the glaze sets and the juices redistribute before serving.
Notes
- Scale with confidence: The recipe multiplies easily, so double or triple for a crowd, but keep the same spice proportions to maintain balance.
- Choose a BBQ sauce you enjoy: Because the sauce is a primary flavor component, pick one that suits your palate, whether tangy, smoky, or sweet.
- Keep some sauce warm for serving: Warm sauce spreads more easily and retains gloss when brushed onto the wings right before serving.
- Use a rimmed baking sheet: A rimmed sheet catches any drips during the oven finish and helps prevent burning on the oven floor.
- Monitor the final roast closely: Oven temperatures and rack positions vary, so watch the wings during the last five minutes to avoid overcooking.