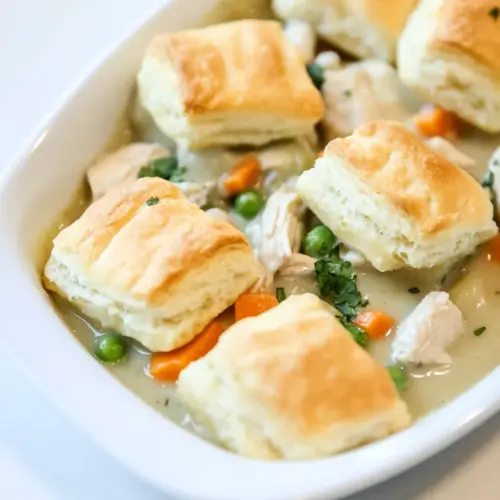
Crock Pot Chicken Pot Pie
Crock Pot Chicken Pot Pie is a creamy, comforting slow cooker dinner with tender chicken, savory gravy, and a crisp biscuit topping. This easy weeknight dinner offers rich, homey flavors and minimal hands on time, making it perfect for family meals. Try it when you want satisfying comfort food that still feels made from scratch.
Equipment
- Large Skillet
- Whisk
- 6 quart slow cooker
- Baking Sheet
- Kitchen shears
Ingredients
- 1/3 cup butter Melted and creamy, provides the rich fat needed to sauté onions and create a silky roux that thickens the filling while adding flavor and mouthfeel.
- 1/3 cup all-purpose flour Combined with fat to form a roux, functions as the thickening agent for the sauce, producing a smooth gravy-like consistency that binds the vegetables and chicken.
- 1 large onion peeled and chopped Peeled and chopped, offers aromatic depth and savory sweetness when softened, forming the base flavor layer that complements chicken and vegetables in the pot.
- 1 1/2 cups water Added as a liquid medium, dissolves bouillon and mixes with the roux to form the sauce, ensuring even cooking and proper consistency for the filling.
- 5 teaspoons chicken base or 5 bouillon cubes Dissolved or crumbled into the cooking liquid, delivers concentrated savory chicken flavor and saltiness to build a robust broth for the casserole.
- 2 teaspoons poultry seasoning Sprinkled in for herbaceous warmth, provides a blend of thyme, sage, and other savory notes that enhance poultry flavor and add depth to the dish.
- 2 large boneless chicken breasts diced Diced and added as the primary protein, supplies tender bite and substance to the pot pie while absorbing surrounding flavors during slow cooking.
- 3 1/2 cups frozen mixed vegetables (peas, carrots, corn and green beans) Frozen and added for convenience, contributes color, texture, and sweet-savory vegetable flavors that round out the filling and add nutritional variety.
- 2 tablespoons chopped parsley Chopped and sprinkled, injects fresh herb brightness and a mild grassy flavor that lifts the richness of the gravy and ties flavors together.
- 1 can large biscuits (about 5 biscuits needed) Opened and placed on top or cut into pieces, supplies a flaky, buttery topping that bakes into golden biscuits, providing contrast to the creamy filling.
Instructions
- Set a large skillet over medium heat. Add the butter. Once melted, whisk in the flour until smooth. Whisk and cook the roux for 2-3 minutes, until golden.: The moment the butter melts you'll smell a buttery sweetness, and as you add the all purpose flour the mixture will transform into a satin paste that begins to smell toasty when cooked. Stir continuously with a whisk so the roux heats evenly and doesn’t form lumps, moving the spatula in smooth circles until the color shifts to a light golden hue. This toasty aroma signals that the raw flour taste has cooked away, which is essential for a glossy, flavorful gravy. A common mistake is rushing the heat to hurry the process, which can brown the roux too quickly and introduce bitterness; keep the flame steady at medium so you develop flavor without burning. The texture should be smooth and slightly thick on the whisk before you add any liquid, indicating the flour has been properly incorporated.
- Then stir in the onions. Cook the onions 2-3 minutes, until soft. Then whisk in the water, chicken base, and poultry seasoning. Simmer 2-3 minutes to form a gravy.: As you fold the chopped onion into the roux, the kitchen will fill with a sweet onion scent as the pieces become translucent and tender. The onions will release moisture that helps loosen the roux into a sauce base, so watch for that glossy sheen. When you whisk in the measured water , drop in the chicken base or bouillon and the poultry seasoning , the mixture will thin and begin to steam, releasing a savory, herbaceous steam that tells you seasoning is integrating. Let it simmer gently for a few minutes until the gravy is smooth and slightly thickened, coating the back of a spoon. This step matters because the gravy is the binding element that clings to the chicken and vegetables later; if you undercook it the sauce may be thin. Avoid boiling aggressively which can break the sauce and dull the flavors.
- Set out a large 6+ quart slow cooker. Pour the gravy into the slow cooker. Add the diced chicken, mixed vegetables, and parsley. Stir well.: When you transfer the warm gravy to the slow cooker you'll notice a comforting steam and the glossy sauce settling into the bowl. Add the diced chicken pieces so they are submerged in the gravy for even cooking, then scatter the frozen mixed vegetables across the surface; they will release tiny beads of moisture as they begin to thaw, which helps the overall texture. Sprinkle in the chopped parsley for fresh herbal lift. Give everything a gentle stir so the gravy coats each piece evenly; this ensures uniform seasoning and prevents pockets of dryness. A typical oversight is overcrowding with too much chicken without enough sauce, which can lead to dry meat, so keep the proportions balanced and stir to combine.
- Cover the crock and set on HIGH for 3-4 hours or on LOW for 6-7 hours.: As the slow cooker hums you will hear a faint, steady simmer and smell the filling deepen into a rich, savory aroma. On HIGH the dish will reach tender doneness faster, with the chicken becoming pull apart tender in about three to four hours; on LOW the flavors develop more gently and the texture becomes silkier after six to seven hours. The long gentle heat helps the gravy thicken slightly and the vegetables soften without turning mushy. Avoid lifting the lid frequently, because every peek lets out steam and lengthens cooking time, which can affect timing and moisture. Trust the slow cooker to do its work and only check near the minimum recommended time to test for doneness.
- Close to dinner time, preheat the oven to 425 degrees (or the temperature listed on the can of biscuits.) Use kitchen shears to snip 5 biscuits into 8 pieces. Spread the pieces out on a baking sheet. Bake for 11-12 minutes, or until golden.: The hot oven will inflate the canned biscuits into puffy pillows of golden crust, giving off a warm, bready fragrance that signals they are nearly ready. Snipping each biscuit with kitchen shears into uniform pieces encourages even browning and makes them easy to scatter over the filling. Arrange the pieces with space between them so air circulates and the edges crisp up; crowded pieces may steam and stay pale. Watch the oven window for a deep golden color and a hollow sound when tapped, which indicate doneness. A common slip is underbaking to save time, which yields dense interiors, so allow the full bake time for a light, airy result.
- Once the biscuit pieces are puffy and golden, stir the chicken pot filling and sprinkle the biscuit topping over the filling. Serve warm.: When you lift the lid and stir the pot the filling should be glossy and cling lightly to each piece of chicken and vegetable, releasing a rich steam that smells homey and satisfying. The biscuit pieces should be golden and slightly crisp at the edges; scattering them over the filling creates a delightful textural contrast as some pieces sink and soften while others remain crisp. Serve immediately so the biscuits retain some structure while the filling stays warm and silky. One mistake to avoid is assembling too far in advance, because the biscuits will become soggy over time; serve right after topping for the best experience.
Notes
- Swap the topping If you prefer a flakier crust, use a refrigerated roll out pie crust cut into diamonds and baked as noted in the recipe notes, which yields crisp, flaky pieces instead of biscuit pockets.
- Adjust cooking speed Use the HIGH setting if you need dinner sooner, but choose LOW for a slightly silkier texture when you have more time. Both deliver tender chicken, but LOW gently develops deeper flavor.
- Check seasoning late Because concentrated chicken base can vary in saltiness, taste the filling near the end of cooking and adjust salt sparingly to avoid oversalting.
- Prep the night before Complete the roux and assemble the slow cooker insert, refrigerate overnight, then start cooking the next day for an easy morning launch. This can compress evening prep without sacrificing flavor.
- Use uniform dice Cutting the chicken into consistent pieces ensures even doneness; uneven sizes may yield some pieces overcooked and some underdone.