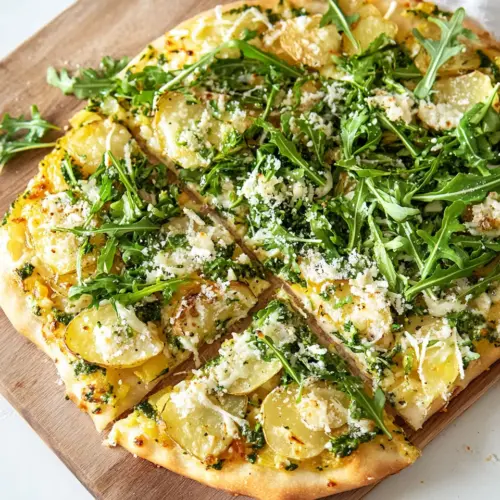
Crispy Potato Gruyere Pizza with Arugula
Crispy Potato Gruyere Pizza with Arugula combines a chewy crust, thin tender potato slices, and nutty gruyere for a crispy, savory pie topped with a bright arugula salad. This easy weeknight dinner feels indulgent yet approachable, with simple pantry ingredients and impressive results, making it a perfect reason to cook something special tonight.
Equipment
- Large Bowl
- Spoon
- Mandolin
- cast iron pan
- Rolling Pin
- Oven with broiler
Ingredients
- 1 cup warm water Provide warmth to activate the yeast and dissolve the honey; water should be around 105–115°F to proof properly. Contribute to dough hydration and help develop gluten for a pliable crust when mixed with flour and kneaded.
- 3 teaspoons active dry yeast Leaven the dough by producing carbon dioxide bubbles during fermentation, creating airy texture and lift in the crust. Sprinkle into warm water with honey and wait until foamy to ensure yeast is alive before mixing with flour.
- 1 tablespoon honey Sweeten and feed the yeast to encourage a vigorous rise while adding a subtle balance to the dough's flavor. Dissolve in the warm water so it integrates evenly and supports fermentation without leaving granular pockets.
- 1 tablespoon olive oil Lubricate dough and add tenderness, contributing to a slightly richer, softer crust and improved handling during shaping. Brush on the surface of the dough or include in the mixing stage to help brown the crust during baking.
- 2 1/2 cups all-purpose flour Form the structural basis of the dough by providing starch and proteins that develop gluten for chew and structure. Measure accurately and combine with water, yeast, and salt to create a cohesive dough that can crisp up in the oven.
- 1 teaspoon salt Enhance overall flavor and regulate yeast activity, strengthening gluten and balancing sweetness; it also seasons the crust throughout. Dissolve into the mixing process so the salt is evenly distributed without inhibiting yeast when added directly to it.
- flour and/or coarse cornmeal for dusting Prevent sticking and aid in transferring the pizza by dusting the peel or baking surface, promoting a crisp bottom crust. Use sparingly to avoid burning in the oven and choose coarse cornmeal for extra texture or flour for a softer finish.
- 8 petite gold potatoes Provide tender, thinly sliced potato topping that becomes crispy at the edges when roasted or par-baked; petite golds offer a buttery flavor and smooth texture. Slice uniformly and toss with oil and seasonings so they cook evenly atop the pizza.
- 2 tablespoons olive oil Coat potatoes for oven-roasting and flavor development, promoting golden color and crispness on the slices. Combine with salt and pepper to season the potatoes before arranging them on the pizza surface for even browning.
- kosher salt and pepper Season the potatoes and pizza to taste, enhancing savory notes and balancing richness from the cheese and oil. Apply kosher salt and freshly ground pepper appropriately, keeping in mind kosher salt’s larger crystals compared to table salt.
- 2 to 3 tablespoons chopped chives Introduce a mild oniony brightness and fresh herbal note when sprinkled over the finished pizza or mixed into the potatoes. Chop chives finely and scatter over the hot pie so their delicate flavor unfolds without overpowering the other toppings.
- 1 1/2 cups freshly grated gruyere cheese Deliver a nutty, melty richness that binds toppings and creates a golden, flavorful cheese layer; gruyere also adds a slightly sweet, complex profile. Grate freshly for optimal melting and even coverage so the cheese forms pockets of creaminess under the potatoes.
- 6 cups baby arugula Contribute peppery, leafy freshness that contrasts the rich cheese and starchy potatoes, adding volume and a slightly bitter note. Toss arugula lightly with lemon juice and olive oil if desired, then add on top of slices or serve alongside for balance.
- 1/2 lemon, juiced Brighten the arugula and cut through the richness with sharp acidity, enhancing overall freshness and flavor contrast. Squeeze half a lemon and drizzle juice just before serving to avoid wilting the greens prematurely.
- 1/4 cup shaved parmesan Add a salty, savory finish and additional umami with thin, delicate curls that complement gruyere’s melt; parmesan offers a sharp counterpoint. Shave freshly from a block and scatter over the arugula or pizza for a final textural and flavor lift.
Instructions
- In a large bowl, combine water, yeast, honey and olive oil. Mix with a spoon, then let sit until foamy, about 10 minutes. Add the flour and salt, stirring with a spoon until the dough comes together but is still sticky. Using your hands, form the dough into a ball and work in the additional 1/2 cup flour, kneading it on a floured surface for a few minutes. Rub the same bowl with olive oil then place the dough inside, turning to coat. Cover with a towel and place in a warm place to rise for about 1 to 1.5 hours.: Warmth and smell tell you the yeast is waking up, you should notice a faint yeasty aroma within minutes, and the mixture will look slightly cloudy. After stirring, let it rest until the surface becomes foamy, which signals active fermentation and predicts a good rise later. If foam fails to appear, the water was likely too hot or the yeast is old, and dough will be dense if you continue. A common misstep is rushing to add flour; waiting for the foam makes a big difference in texture.
- At this point, I get my toppings ready.: As you mix, the bowl will change from a shaggy mass to a cohesive, tacky ball. The dough should cling to the spoon slightly yet pull away from the bowl sides. This tackiness means you will get an airy crumb after rising. Overworking a dry dough can make a tough crust, so stop when it just holds together.
- I use a mandolin to thinly slice the potatoes - you want them as thin as possible! Place the potato slices in a large bowl and cover with cold water. Let them soak for 20 to 30 minutes.: The dough will shift under your palms, smoothing into a soft, elastic sphere that springs back when poked. Kneading develops gluten, giving the crust chew and structure. If the dough resists stretching, it needs more kneading; if it tears easily, it may be too dry. Avoid adding too much flour, which will yield a heavy crust.
- Once soaked, drain the potatoes and place them on a towel. Pat with another towel to dry them off. Once dry, place the potatoes back in a dry bowl. Drizzle with 1 to 2 tablespoons olive oil and sprinkle with a big pinch of salt and pepper. Toss well. Stir in the chives.: Coating the dough prevents sticking and keeps the surface from forming a crust during proofing, which allows the interior to rise freely. When turned, the dough should glisten slightly from the olive oil , and the bowl will be easier to clean afterwards. Skipping this often leads to difficult removal and torn dough.
- Heat a 10 or 12-inch cast iron pan over medium heat. I like to heat mine for a full 5 to 10 minutes before placing the dough in it. At the same time, preheat the broiler in your oven to high. Make sure there is an oven rack in the center (and not right below the broiler).: The dough will slowly puff and nearly double in size, and you can often smell a subtle fermentation scent. This resting time builds flavor and texture. If your kitchen is cool, place the bowl somewhere slightly warm but not hot; too high heat can overproof and result in a collapsed dough.
- After the dough has risen, punch it down and place it back on a floured surface. Divide it in half and use only one half for this pizza recipe. Save the other half - stick it in the fridge for a few days, or even freeze it!: Preparing toppings early keeps the final assembly calm and efficient. While you wait, you can thinly slice the potatoes and grate the gruyere . Having everything at the ready avoids rushing under the broiler, which is when mistakes happen. A rushed topping stage often leads to uneven layering and inconsistent baking.
- Using a rolling pin or your hands, form it loosely into a circle that fits in your cast iron pan.: Thin slices cook quickly and develop crisp edges under the broiler. As you slice, you will hear a soft whispering sound as the blade passes, and the slices should be uniformly translucent. Inconsistent thickness produces irregular cooking, so take your time and protect your fingers with a guard or cut-resistant glove.
- Add 1 tablespoon of olive oil to the preheated cast iron and make sure it coats the bottom of the pan. Place your dough in the pan. Cook for 1 to 2 minutes, until the dough is bubbling up.: Soaking removes excess starch, which helps the slices separate and crisp rather than glue together. The water turns slightly cloudy, a sign the starch is leaving the surface. If you skip this, the potatoes can clump and steam instead of crisping, leaving a gummy texture on the pizza.
- Add a sprinkle of the gruyere cheese. Top with the thinly sliced potatoes. They can be layered, but don’t over layer them and make sure they are equally layered!: Drying is crucial because surface moisture prevents browning. When you pat them, you should feel the slices go from slick to slightly tacky. If they remain damp, they will steam in the oven and not crisp. A common issue is under drying, which leads to soggy spots on the crust.
- Top with the remaining gruyere cheese.: The oil helps the edges caramelize while the chives add aromatic lift. As you toss, you will see a sheen on each slice and smell a hint of herb and pepper. Too much oil makes the pizza greasy, so measure carefully for the best texture.
- Place the skillet in the middle of the oven with the broiler on. Broil for 5 minutes - but watch it! This all depends on your broiler and it can burn fast. I find that my pizza can go between 5 and 8 minutes, so just keep an eye on it until it is as golden and bubbly as you’d like.: A properly warmed cast iron gives the crust a strong initial sear, producing a crisp bottom. You may hear a low hum from the burner and feel the skillet radiate heat when you hover your hand above it. Putting dough into a cold pan will yield a pale, limp crust, so preheating is essential.
- Remove the pizza and let it rest for 5 minutes. In a large bowl, toss together the arugula, lemon juice, 1 to 2 teaspoons olive oil, a big pinch of salt and pepper and the shaved parmesan. Toss well.: The broiler delivers intense top heat that browns the cheese and crisps the potato edges quickly. Make sure the oven rack is centered so the pizza cooks evenly without burning. Different broilers vary widely; if yours runs hot, watch closely to prevent charring.
- Carefully remove the pizza from the skillet and place it on a cutting board. Top the pizza with the arugula salad. Slice and serve!: Punching down releases large gas pockets and redistributes yeast, which makes shaping easier. Dividing the dough gives you a second pizza for later. If you skip this step, shaping a very overproofed dough can be frustrating because it resists forming a neat circle.
- Using a rolling pin or your hands form it loosely into a circle that fits in your cast iron pan: You should feel the dough relax and spread, forming a thin, even disc. The edge can be slightly thicker to hold toppings. If the dough springs back too much, let it rest five minutes to relax the gluten before continuing. Forcing a cold dough will tear it.
- Add 1 tablespoon of olive oil to the preheated cast iron and make sure it coats the bottom of the pan place your dough in the pan cook for 1 to 2 minutes until the dough is bubbling up: The oil sizzles when the dough hits the pan, and you will see small bubbles form on the surface, indicating a good sear. That initial cook starts the crust browning and prevents soggy bottoms. If the pan is not hot enough, the dough will absorb oil and become greasy.
- Add a sprinkle of the gruyere cheese top with the thinly sliced potatoes they can be layered but don’t over layer them and make sure they are equally layered: The first dusting of gruyere under the potatoes creates a melty barrier so the crust does not get soggy. Arrange the potato slices in a single even layer where possible, so each slice gets direct heat. Overlapping too heavily traps steam and prevents browning.
- Top with the remaining gruyere cheese: Another layer of gruyere finishes the pie and ensures an attractive golden top after broiling. As the cheese warms it will look glossy and then bubble, signaling it is ready for the intense broiler finish. Skimping on cheese can result in a dry mouthfeel.
- Place the skillet in the middle of the oven with the broiler on broil for 5 minutes but watch it: Under the broiler the cheese will quickly bubble and develop golden spots; the edges of the potato will blister and brown. Listen for gentle popping as moisture escapes. Because broilers vary, start checking at about 4 minutes to avoid burning. A charred top is an easy mistake if you step away.
- Remove the pizza and let it rest for 5 minutes in a large bowl toss together the arugula lemon juice 1 to 2 teaspoons olive oil a big pinch of salt and pepper and the shaved parmesan toss well: Resting lets the cheese set slightly, making slicing neater. The salad should glisten from the lemon and olive oil , and the aroma of citrus will lift the rich pie. If you dress the greens too early, they will wilt from the residual heat.
- Carefully remove the pizza from the skillet and place it on a cutting board top the pizza with the arugula salad slice and serve: When you lift the pizza, you should hear a soft crackle as the crust separates from the skillet. The warm pie topped with cool, peppery arugula creates a lovely temperature contrast. Slice with a sharp cutter and serve immediately for best texture; letting it sit too long makes the salad wilt and the crust soften.
Notes
- Use fresh gruyere: Freshly grated gruyere melts more gracefully than pre shredded cheese and avoids anti clumping additives that can affect melt and texture.
- Mandolin for uniform slices: A mandolin produces ultra thin, even potato slices which ensure consistent cooking and crisping under the broiler.
- Control oil amounts: Use measured olive oil on the potatoes to get browning without greasiness, and brush the skillet lightly to create a crisp bottom.
- Chill extra dough: Save and refrigerate or freeze the second half of the dough for another pizza so you can enjoy this recipe again with less prep time.
- Watch the broiler timing: Because broilers vary, start checking at about four minutes to avoid burning and achieve the ideal golden bubbly finish.